
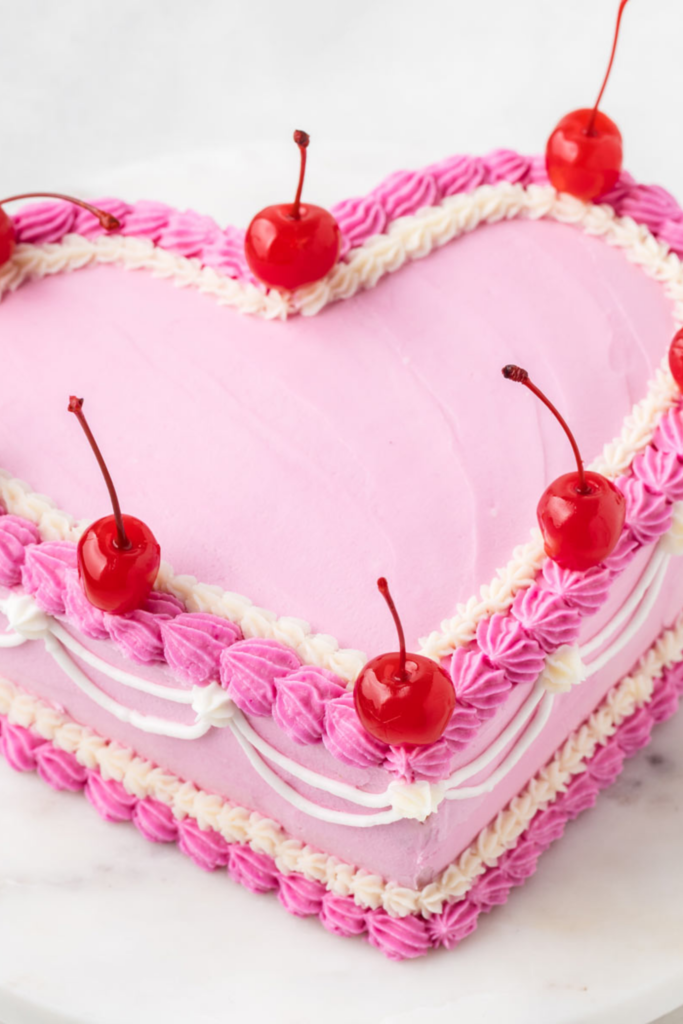

This vintage heart cake hits all of that for me. It feels like something you’d see in an old family photo album, sitting on a card table with paper plates and a crooked candle.
I started making this cake because I didn’t want to buy a special pan for one holiday. I already had round pans, a messy kitchen, and a strong craving to make something that felt personal. Turns out, that’s all you really need. This cake looks fancy, but it’s forgiving. I’ve messed it up more than once and it still came out charming.
What I love most is that it doesn’t feel precious. You can use a boxed mix or bake from scratch. You can go heavy on the decorations or keep it simple. Every version I’ve made has looked a little different, which honestly makes it better. Perfection would ruin it.
I usually make this for Valentine’s Day, but I’ve also done it for birthdays, anniversaries, and once just because I had leftover frosting and a free afternoon. Nobody complained. A heart-shaped cake tends to get people smiling before you even cut into it.
Ingredients I Used for the Recipe
- Round cake layers – these are the base of the heart shape, no special pan needed
- Buttercream frosting – for holding the cake together and doing all the vintage decorating
- Food coloring – optional, but great if you want that classic pastel look
- Maraschino cherries – mostly for decoration, but I always sneak a few
- Sprinkles – because vintage cakes never skip the fun stuff
I usually go with three six-inch round layers because they’re easy to handle and don’t feel overwhelming. Flavor-wise, I lean toward cherry chip or vanilla. Chocolate works too, but it hides crumbs less politely, and I’ve learned that the hard way.
How to make Starbucks Medicine Ball Recipe?
Step 1 – Chill the cake layers
I always start with chilled cake layers. Warm cake is fragile and dramatic, and it will fall apart the second you touch it with a knife. A short rest in the fridge makes everything calmer. Including me.
Step 2 – Stack and lightly frost
I stack the layers with buttercream in between, keeping things fairly even but not stressing about it. This isn’t a competition cake. Then I spread a thin layer of frosting over the top and sides. Think of it like a base coat. Messy is fine here.
Step 3 – Mark the cutting lines
Using a serrated knife, I mark the cake into four equal sections by drawing two lines across the top. One straight down the middle, then turn the cake and do it again. These lines are just guides, not commitment.
Step 4 – Cut the heart shape
I cut from the end of one side line down to the bottom line, creating a point. Then I repeat on the other side. This forms the bottom of the heart. The pieces you remove are gold, so don’t eat them yet.
Step 5 – Build the top curves
I take those cut pieces and press them against the top of the cake, flat side down, to form the rounded top of the heart. This part feels a little like cake Tetris. Use your hands. Adjust. Nobody’s grading you.
Step 6 – Seal it with frosting
I use buttercream to glue those pieces in place and cover any exposed cake. Then I add a thin layer along the bottom point. At this stage, the cake looks awkward. That’s normal.
Step 7 – Chill again
I pop the cake back in the fridge for about ten minutes. This sets the frosting and locks in crumbs. Skipping this step always comes back to haunt me.
Step 8 – Final frosting
Once the cake is firm, I frost the entire thing smoothly. Smooth-ish, really. Vintage cakes don’t need perfection. They need personality.
Step 9 – Decorate in layers
This is where the fun happens. I pipe shell borders around the top and bottom edges, then add spirals and garlands along the sides. I don’t always measure, but when I do, it helps keep things balanced. When I don’t, I pretend it was intentional.
Step 10 – Finish with toppings
I add cherries, sprinkles, and any extra little frosting details that feel right in the moment. I usually stop when I think, okay, one more thing would be too much. Then I stop.
Tips
Chill your cake more than you think you need to. Cold cake is easier to cut, frost, and move around. Warm cake is chaos.
If your frosting looks full of air bubbles, beat it slowly for a few minutes. I learned this after piping what looked like Swiss cheese all over a cake.
Always crumb coat, especially if you’re using light frosting on a darker cake. It saves your sanity and your final layer.
If you mess up a piping line, add another one next to it. Vintage designs are busy for a reason. They forgive mistakes beautifully.
Once the cake is cut, press plastic wrap directly against the exposed sides. It keeps the cake soft and fresh, even overnight.
Why this cake keeps me coming back
I’ve made trendier cakes. Cleaner cakes. Cakes that photograph better. But this one always feels the most satisfying. It reminds me that baking doesn’t have to be serious to be meaningful.
Every time I make it, something goes slightly differently. A curve is uneven. A border is thicker than planned. And every time, someone still says it looks amazing before they even taste it.
This cake is proof that effort matters more than perfection. It’s playful, a little nostalgic, and honestly just fun to make. And that’s usually the kind of recipe I end up loving the most.
Vintage Heart Cake Recipe
Description
Say “I love you” in the sweetest possible way this Valentine’s Day with this vintage heart cake. There’s no sweeter way to say “I love you” than with cake—and if you want to kick your confections up a notch, this heart-shaped cake with vintage buttercream embellishments is sure to do the trick. In this tutorial, you’ll learn how to make a heart-shaped cake from any size round cake (no special pan and no wasted cake) as well as create this fun, nostalgic design.
Ingredients
For the Cherry Chip Cake Layers
For the Almond Buttercream Frosting
For Decoration (Optional)
Instructions
How to Make the Cherry Chip Cake
-
Prepare the batter
In a large bowl, whip the eggs and sugar on high speed until light and fluffy (about 2–3 minutes).This step helps the cake rise and become airy. -
Mix wet ingredients
In a separate bowl, whisk together vegetable oil, milk, maraschino cherry juice, sour cream, vanilla extract, and almond extract. -
Combine dry ingredients
In another bowl, stir together flour, baking powder, baking soda, and salt. -
Assemble the batter
With mixer on low, add half the dry ingredients to the egg mixture, then all of the wet ingredients, followed by the remaining dry ingredients. Mix until just combined.Do not overmix—this prevents a dense cake. -
Bake
Divide batter evenly between three parchment-lined 6" round cake pans (about 370g per pan). Top each with ⅓ of the diced cherries. Bake at 350°F (177°C) for 30–35 minutes, or until a toothpick comes out mostly clean. -
Cool and chill
Let cakes cool in pans briefly, then turn out, wrap in plastic, and refrigerate for easier handling.
How to Make the Almond Buttercream Frosting
-
Cream butter
Beat softened butter until smooth. -
Add sugar and flavor
Add half the powdered sugar and beat until combined. Add almond extract and heavy cream, mix on low. Add remaining sugar, then beat on high until fluffy (3–5 minutes).For air bubble-free frosting, beat on lowest speed for 3–5 minutes after mixing.
How to Shape & Decorate the Vintage Heart Cake
-
Assemble and crumb coat
Level chilled cake layers and stack with ~⅓" frosting between each. Apply a thin crumb coat over entire cake and chill 10 minutes.Crumb coating locks in crumbs—especially important with light frosting on dark cake. -
Shape into a heart
Using a serrated knife, mark center lines dividing cake into quarters. Cut from right-side line to bottom point, repeat on left. Press cut pieces onto top of cake to form heart curves. Seal with frosting and re-chill.Place cake off-center on board so heart point aligns with edge. -
Pipe vintage design
Use Ateco 844 tip to pipe shell borders on top/bottom edges and spiral border on top rim. Use Wilton 5 to pipe symmetrical garlands along sides (mark with toothpicks). Finish with Wilton 27 for inner shell borders and small embellishments.Reserve 1½ cups frosting for decoration; use rest for base frosting. -
Garnish
Top with maraschino cherries and sprinkles for a festive finish.
Nutrition Facts
Servings 16
Serving Size 1 slice
- Amount Per Serving
- Calories 749kcal
- % Daily Value *
- Total Fat 41.8g65%
- Saturated Fat 21.6g108%
- Cholesterol 112mg38%
- Sodium 336mg15%
- Potassium 120mg4%
- Total Carbohydrate 92.3g31%
- Dietary Fiber 0.4g2%
- Sugars 75.8g
- Protein 3.4g7%
- Calcium 40 mg
- Iron 1 mg
* Percent Daily Values are based on a 2,000 calorie diet. Your daily value may be higher or lower depending on your calorie needs.
Note
- Chill your cake: A cool cake is easier to cut and handle—always chill before shaping and frosting.
- Frosting amount: This recipe yields ~5½ cups total—enough for filling, crumb coat, final layer, and 1½ cups for vintage piping.
- Air bubble-free frosting: Beat finished buttercream on lowest speed 3–5 minutes to remove air bubbles for smooth piping.
- Crumb coat essential: Especially critical when using light frosting on darker cakes like cherry chip.
- Storage: Keep uncut cake refrigerated up to 3 days. Once cut, press plastic wrap directly onto exposed surface to retain moisture.
- Serving tip: Bring to room temperature before serving—cold cake tastes less sweet!

Frequently Asked Questions
Can I use a different cake flavor?
Absolutely! While this design uses cherry chip cake, any 6-inch round cake (homemade or upgraded boxed mix) works beautifully. Just ensure it’s sturdy enough to hold its shape when cut.
Do I need special tools?
No special pans—but you will need three piping tips: Ateco 844, Wilton 27, and Wilton 5. A serrated knife and cake turntable also help immensely.
Can I make this ahead of time?
Yes! Bake and freeze cake layers (wrapped) up to 3 months ahead. Frosting can be made 2–3 days ahead and stored in the fridge. Assemble and decorate the day before serving for best results.