
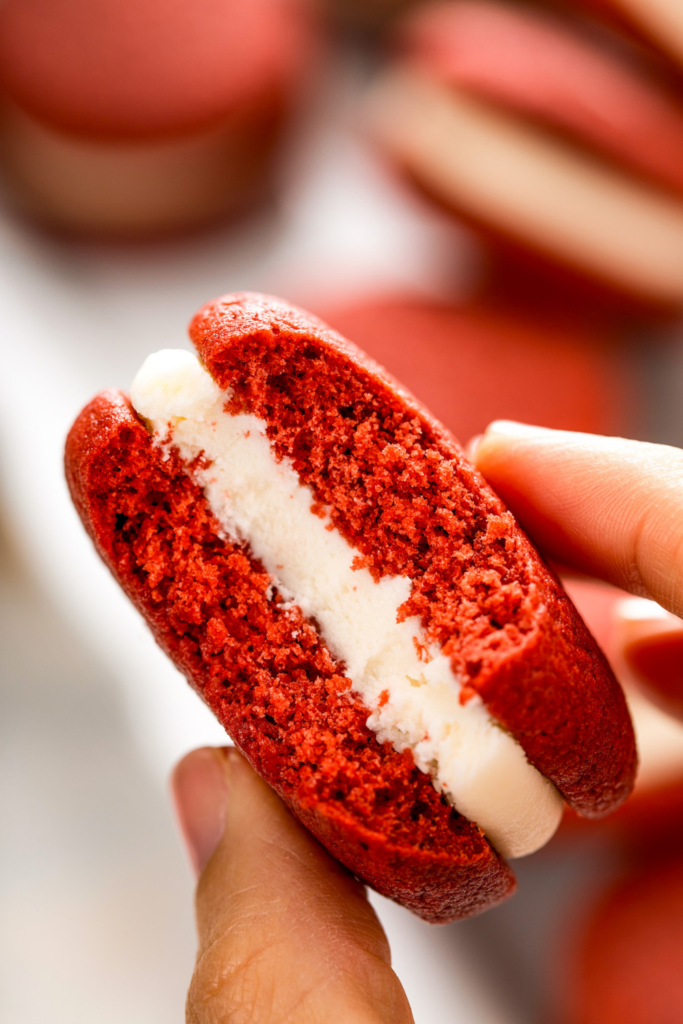

If you love red velvet cake but want something more playful, portable, and downright irresistible, this Red Velvet Whoopie Pies Recipe is about to become your new favorite bake. Imagine two soft, cake-like red velvet rounds sandwiching a thick layer of tangy, creamy cream cheese filling
They’re nostalgic, indulgent, and perfect for sharing—though you might be tempted to keep a few just for yourself.
Whoopie pies sit somewhere between cake, cookies, and sandwiches, and that’s exactly why they’re so beloved.
This red velvet version takes everything we adore about classic red velvet cake—its subtle cocoa flavor, moist crumb, and signature red hue—and transforms it into a fun, handheld dessert that’s perfect for holidays, parties, bake sales, or cozy weekends at home.
Why You’ll Love This Red Velvet Whoopie Pies Recipe
- All the flavor of red velvet cake, but in a smaller, more snackable form
- Ultra-soft, cake-like texture that stays moist
- Rich cream cheese filling that balances sweetness with a slight tang
- Perfect for celebrations like Valentine’s Day, Christmas, or birthdays
- Easy to make ahead and store
These whoopie pies feel special enough for a celebration but simple enough for everyday baking.
What Are Whoopie Pies?
Before diving into the recipe, let’s talk briefly about what makes whoopie pies so unique. Traditionally popular in the northeastern United States, especially in Pennsylvania Dutch and New England baking, whoopie pies are made from two soft, round cake-like cookies with a creamy filling in the middle. Legend has it that the name comes from children (or farmers!) shouting “Whoopie!” when they discovered these treats packed in lunch pails.
This Red Velvet Whoopie Pies Recipe puts a modern spin on that classic by pairing red velvet “cakes” with a luscious cream cheese filling—an iconic combination that never disappoints.
Ingredients You’ll Need
This recipe is made from simple pantry staples, but each ingredient plays an important role in achieving the perfect texture and flavor.
For the Red Velvet Whoopie Cakes
- All-purpose flour
- Cocoa powder (for that subtle chocolate undertone)
- Baking powder
- Baking soda
- Salt
- Unsalted butter, softened
- Vegetable shortening
- Light brown sugar
- Granulated sugar
- Eggs
- Vanilla extract
- Red food coloring
- Buttermilk
The combination of butter and shortening ensures a tender crumb, while buttermilk adds moisture and a gentle tang that defines classic red velvet flavor.
For the Cream Cheese Filling
- Cream cheese, softened
- Unsalted butter, softened
- Powdered sugar
- Vanilla extract
This filling is smooth, creamy, and just sweet enough to complement the cocoa-kissed cakes.
How to Make Red Velvet Whoopie Pies
Step 1: Prepare the Dry Ingredients
Preheat your oven to 350°F (175°C) and line two baking sheets with parchment paper. In a medium bowl, whisk together flour, cocoa powder, baking powder, baking soda, and salt. This ensures even distribution and consistent texture.
Step 2: Cream the Fats and Sugars
In a large mixing bowl, beat the butter, shortening, brown sugar, and granulated sugar until light and fluffy. This step is key for soft, airy whoopie cakes.
Step 3: Add Eggs and Flavorings
Beat in the eggs one at a time, mixing well after each addition. Add vanilla extract and red food coloring, blending just until incorporated.
Step 4: Combine Wet and Dry Ingredients
Add half of the dry ingredients and half of the buttermilk to the batter, mixing gently. Scrape down the sides, then add the remaining flour mixture and buttermilk. Mix just until combined—overmixing can make the cakes dense.
Step 5: Scoop and Bake
Using a spoon or cookie scoop, drop tablespoon-sized portions of batter onto the prepared baking sheets, spacing them at least 2 inches apart. Bake one sheet at a time for about 10 minutes, or until the tops spring back when lightly pressed.
Allow the cakes to cool briefly on the baking sheet before transferring them to a wire rack to cool completely.
Making the Cream Cheese Filling
In a clean mixing bowl, beat the cream cheese and butter until smooth. Add powdered sugar gradually, mixing on low speed at first. Once combined, add vanilla extract and beat on medium-high speed for several minutes until light, fluffy, and creamy.
This filling should be thick enough to hold its shape but soft enough to spread easily.
Assembling the Whoopie Pies
Take one cooled red velvet cake and spread or pipe a generous amount of cream cheese filling onto the flat side. Top with another cake, flat side down, gently pressing until the filling reaches the edges. Repeat until all whoopie pies are assembled.
For a polished look, you can use a piping bag with a round tip, but a spoon works just as well for a rustic, homemade feel.
Tips for Perfect Red Velvet Whoopie Pies
- Let the cakes cool completely before assembling to prevent melting or sliding filling
- Use parchment paper to keep the cakes from sticking
- Measure flour accurately for a soft, tender crumb
- Don’t overbake—the cakes should remain soft and cake-like
- For cleaner storage, place parchment paper between layers
Storage and Make-Ahead Tips
These whoopie pies store beautifully, making them ideal for prepping in advance:
- Store assembled whoopie pies in an airtight container in the refrigerator for up to 3 days
- Bring to room temperature before serving for the best texture and flavor
- Unfilled cakes can be frozen and assembled later
When to Serve Red Velvet Whoopie Pies
This Red Velvet Whoopie Pies Recipe shines during festive seasons but is versatile enough for any occasion:
- Valentine’s Day desserts
- Christmas cookie trays
- Birthday parties
- Bake sales and potlucks
- Afternoon coffee or tea treats
Their bold red color and creamy center make them eye-catching and crowd-pleasing wherever they go.
Red Velvet Whoopie Pies Recipe
Description
All-time favorite red velvet cake in the form of small, handy whoopie pies with a yummy cream cheese filling. These soft, cake-like cookies sandwiched with tangy-sweet frosting are perfect for holidays like Christmas or Valentine’s Day—or any day you’re craving something decadent!
ingredients
Whoopies
Filling
Instructions
Cakes
-
Preheat oven to 350°F (177°C). Line two cookie sheets with parchment paper.
-
In a medium bowl, whisk together flour, cocoa powder, baking powder, baking soda, and salt. Set aside.
-
Using a mixer with paddle attachment, beat butter, shortening, brown sugar, and granulated sugar until light and fluffy.
-
Add eggs one at a time, mixing well after each addition. Mix in vanilla and red food coloring until just blended.
-
Add half of the dry ingredients and half of the buttermilk to the batter. Beat until just incorporated. Scrape down the sides of the bowl.
-
Add remaining dry ingredients and buttermilk. Mix until completely combined.
-
Drop tablespoonfuls of batter onto lined cookie sheets, spacing at least 2 inches apart.
-
Bake one sheet at a time for about 10 minutes, or until whoopies spring back when lightly pressed. Let cool on sheet for 5 minutes, then transfer to a wire rack to cool completely.
Filling
-
Using a mixer with paddle attachment, beat cream cheese and butter on medium speed until smooth.
-
Gradually add powdered sugar and mix on low until combined. Add vanilla and increase speed to medium-high; beat until creamy and smooth (about 4 minutes).
Assembly
-
Spread or pipe filling onto the flat side of one whoopie pie. Top with another whoopie, flat-side down. Repeat with remaining cakes and filling.
Nutrition Facts
Servings 24
Serving Size 1 whoopie pie (2 halves + filling)
- Amount Per Serving
- Calories 401kcal
- % Daily Value *
- Total Fat 18g28%
- Saturated Fat 9g45%
- Cholesterol 48mg16%
- Sodium 250mg11%
- Potassium 140mg4%
- Total Carbohydrate 57g19%
- Dietary Fiber 1g4%
- Sugars 42g
- Protein 5g10%
- Calcium 6 mg
- Iron 8 mg
* Percent Daily Values are based on a 2,000 calorie diet. Your daily value may be higher or lower depending on your calorie needs.
Note
- Storage tip: Store in an airtight container in the refrigerator for up to 5 days.
- Make ahead: You can bake the cakes a day in advance and assemble them the next day.
- No shortening? Substitute with an equal amount of unsalted butter—but texture may vary slightly.

Frequently Asked Questions
Can I make these gluten-free?
Yes! Substitute the all-purpose flour with a 1:1 gluten-free baking flour blend. Be sure your cocoa powder and other ingredients are certified gluten-free.
How do I prevent whoopie pies from sticking together?
Ensure they are completely cooled before stacking. Place parchment paper between layers if storing multiple whoopie pies in a container.