
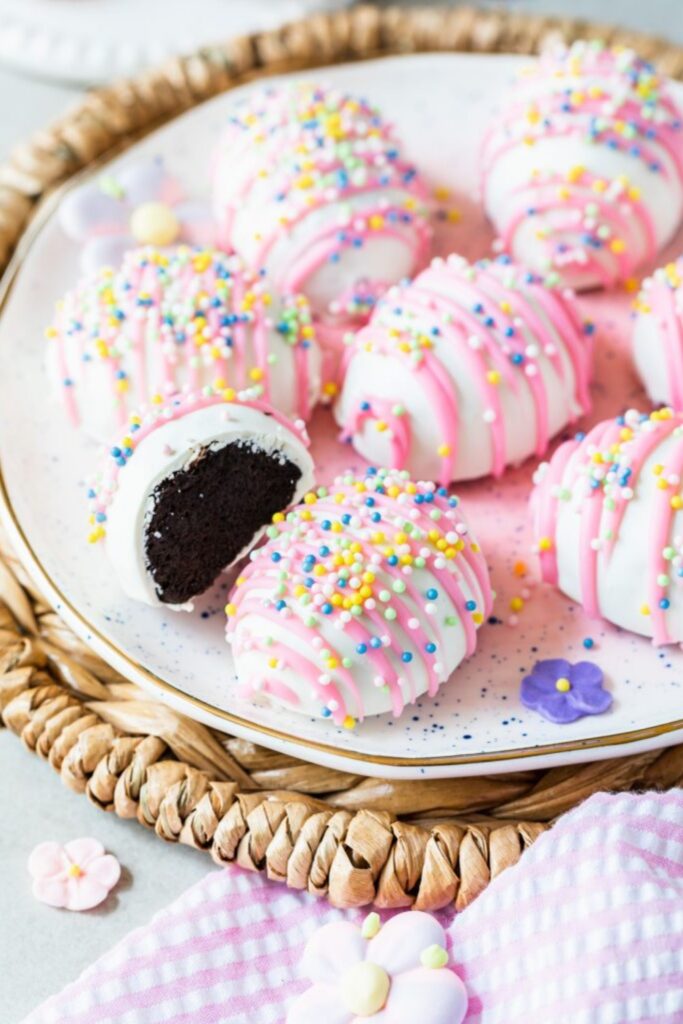

These Easter Egg OREO balls kind of changed that for me. The first time I made them, I was honestly just trying to use up a random pack of Oreos sitting in my pantry. I didn’t expect much. But then I took a bite, and yeah… I immediately understood the hype.
They’re creamy, rich, a little messy in the best way, and somehow feel fancy even though they’re ridiculously simple. I also like that they don’t require turning on the oven. Around Easter, my kitchen already feels chaotic, so anything that keeps things low-effort is a win for me.
Over time, I started shaping them into little eggs instead of basic balls. It just makes them feel more festive. And honestly, they look way cuter on a plate.
Ingredients I Used for the Recipe
- 36 Oreo cookies – these are the base, crushed into fine crumbs to create that rich chocolate filling
- 8 oz cream cheese (softened) – this binds everything together and gives the filling that smooth, creamy texture
- 2 cups white chocolate candy melts or almond bark – for coating the outside and creating that sweet shell
- ½ cup pink candy melts – I use this for drizzling on top, mostly for color and a little extra sweetness
- Nonpareil sprinkles – just for decoration, but they really make them look like Easter treats
How to make Starbucks Medicine Ball Recipe?
Step 1 – Crush the Oreos
I toss all the Oreo cookies into my food processor and pulse until they turn into fine crumbs. If I’m being honest, there have been times when I didn’t feel like dragging that thing out, so I just used a zip-top bag and smashed them with a rolling pin. It works. Not as perfect, but good enough.
Step 2 – Mix with cream cheese
Once the crumbs are ready, I mix them with softened cream cheese. This part gets a little messy. I usually start with a spoon, then give up and use my hands. It should come together into a thick, slightly sticky dough. If it feels too dry, I know I didn’t mix enough.
Step 3 – Shape into eggs
I scoop about a tablespoon of the mixture and shape it into an egg using my hands. I’ve tried molds before, and they’re nice, but honestly, I kind of enjoy doing it by hand. They’re not perfectly shaped, but that makes them feel more homemade.
Step 4 – Chill until firm
I place the shaped eggs onto a tray and pop them in the fridge for a couple of hours. If I’m in a rush, I’ll use the freezer for about 30 minutes. They just need to firm up so they don’t fall apart when dipping.
Step 5 – Dip in melted chocolate
I melt the white chocolate in the microwave, stirring every 30 seconds so it doesn’t burn. Then I dip each egg into the chocolate, let the excess drip off, and place them on parchment paper. This step took me a few tries to get right. At first, I made a huge mess. Now I just accept that my fingers will get covered in chocolate.
Step 6 – Drizzle and decorate
I melt the pink candy melts and drizzle it over the eggs. I don’t use a piping bag every time. Sometimes I just use a spoon and go with it. Then I quickly add sprinkles before the chocolate sets. This part is actually fun, especially if kids are helping.
Step 7 – Chill again before serving
I let them sit in the fridge for a bit so the coating fully hardens. They taste best when they’re slightly chilled, at least in my opinion. The texture just feels better.
Little Things I Learned the Hard Way
The first time I made these, I used double-stuffed Oreos because that’s what I had. Big mistake. The mixture turned way too soft and didn’t hold its shape well. Now I stick to regular ones, and everything comes together much easier.
I also learned not to rush the chilling step. If the eggs aren’t firm enough, they’ll fall apart in the melted chocolate. I’ve had a few break mid-dip, and it’s not fun trying to fish them out.
Another thing, melting chocolate sounds simple, but it’s easy to overheat it. I used to just microwave it all at once and ended up with clumpy chocolate. Now I take it slow, stirring often, and it turns out smooth every time.
Ways I Like to Switch Things Up
After making these a few times, I started experimenting a bit. Sometimes I use Golden Oreos instead of regular ones, and it gives a totally different flavor. Lighter, a little more vanilla-forward. It feels more “spring,” if that makes sense.
I’ve also tried using different colored candy melts for the coating. Pastels look really pretty for Easter. Once I even went all out and made a batch with multiple colors and patterns. It took forever, though, so I only do that when I’m feeling extra patient.
One time, I skipped the egg shape completely and just made classic balls again. Still tasted amazing. So if shaping feels like too much, it’s honestly not a big deal.
Tips
- Make sure the cream cheese is fully softened before mixing, or you’ll end up with lumps
- Chill the shaped eggs properly before dipping, it makes everything easier
- Use a fork or dipping tool for coating if you want cleaner results, though I usually just wing it
- Don’t overload with sprinkles, they can overpower the look if you add too many
- Store them in the fridge until serving, they hold their shape and taste better cold
- If you have leftovers, keep them in an airtight container for up to 3 days or freeze for longer storage
Why These End Up on My Easter Table Every Year
I’ve made a lot of Easter desserts over the years, but these are the ones people always ask about. Not because they’re complicated, but because they’re not. There’s something about simple recipes that just work.
They’re easy to make ahead, they look festive without much effort, and they taste like something way more time-consuming than they actually are. Plus, I like that I can tweak them a little each year and not get bored.
At this point, making these has kind of become a small tradition for me. Nothing fancy. Just me in the kitchen, probably making a mess, but ending up with a tray of cute little Easter treats that everyone grabs within minutes.
Easter Egg OREO Balls Recipe
Description
These Easter Egg OREO Balls are a delightful no-bake treat perfect for spring celebrations. With just four main ingredients, these creamy truffles feature a rich chocolate cookie center, a smooth white chocolate shell, and festive pastel sprinkles. They are easy to make, fun to decorate, and guaranteed to be the hit of your Easter dessert table.
ingredients
Truffle Center
Coating & Decoration
Instructions
-
Prepare the Cookie Crumbs
Place the OREO cookies (including the filling) into a food processor and pulse until they become fine crumbs. Alternatively, place them in a sealed zip-top bag and crush with a rolling pin.Ensure crumbs are uniform for a smooth texture. -
Mix the Filling
In a large bowl, combine the OREO crumbs with the softened cream cheese. Mix thoroughly until well combined and the mixture holds together when pressed.Use a hand mixer or sturdy spatula. -
Shape the Eggs
Press the mixture firmly into egg-shaped silicone molds. If you don't have molds, scoop heaping tablespoons of the mixture and shape them into eggs by hand.Chill in the freezer for 30 minutes or refrigerator for 2 hours until firm. -
Melt the White Chocolate
Melt the white chocolate candy melts in a microwave-safe bowl in 30-second intervals, stirring between each, until completely smooth.Do not overheat to avoid seizing. -
Dip the Truffles
Remove the chilled egg shapes from the molds. Dip each egg into the melted white chocolate, shaking off excess, and place on a parchment-lined baking sheet.Work quickly so the chocolate doesn't harden before dipping. -
Decorate
If using pink candy melts, melt them separately and transfer to a piping bag or small zip-top bag with a tiny corner cut. Drizzle over the white chocolate eggs. Immediately top with nonpareil sprinkles before the chocolate sets.Sprinkles must be added while chocolate is wet. -
Chill and Serve
Refrigerate the decorated eggs for at least 30 minutes to set the chocolate completely. Keep refrigerated until ready to serve.Best served cold.
Nutrition Facts
Servings 30
Serving Size 1 truffle
- Amount Per Serving
- Calories 145kcal
- % Daily Value *
- Total Fat 8.5gg14%
- Saturated Fat 4.2gg22%
- Trans Fat 0gg
- Cholesterol 8mgmg3%
- Sodium 95mgmg4%
- Potassium 45mgmg2%
- Total Carbohydrate 17gg6%
- Dietary Fiber 0.5gg2%
- Sugars 12gg
- Protein 1.8gg4%
- Calcium 3% mg
- Iron 4% mg
* Percent Daily Values are based on a 2,000 calorie diet. Your daily value may be higher or lower depending on your calorie needs.
Note
- Mold Alternative: If you don't have egg molds, shape the mixture by hand into ovals; chilling them thoroughly before dipping makes this easier.
- Flavor Variations: Try Golden OREOs or Lemon OREOs for a bright, citrusy spring twist that pairs beautifully with the floral theme of Easter.
- Make Ahead: These truffles can be made up to 3 days in advance; store in an airtight container in the fridge.
- Freezing: Freeze undecorated truffles for up to 2 months; thaw in the fridge before dipping and decorating.

Frequently Asked Questions
Can I use Double Stuf OREOs?
It is not recommended. Double Stuf OREOs have too much filling, which can make the truffle mixture too soft and difficult to shape. Stick to regular OREOs for the best texture [[8]].
How do I get the white chocolate smooth?
Melt the candy melts slowly in 30-second intervals in the microwave, stirring well between each burst. If the chocolate is too thick, add a teaspoon of vegetable oil or shortening to thin it out.
Can I make these gluten-free?
Yes! Simply substitute regular OREOs with gluten-free chocolate sandwich cookies. Ensure your cream cheese and candy melts are also certified gluten-free.
Why are my truffles falling off the stick or breaking?
If you are dipping them, ensure the centers are very cold (frozen is best) before dipping. If they are breaking, the mixture may be too dry; add a tiny bit more cream cheese next time.