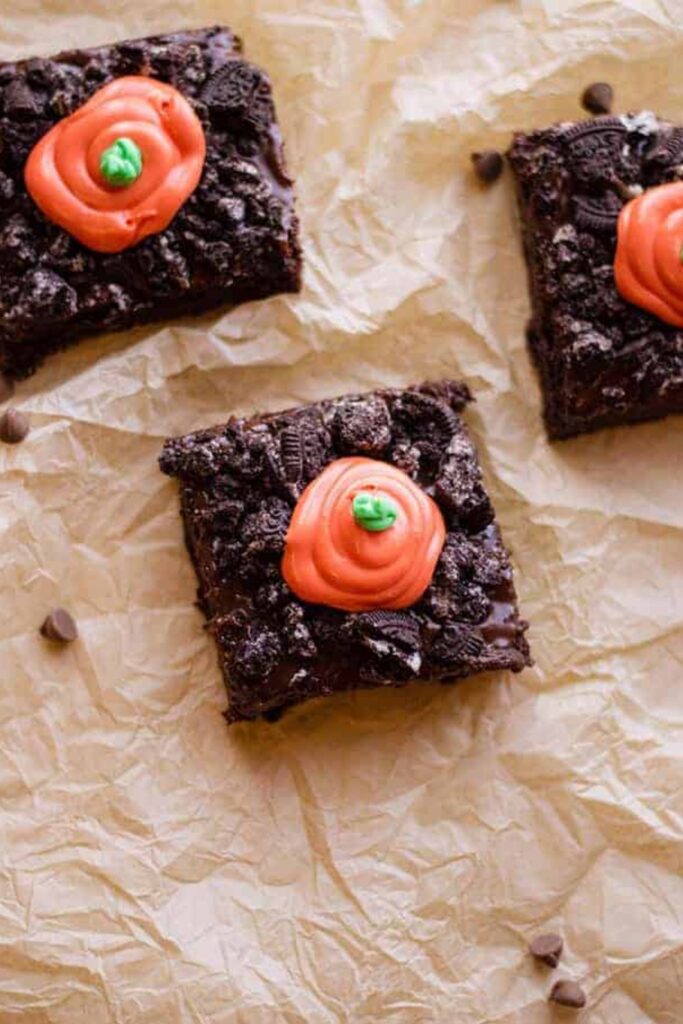
I didn’t plan to fall in love with a themed dessert, but here we are. The first time I made these carrot patch brownies, it was honestly just me trying to bring something “cute enough” to a family get-together. I figured brownies are safe. Everyone eats brownies.
But these? They disappeared faster than anything else on the table. People weren’t just eating them, they were pointing at them, laughing a little, then grabbing seconds. That’s when I realized this recipe isn’t just about taste. It’s about that tiny moment when someone smiles before taking a bite.
I’ve made them a bunch of times since then, and I still mess up the frosting sometimes. The carrots end up lopsided or weirdly chunky. Doesn’t matter. They still taste ridiculously good, and honestly, that’s what keeps me making them.
Ingredients I Used for the Recipe
- 2 sticks salted butter - this melts down into the base and gives that rich, soft brownie texture I always want.
- 1/2 cup semi-sweet chocolate chips - I use these to deepen the chocolate flavor without making it too bitter.
- 1/2 cup unsweetened cocoa powder - adds that intense chocolate kick that boxed brownies never quite hit.
- A pinch of salt - just enough to balance all the sweetness going on.
- 1 cup granulated sugar - for sweetness and that slightly crackly top.
- 1 cup light brown sugar, packed - this is what makes the brownies feel soft and almost fudgy in the center.
- 1 cup all-purpose flour - holds everything together without making it cakey.
- 2 large eggs - these give structure and help the brownies stay moist.
- 2 cups chocolate buttercream - I usually don’t overthink this, store-bought works just fine and saves time.
- 2 cups crushed Oreos - this is the “dirt,” and honestly my favorite part.
- 2 cups vanilla buttercream - this gets turned into the carrot topping.
- Orange gel food coloring - for the carrot look.
- Green gel food coloring - for those little leafy tops.
How to make Starbucks Medicine Ball Recipe?
Step 1 - Prep the pan and oven
I start by preheating the oven to 350 degrees. Then I line a square pan with parchment paper, leaving some hanging over the sides. That overhang has saved me more times than I can count when it’s time to lift the brownies out.
Step 2 - Melt butter and chocolate
I grab a saucepan and melt the butter with the chocolate chips over medium heat. I don’t rush this. If I crank the heat, it gets weird and grainy. Learned that the hard way once.
Step 3 - Add cocoa and salt
Once everything is melted and smooth, I stir in the cocoa powder and a pinch of salt. It thickens up pretty quickly and starts smelling like real brownies, not just sugar.
Step 4 - Stir in sugars
I add both the granulated sugar and brown sugar right into the warm chocolate mixture. It looks like too much at first, but it melts in and turns glossy.
Step 5 - Combine with flour
I put the flour in a large bowl, then pour the chocolate mixture over it. I mix it gently. Overmixing makes tough brownies, and I’ve done that enough times to know better.
Step 6 - Add eggs
I add the eggs one at a time, whisking after each one. The batter gets smooth and shiny, which is always a good sign.
Step 7 - Bake the brownies
I pour the batter into the pan and bake for about 20 to 25 minutes. I check with a toothpick. If it comes out with a few moist crumbs, I pull them out. If it’s wet batter, they need more time.
Step 8 - Cool completely
This is the step I hate waiting for. I let them sit for about 10 minutes, then lift them out and let them cool fully. If I rush this, the frosting melts and everything turns into a mess.
Step 9 - Add chocolate frosting
Once cooled, I spread chocolate buttercream all over the top. I don’t try to make it perfect. A slightly messy layer actually works better for the dirt effect.
Step 10 - Sprinkle the Oreo dirt
I sprinkle crushed Oreos all over the frosting. I press them in a little so they stick. This is the part where it really starts looking like a “patch.”
Step 11 - Cut into squares
I slice the brownies into squares before adding the decorations. It just makes everything easier later.
Step 12 - Make the carrot topping
I take most of the vanilla buttercream and mix in orange food coloring. Then I pipe a little mound onto each brownie. It doesn’t need to be perfect. Carrots in real life aren’t perfect either.
Step 13 - Add the green tops
I color the remaining frosting green and pipe small leafy tops onto each carrot. This step always makes me smile a little. It pulls everything together.
What I Learned After Making These Way Too Many Times
The first time I made these, I thought the decorations were the main thing. Turns out, if the brownie base isn’t good, none of the cute stuff matters. So now I pay way more attention to the batter than the frosting.
I also learned that store-bought frosting is completely fine here. I used to feel weird about that, like I had to make everything from scratch. But honestly, it saves time and still tastes great.
One small thing that changed everything for me was letting the brownies cool fully before decorating. I used to rush it, and the frosting would slide around like it had no idea what it was doing.
And yeah, I’ve tried freezing them too. It works, but I skip the frosting and Oreos until after thawing. Otherwise, it just gets messy in a way that’s not fun.
Tips
- Let the brownies cool completely before decorating. I know it’s annoying, but it matters.
- Use mild-flavored oil if you ever swap out butter. Strong flavors can mess with the chocolate taste.
- Don’t overbake. Slightly underdone brownies taste way better than dry ones.
- Crush the Oreos unevenly. Some chunks, some crumbs. It looks more like real dirt that way.
- If piping stresses you out, just spoon the frosting on. It still works.
- Store leftovers in an airtight container. They stay good for about 3 to 4 days, but I think they taste best in the first two.
Why These Always End Up Being the Favorite
I think it’s the mix of things going on. You get that rich chocolate base, the soft frosting, a little crunch from the Oreos, and then that playful carrot topping. It’s not complicated, but it feels like more than just brownies.
Every time I bring these somewhere, someone asks how I made them. And I always feel a little awkward explaining because it’s actually pretty simple. It just looks like you put in way more effort than you did.
I keep coming back to this recipe because it hits that balance I’m always chasing. Easy enough that I don’t dread making it, but special enough that people remember it. And honestly, that’s kind of the sweet spot for me.