
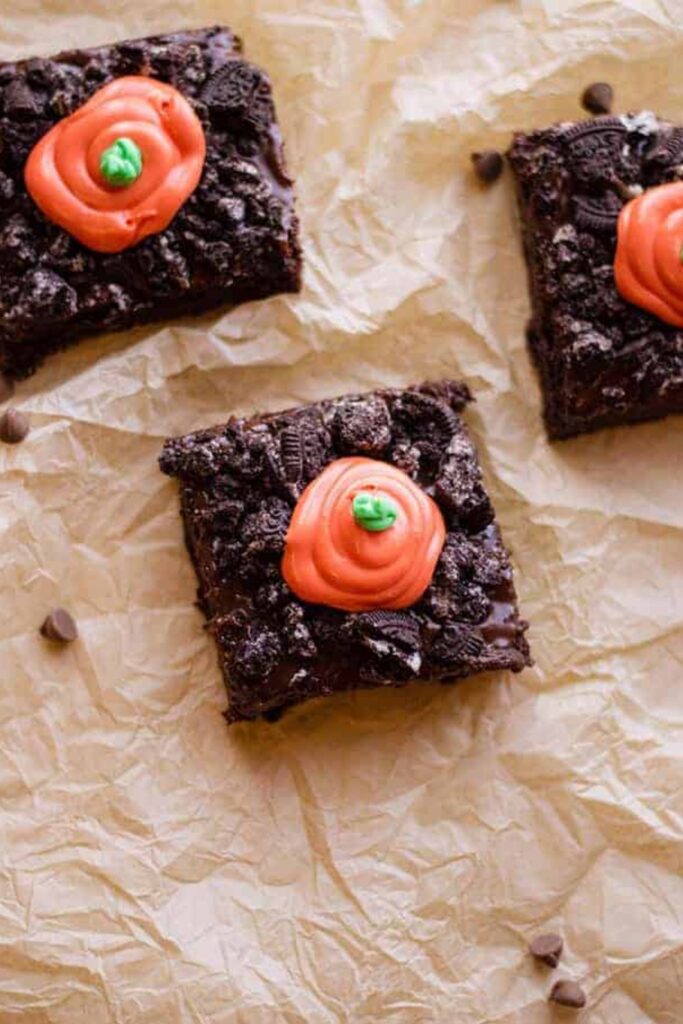

I didn’t plan to fall in love with a themed dessert, but here we are. The first time I made these carrot patch brownies, it was honestly just me trying to bring something “cute enough” to a family get-together. I figured brownies are safe. Everyone eats brownies.
But these? They disappeared faster than anything else on the table. People weren’t just eating them, they were pointing at them, laughing a little, then grabbing seconds. That’s when I realized this recipe isn’t just about taste. It’s about that tiny moment when someone smiles before taking a bite.
I’ve made them a bunch of times since then, and I still mess up the frosting sometimes. The carrots end up lopsided or weirdly chunky. Doesn’t matter. They still taste ridiculously good, and honestly, that’s what keeps me making them.
Ingredients I Used for the Recipe
- 2 sticks salted butter – this melts down into the base and gives that rich, soft brownie texture I always want.
- 1/2 cup semi-sweet chocolate chips – I use these to deepen the chocolate flavor without making it too bitter.
- 1/2 cup unsweetened cocoa powder – adds that intense chocolate kick that boxed brownies never quite hit.
- A pinch of salt – just enough to balance all the sweetness going on.
- 1 cup granulated sugar – for sweetness and that slightly crackly top.
- 1 cup light brown sugar, packed – this is what makes the brownies feel soft and almost fudgy in the center.
- 1 cup all-purpose flour – holds everything together without making it cakey.
- 2 large eggs – these give structure and help the brownies stay moist.
- 2 cups chocolate buttercream – I usually don’t overthink this, store-bought works just fine and saves time.
- 2 cups crushed Oreos – this is the “dirt,” and honestly my favorite part.
- 2 cups vanilla buttercream – this gets turned into the carrot topping.
- Orange gel food coloring – for the carrot look.
- Green gel food coloring – for those little leafy tops.
How to make Starbucks Medicine Ball Recipe?
Step 1 – Prep the pan and oven
I start by preheating the oven to 350 degrees. Then I line a square pan with parchment paper, leaving some hanging over the sides. That overhang has saved me more times than I can count when it’s time to lift the brownies out.
Step 2 – Melt butter and chocolate
I grab a saucepan and melt the butter with the chocolate chips over medium heat. I don’t rush this. If I crank the heat, it gets weird and grainy. Learned that the hard way once.
Step 3 – Add cocoa and salt
Once everything is melted and smooth, I stir in the cocoa powder and a pinch of salt. It thickens up pretty quickly and starts smelling like real brownies, not just sugar.
Step 4 – Stir in sugars
I add both the granulated sugar and brown sugar right into the warm chocolate mixture. It looks like too much at first, but it melts in and turns glossy.
Step 5 – Combine with flour
I put the flour in a large bowl, then pour the chocolate mixture over it. I mix it gently. Overmixing makes tough brownies, and I’ve done that enough times to know better.
Step 6 – Add eggs
I add the eggs one at a time, whisking after each one. The batter gets smooth and shiny, which is always a good sign.
Step 7 – Bake the brownies
I pour the batter into the pan and bake for about 20 to 25 minutes. I check with a toothpick. If it comes out with a few moist crumbs, I pull them out. If it’s wet batter, they need more time.
Step 8 – Cool completely
This is the step I hate waiting for. I let them sit for about 10 minutes, then lift them out and let them cool fully. If I rush this, the frosting melts and everything turns into a mess.
Step 9 – Add chocolate frosting
Once cooled, I spread chocolate buttercream all over the top. I don’t try to make it perfect. A slightly messy layer actually works better for the dirt effect.
Step 10 – Sprinkle the Oreo dirt
I sprinkle crushed Oreos all over the frosting. I press them in a little so they stick. This is the part where it really starts looking like a “patch.”
Step 11 – Cut into squares
I slice the brownies into squares before adding the decorations. It just makes everything easier later.
Step 12 – Make the carrot topping
I take most of the vanilla buttercream and mix in orange food coloring. Then I pipe a little mound onto each brownie. It doesn’t need to be perfect. Carrots in real life aren’t perfect either.
Step 13 – Add the green tops
I color the remaining frosting green and pipe small leafy tops onto each carrot. This step always makes me smile a little. It pulls everything together.
What I Learned After Making These Way Too Many Times
The first time I made these, I thought the decorations were the main thing. Turns out, if the brownie base isn’t good, none of the cute stuff matters. So now I pay way more attention to the batter than the frosting.
I also learned that store-bought frosting is completely fine here. I used to feel weird about that, like I had to make everything from scratch. But honestly, it saves time and still tastes great.
One small thing that changed everything for me was letting the brownies cool fully before decorating. I used to rush it, and the frosting would slide around like it had no idea what it was doing.
And yeah, I’ve tried freezing them too. It works, but I skip the frosting and Oreos until after thawing. Otherwise, it just gets messy in a way that’s not fun.
Tips
- Let the brownies cool completely before decorating. I know it’s annoying, but it matters.
- Use mild-flavored oil if you ever swap out butter. Strong flavors can mess with the chocolate taste.
- Don’t overbake. Slightly underdone brownies taste way better than dry ones.
- Crush the Oreos unevenly. Some chunks, some crumbs. It looks more like real dirt that way.
- If piping stresses you out, just spoon the frosting on. It still works.
- Store leftovers in an airtight container. They stay good for about 3 to 4 days, but I think they taste best in the first two.
Why These Always End Up Being the Favorite
I think it’s the mix of things going on. You get that rich chocolate base, the soft frosting, a little crunch from the Oreos, and then that playful carrot topping. It’s not complicated, but it feels like more than just brownies.
Every time I bring these somewhere, someone asks how I made them. And I always feel a little awkward explaining because it’s actually pretty simple. It just looks like you put in way more effort than you did.
I keep coming back to this recipe because it hits that balance I’m always chasing. Easy enough that I don’t dread making it, but special enough that people remember it. And honestly, that’s kind of the sweet spot for me.
Carrot Patch Brownies Recipe
Description
These carrot patch brownies are perfect for Easter and spring in general! These brownies make for a rich, fudgy base with a chocolate frosting slathered on top! Sprinkle some crushed up Oreos on for the dirt and pipe the tops of carrots for an adorable, festive dessert that's sure to impress at any holiday gathering.
ingredients
For the Brownies
For the Decoration
Instructions
-
Prep the Pan
Preheat oven to 350°F (175°C). Line a 9x9-inch square pan with parchment paper, leaving an overhang on two sides for easy removal. Set aside.The parchment sling makes removing the brownies much easier! -
Melt Butter & Chocolate
In a medium saucepan, melt butter and semi-sweet chocolate chips over medium heat, stirring frequently until smooth.Keep heat on medium-low to prevent scorching. -
Add Dry Ingredients to Chocolate
Once melted, remove from heat and stir in cocoa powder and a pinch of salt until fully combined. -
Incorporate Sugars
Add both granulated sugar and packed brown sugar to the chocolate mixture. Stir until sugars are mostly dissolved and mixture is glossy.The mixture will be thick—that's okay! -
Combine with Flour
In a large bowl, add the all-purpose flour. Pour the warm chocolate mixture over the flour and mix until just combined.Don't overmix—stop as soon as no flour streaks remain. -
Add Eggs
Add eggs one at a time, whisking well after each addition until fully incorporated and batter is smooth and shiny.Room temperature eggs incorporate more easily. -
Bake
Pour batter into prepared pan and spread evenly. Bake for 20–25 minutes, or until a toothpick inserted in the center comes out with moist crumbs (not wet batter).Brownies continue to cook as they cool, so don't overbake! -
Cool Completely
Let brownies cool in pan for 10 minutes. Use parchment overhang to lift brownies onto a wire rack. Cool completely before decorating (about 1–2 hours).Warm brownies will melt the frosting—patience is key! -
Frost & Add 'Dirt'
Once cooled, spread chocolate buttercream evenly over the top. Sprinkle crushed Oreos generously over the frosting to create the 'dirt' effect.Press Oreos gently so they adhere to the frosting. -
Cut into Squares
Using a sharp knife, cut brownies into 9 equal squares. Wipe knife between cuts for clean edges.Chill brownies for 15 minutes before cutting for cleaner slices. -
Make Orange Carrot Frosting
Tint 1½ cups of vanilla buttercream with orange gel food coloring until vibrant. Transfer to a piping bag fitted with a round tip or coupler.Gel coloring gives brighter color without thinning frosting. -
Pipe Carrot Tops
Pipe a tapered mound of orange frosting onto the center of each brownie square to resemble a carrot peeking out of the dirt.Start wide at the base and taper upward for realistic carrot shape. -
Add Green Tops
Tint remaining vanilla buttercream with leaf green gel food coloring. Pipe small leafy tops onto each orange carrot using a small round or grass tip.A Wilton #4 round tip or small star tip works perfectly for the greens.
Nutrition Facts
Servings 9
Serving Size 1 brownie
- Amount Per Serving
- Calories 1087kcal
- % Daily Value *
- Total Fat 55gg85%
- Saturated Fat 32gg160%
- Trans Fat 1gg
- Cholesterol 95mgmg32%
- Sodium 410mgmg18%
- Potassium 215mgmg7%
- Total Carbohydrate 142gg48%
- Dietary Fiber 4gg16%
- Sugars 110gg
- Protein 5gg10%
- Calcium 45mg mg
- Iron 2.8mg mg
* Percent Daily Values are based on a 2,000 calorie diet. Your daily value may be higher or lower depending on your calorie needs.
Note
- Make Ahead Tip: Brownies can be baked 1 day ahead. Store unfrosted at room temperature, then frost and decorate the day of serving for best results.
- Freezing Instructions: Freeze unfrosted brownies wrapped tightly for up to 3 months. Thaw overnight in fridge, then frost and decorate. If freezing decorated brownies, place in a single layer in an airtight container and freeze solid before stacking.
- Food Coloring Tip: Use gel food coloring (not liquid) for vibrant carrot colors without altering frosting consistency.
- Homemade Frosting Option: Substitute store-bought buttercream with your favorite chocolate and vanilla buttercream recipes for a from-scratch version.
- Storage: Store decorated brownies in an airtight container at room temperature for up to 2 days, or refrigerate for up to 4 days. Bring to room temperature before serving for best texture.

Frequently Asked Questions
Can you freeze carrot patch brownies?
Yes! For best results, freeze the brownies unfrosted. Wrap the cooled slab tightly in plastic wrap, then foil, and freeze for up to 3 months. Thaw overnight in the refrigerator, then frost with chocolate buttercream, add crushed Oreos, and pipe the carrot decorations the day you plan to serve. If you must freeze decorated brownies, flash-freeze them uncovered on a baking sheet until the frosting is solid (about 1 hour), then transfer to an airtight container with parchment between layers.
Can I use olive oil instead of butter in these brownies?
You can substitute olive oil for the butter, but choose a mild, light-tasting olive oil. Strongly flavored extra virgin olive oil will impart a fruity note that may clash with the chocolate. Keep in mind that butter contributes to the fudgy texture and rich flavor, so the final result may be slightly different with oil.
How long do these brownies last?
When stored in an airtight container at room temperature, decorated carrot patch brownies stay fresh for 2 days. Refrigerated, they'll keep for up to 4 days. For the best texture and flavor, enjoy within 1–2 days. Let refrigerated brownies sit at room temperature for 20–30 minutes before serving to soften the frosting.
Can I make these brownies gluten-free?
Yes! Substitute the all-purpose flour with a 1:1 gluten-free baking blend that contains xanthan gum. Also ensure your Oreos are the gluten-free variety (available in many regions) and verify that your chocolate chips and frosting are certified gluten-free if needed.
What if I don't have gel food coloring?
Liquid food coloring can work in a pinch, but you'll need more drops to achieve vibrant orange and green shades, which may thin your frosting slightly. If using liquid coloring, add it gradually and be prepared to add a little extra powdered sugar to thicken the frosting if needed. Gel coloring is highly recommended for best results.