I used to overcook it. Every. single. time. I thought “better safe than pink” and ended up with dry slices and a polite silence at the table.
Then I figured out what actually matters, and honestly, it’s simpler than I made it. Now it’s juicy, deeply flavored, and the gravy? That’s the part people fight over.
This is how I do it now, with all the small habits and mistakes baked in.
Ingredients I Used for the Recipe
- 2.75 - 3 kg bone-in lamb leg - this is the main event, and I always go for the best quality I can afford because it really shows
- 1 1/2 tsp salt - brings out the natural flavor of the lamb
- 1/2 tsp black pepper - adds a mild heat without overpowering
- 1 1/2 tbsp fresh rosemary, finely chopped - gives that classic earthy flavor that just belongs with lamb
- 3 garlic cloves, minced - for a strong, savory base in the rub
- 2 tbsp olive oil - helps carry the flavors and coat the meat evenly
- 2 whole heads of garlic, halved - this sits under the lamb and slowly caramelizes
- Few rosemary sprigs - optional, but I like how it perfumes everything
- 4 tbsp flour - used to thicken the gravy later
- 2 1/2 cups beef stock - gives the gravy a deep color and richer taste than chicken stock
The one thing I learned the hard way
I ignored thermometers for years. I thought I could just “feel it” or guess by timing. That worked okay for chicken sometimes, but lamb leg? Not forgiving.
The truth is, lamb leg is lean. If it’s not slightly pink inside, it’s dry. No debate there. I’ve ruined enough expensive cuts to accept that.
Now I always check the internal temperature. I don’t even trust my oven anymore, and honestly, ovens lie. Mine definitely does.
Once I started pulling the lamb out earlier than I thought I should, everything changed. Juicy meat, not dry. That simple shift fixed years of frustration.
How to make Starbucks Medicine Ball Recipe?
Step 1 - Bring the lamb to room temperature
I take the lamb out of the fridge at least an hour before cooking. I used to skip this, but cold meat cooks unevenly and the inside stays behind while the outside overcooks.
Step 2 - Make the rosemary garlic rub
I mix the chopped rosemary, minced garlic, and olive oil in a small bowl. It smells strong at this point, almost too much, but once it roasts, it mellows into something really balanced.
Step 3 - Rub the lamb properly
I put the lamb straight in the roasting pan and rub everything over it with my hands. Then I sprinkle salt and pepper separately. I learned that mixing salt into the oil doesn’t spread it evenly.
Step 4 - Create the garlic base
I place the halved garlic heads cut side up under the lamb, plus a few rosemary sprigs. This step feels small but it builds flavor in the drippings later, which matters for the gravy.
Step 5 - Start hot for color
I roast it at a high temperature for about 20 minutes. This is where the outside gets that golden crust. I used to leave it longer, thinking more color is better, but that just created a dry outer layer.
Step 6 - Lower the heat and cook through
Then I drop the oven temperature and keep roasting for about an hour. Around the 45 minute mark, I always check the internal temperature. I don’t trust time anymore, only the thermometer.
Step 7 - Pull it out early
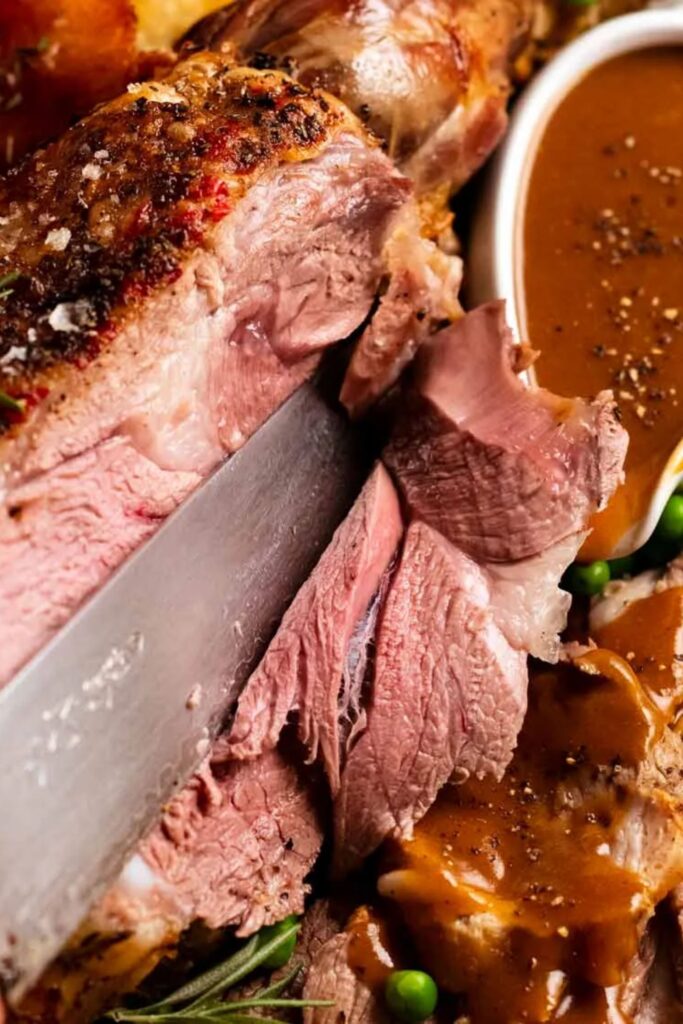
I take the lamb out when it hits around 53°C. It looks underdone at first, and yeah, that used to scare me. But resting finishes the cooking.
Step 8 - Let it rest
I let it rest for at least 20 minutes, sometimes longer if I get distracted. This part is non-negotiable. If you cut too early, all the juices run out and you lose everything you worked for.
Step 9 - Start the gravy in the same pan
I put the roasting pan on the stove and heat the drippings. Then I stir in the flour and cook it for about a minute until it turns into a paste.
Step 10 - Add stock and build the gravy
I slowly pour in the beef stock while stirring. It loosens up and turns into a smooth gravy pretty quickly.
Step 11 - Smash the garlic
This is my favorite part. I press the roasted garlic into the gravy. It melts right in and adds this deep, sweet flavor that you can’t fake.
Step 12 - Simmer and strain
I let it simmer until it thickens, then strain it. Sometimes I skip straining if I’m feeling lazy, but the texture is better when I do it properly.
What I serve it with (and what I stopped overthinking)
I used to stress about side dishes like they had to be perfect too. Now I keep it simple. Crispy potatoes, peas, carrots. That’s it.
The lamb and gravy do most of the heavy lifting anyway. No one’s ever complained about basic sides when the main dish is right.
Also, I learned not to overload the plate. A few slices of lamb, a spoon of gravy, and space to breathe. It just feels better that way.
Tips
- Use a thermometer - guessing will eventually betray you
- Take the lamb out earlier than you think - it keeps cooking while resting
- Don’t skip resting time - this is where the juiciness locks in
- Fresh rosemary matters - dried just doesn’t hit the same
- Make the gravy in the same pan - that’s where all the flavor is hiding
- Don’t overdo the initial high heat - too long creates a dry outer layer
- Let the garlic roast under the lamb - it transforms into something sweet and rich
The part that always surprises people
It’s the gravy. Every single time.
People expect the lamb to be good, but they don’t expect the gravy to steal the show. It’s deep, rich, and honestly better than beef gravy, which I didn’t believe until I tasted it done right.
I used to think gravy was just a side thing. Now I treat it like half the dish.
And yeah, when someone asks how I made it, I just smile and keep it vague. Not out of secrecy, just because it feels like one of those things you only really understand after messing it up a few times.