Okay, so I have a thing for heart-shaped cakes. It's a little embarrassing. My kitchen cabinets are basically a shrine to various heart-shaped pans I've collected over the years. But for the longest time, my results were... not great. Dense cakes, frostings that tasted like sweetened shortening, and colors that looked more radioactive than romantic.
Then I messed around and landed on this raspberry heart cake. It's the one. The one people ask for by name. The one my friend requested for her bridal shower instead of ordering a fancy bakery cake. That's a compliment that still makes me blush.
What makes it different? It's not just pink food coloring. It's real raspberry flavor, in the cake, in the frosting, in the filling. It’s got this soft, vintage look that feels fancy but homemade. And honestly, it's a project. I'm not gonna lie to you. But breaking it down into parts makes it totally doable, even fun. Let's get into it.
Ingredients I Used for the Recipe
Gathering everything first is key. Here's what you'll need, and why I use it.
- Cake flour: This is non-negotiable for me. It gives the cake that super soft, delicate crumb that feels professional. All-purpose flour makes it a bit tougher.
- Unsalted butter, softened: For the cake and the buttercream. "Softened" means you can press your finger into it easily. I leave mine out for a good 2 hours. Not melty, just soft.
- Egg whites: Just the whites! It keeps the cake layers light and bright white, so the raspberry pink really pops. Save the yolks for custard or something.
- Granulated & powdered sugar: Regular white sugar for the cake, powdered (confectioners') for the frostings.
- Buttermilk: The secret to moisture and a slight tang that balances the sweet raspberries. If you don't have it, you can make a decent substitute with milk and a squeeze of lemon juice, but real buttermilk is better.
- Fresh or frozen raspberries: A whole lot of them. I use frozen most of the time because they're cheaper and work perfectly for the compote and purée. No one can tell the difference once it's cooked down.
- Mascarpone cheese: For the filling frosting. It's like a richer, less tangy cream cheese. It makes the filling so luxuriously creamy.
- Heavy cream: For whipping into the mascarpone frosting and to smooth out the buttercream.
- Vanilla extract & a pinch of salt: The flavor boosters. They make the raspberry taste more like itself, somehow.
- Pink food coloring (optional): I use just a tiny drop of gel coloring if my raspberry purée isn't giving me that soft pink I want. It's backup.
How to make Starbucks Medicine Ball Recipe?
Wait, what? That's a drink. We're making a cake. Let's focus, people.
How to make Raspberry Heart Cake?
Step 1 - Make the Raspberry Stuff First
This is the biggest tip I can give you. Do the compote/purée ahead of time. It needs to cool completely. I often do it the night before. Throw the raspberries in a pot, cook them down until thick, stirring so they don't scorch. Let it bubble away for like 10 minutes. Then, I take out about a third of a cup of this thick jammy stuff for the filling later. The rest goes in my blender, then gets strained through a fine mesh sieve to get rid of the seeds. It's a bit of a pain, but seedless purée is what gives you that smooth, professional texture in the cake and buttercream. Trust me on this.
Step 2 - The Heart of the Matter: The Cake Layers
Preheat your oven to 325°F. Grease your heart pan well. I mean it. Get in all those curves. Line the bottom with parchment paper too.
Now, cream the soft butter and sugar together for a solid 3 minutes. It should look pale and fluffy. Then add the egg whites and vanilla. Here's where patience pays off: whip this for another 5 minutes. It'll get super light and almost like a mousse. This is what gives the cake its beautiful texture. Mix in your cooled raspberry purée. Then, add your dry stuff (flour, baking powder, baking soda, salt) and the buttermilk in alternating batches, starting and ending with the dry. Mix just until it's combined. Don't overmix here. If the color isn't pink enough for you, now's the time for that tiny drop of food coloring.
Step 3 - Baking & The Waiting Game
Since most of us only have one heart pan, we bake one layer at a time. It's okay. Just keep the other batter bowls at room temp. Pour in a third of the batter, spread it evenly, and bake for 20-25 minutes. Don't open the oven door early. A toothpick should come out clean. Cool the cake in the pan for 10 minutes, then flip it out onto a wire rack to cool completely. I mean completely. Warm cake layers will melt your frosting and make a huge mess. I sometimes even pop them in the fridge for a bit.
Step 4 - The Two Frostings
First, the raspberry buttercream. Beat the softened butter until it's creamy. Gradually add the powdered sugar. It will be thick. Add the vanilla and heavy cream, and beat on medium-high until it's light and fluffy, maybe 2-3 minutes. Then, gently beat in that seedless raspberry purée. It'll turn this gorgeous pale pink. Set this aside.
Second, the mascarpone filling. This one's easy but crucial: everything needs to be cold. Cold mascarpone, cold heavy cream. Whisk it all together—the mascarpone, cream, a bit of the purée, powdered sugar, and vanilla—on LOW speed just until it's thick and holds its shape. Over-beating will make it grainy. Pop it in the fridge until you're ready to assemble.
Step 5 - The Fun Part: Assembly
Put a little dab of buttercream on your cake board or plate to hold the first layer. Place it down. Take your piping bag with the buttercream and pipe a border around the very edge of the cake layer. This is your "dam" to hold in the runny filling. Inside that dam, spread on some of the mascarpone frosting, then spoon on some of that reserved thick raspberry compote. Gently place the next cake layer on top and repeat. Top with the final layer.
Step 6 - Crumb Coat & Final Frost
Spread a very thin layer of buttercream all over the cake. This is the "crumb coat." It doesn't have to be pretty. It's just to trap any loose crumbs. Chill the cake for 20-30 minutes to set it. Then, pile on the rest of your buttercream and use a bench scraper or spatula to smooth it all around. This is when it starts looking real.
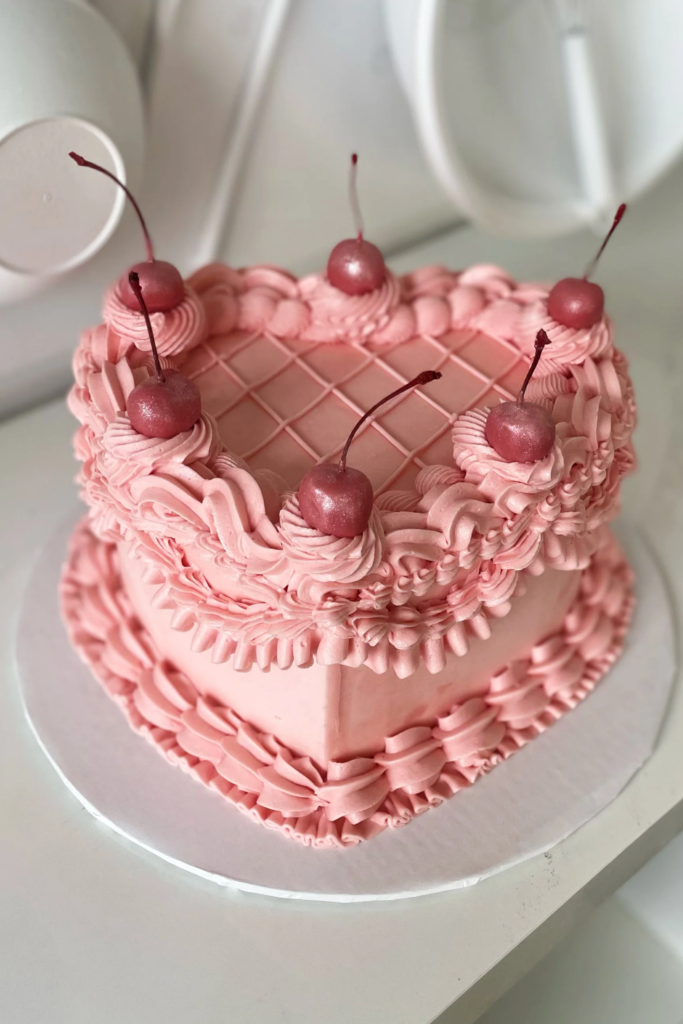
Step 7 - The Vintage Vibe Decoration
I use a star piping tip for this. Just simple shell borders around the top and bottom edges. It gives that classic, vintage bakery look with zero fuss. Sometimes I'll dot a few fresh raspberries on top if I have them.
Tips
My biggest lesson? A digital kitchen scale. Cups are so inconsistent, especially with flour. Weighing your ingredients is a game-changer for baking success.
If your buttercream ever looks curdled or weird, just keep beating. It's probably just a temperature issue. Sometimes I'll gently warm a bit of it in the microwave for 5 seconds and beat it back in to smooth everything out.
And for slicing a clean piece? Run your knife under hot water, wipe it dry, then cut. Do this between every slice. It's a pain, but the pictures will be worth it.
This cake is a labor of love. It's for a birthday, an anniversary, a "just because I love you" day. It's not a Tuesday night cake. But when you bring it out, and everyone goes quiet for a second before the "wows" start? That's the good stuff right there. Happy baking.