I still remember the first time I had real Peruvian chicken. It was at this tiny place in Queens, somewhere my friend dragged me to after swearing up and down it would change my life. I was skeptical, honestly. How good could roast chicken really be?
But then I took a bite. And another. And suddenly we were ordering a second half-chicken because we couldn't stop fighting over the first one. The skin was bronzed and crispy, the meat so juicy it almost didn't seem real, and that flavor - garlicky, tangy, with this warm spice thing happening that I couldn't quite figure out.
That was years ago. I've made a lot of versions since then, messed up plenty along the way, and finally landed on this one. It's the closest I've gotten to those Queens days, and honestly? My family might like it better than the restaurant version. Not to brag or anything.
Ingredients I Used for the Recipe
Before we get into it, here's exactly what you need. I've learned through trial and error that each thing here actually matters, even if some substitutions are possible.
- 3.5 lb whole chicken - This is the sweet spot size. Bigger birds take longer and can dry out before the dark meat finishes. I've made that mistake.
- 2 tbsp avocado oil - You can use olive oil too, I have plenty of times. Avocado oil just handles the heat a little better, but don't stress if you only have olive.
- 2 tbsp aji amarillo paste - This is non-negotiable for me now. It's what gives Peruvian chicken that sunshiney color and fruity heat. I order it online because my regular grocery store doesn't carry it. One jar lasts forever.
- 1.5 tbsp lime juice - Fresh only. The bottled stuff changes the whole vibe. I learned this the hard way when I was lazy once and regretted it.
- 3 large garlic cloves - Pressed or minced really fine. Sometimes I do 4 if they're small. Garlic is your friend here.
- 2 tsp kosher salt - If you're using table salt, cut back a little. I under-salted my first attempt and the chicken was just... blah. Don't be shy with it.
- 1 tsp ground cumin - This adds that warm, almost smoky note that makes the chicken smell incredible while it's roasting.
- 1 tsp dried oregano - Nothing fancy, just the regular stuff in your spice drawer.
- 1 tsp freshly ground black pepper - Pre-ground works, but fresh really does make a difference here.
Oh and about that green sauce - I used to try making it exactly like the restaurants, but honestly? My cilantro jalapeño version is easier and my kids actually prefer it. Sometimes I blend up some mayo, cilantro, jalapeño, garlic, and lime juice. Not authentic at all but so good I don't care.
How to Make Peruvian Chicken
The first time I made this, I skipped some steps because I was in a hurry. Big mistake. The chicken came out uneven, some parts overcooked, others not done. Now I follow these steps and it works every time.
Step 1 - Spatchcock the Bird (Just Do It)
I know spatchcocking sounds fancy or intimidating, but it's literally just cutting out the backbone so the chicken lays flat. Grab some kitchen shears - regular scissors work too if they're sturdy - and cut along both sides of the backbone. Pop that bone out (save it for stock if you're that person, I never am).
Press down on the breastbone until you hear a little crack and the chicken flattens out. That's it. This one step changed my roast chicken game forever. It cooks in like half the time, everything gets done evenly, and carving is stupid easy. I've never once regretted spatchcocking, but I've regretted not doing it plenty.
Step 2 - Pat It Super Dry
Grab some paper towels and really dry that chicken off. Inside, outside, everywhere. Chicken from the store always has this weird moisture on it that will water down your marinade and keep the skin from getting crispy. I learned this after making sad, flabby-skinned chicken for way too long.
Dry chicken = crispy skin. It's that simple.
Step 3 - Mix the Marinade
In a small bowl, stir together the oil, aji amarillo paste, lime juice, garlic, salt, cumin, oregano, and pepper. It'll be this beautiful golden-orange color that just looks happy. Sometimes I taste a tiny bit to check the salt level, but don't go crazy because raw garlic is intense.
The paste can be kind of thick, so really mix it well until everything comes together. No oil slicks or clumps of spice.
Step 4 - Rub It All Over
This part gets messy. I usually put on a glove for this because my hands are sensitive and the garlic lingers forever. Rub that marinade everywhere - under the skin, over the skin, inside the cavities, on the legs. Really get in there. Don't be polite about it.
I like to lift the skin gently over the breast and thighs and get some marinade directly on the meat too. That's where the real flavor happens.
Step 5 - Let It Sit at Room Temp
Here's something I didn't used to do that made a huge difference. Let the chicken sit out on the counter for one hour. Not in the fridge. Room temperature. The meat cooks so much more evenly this way and stays juicier because it doesn't need as long in the oven.
If you're marinating longer than that (up to 24 hours), keep it in the fridge, but then take it out an hour before cooking to come to room temp. Just don't leave it out more than 2 hours total, safety-wise.
Step 6 - Roast at 425
About 15 minutes before your hour is up, preheat the oven to 425F. Put the chicken on a baking sheet, breast side up, legs pointing toward you. I've noticed my oven runs hotter in the back, so I position the breast toward the back since dark meat can handle more heat.
Roast for 40-45 minutes. At the 30 minute mark, baste it with the juices in the pan. Do it again at 40 minutes. The chicken should hit 160F in the breast when it's done. Don't skip the thermometer - I've pulled chicken too early and had to put it back in, which always dries it out a little.
Step 7 - Rest Before Cutting
This is the hardest part because your kitchen smells amazing and everyone's hovering. Let the chicken rest for 5-10 minutes. Those juices need to redistribute or they'll all run out when you cut into it, leaving dry meat. I know, I know. But trust me.
While it rests, make that green sauce if you haven't already. Or just stare at the chicken. I won't judge.
Tips
After making this probably dozens of times, here's what I wish someone had told me at the beginning.
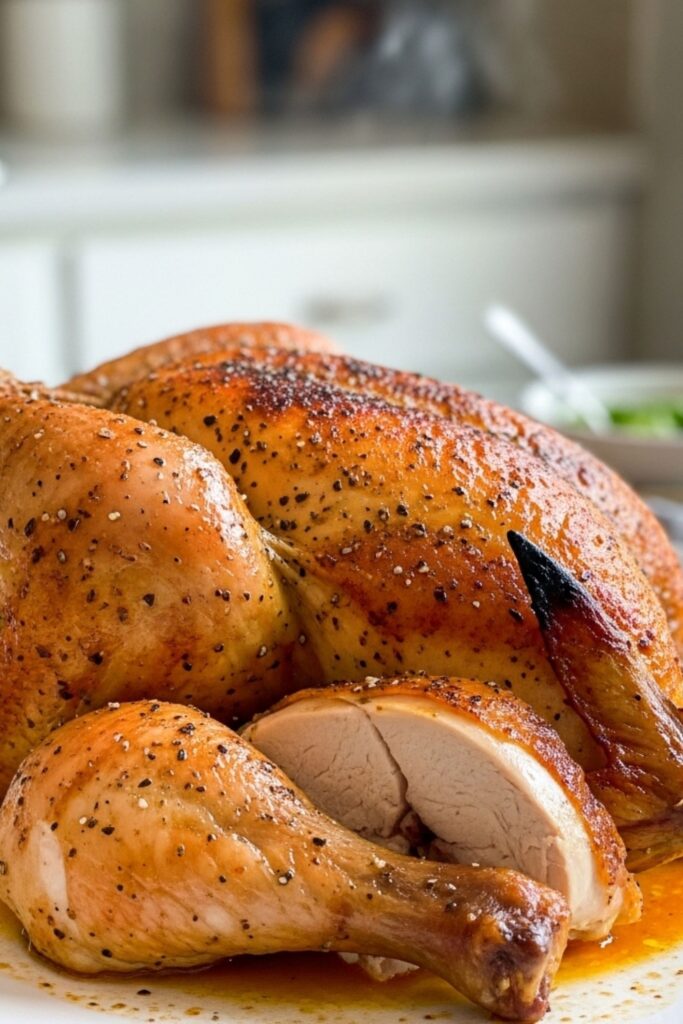
Don't panic about the dark spots. The marinade has natural sugars from the lime juice that caramelize and can look almost burned in places. It's not burned. It's delicious. I used to scrape those bits off before serving and now I fight my husband for them.
Know your oven. Some run hot, some run cold. My first oven took 50 minutes easy. This new one does it in 40. Get a thermometer and trust that more than the timer.
Make extra green sauce. I don't care what recipe you use, double it. People put this stuff on everything - the chicken, rice, vegetables, even just bread. I've caught my daughter eating it with a spoon when she thinks I'm not looking.
Leftovers are actually better. If there's any chicken left, shred it and toss it in a salad or make tacos the next day. The flavors have settled in even more and it's just fantastic cold.
Try different cuts. Sometimes I just do a pack of thighs or drumsticks with this marinade. Works perfectly, just adjust cooking time. Thighs take about 30-35 minutes, drumsticks around the same. Breasts are trickier - watch them carefully so they don't dry out.
Warm your pan. This is something I stumbled into by accident. If I remember, I put the baking sheet in the oven while it preheats, then carefully put the chicken on the hot pan. That bottom skin gets extra crispy. Just be careful, obviously.
The best part about this recipe, for me anyway, is that it feels special but it's actually really simple. It's become my go-to for Sunday dinners, for when friends come over, for when I just want to make something that feels like a hug. Even when I mess up a little - and I still do, don't let anyone tell you they nail it every time - it's still better than takeout.
My advice? Just try it. The first time might not be perfect, but it'll be pretty darn good. And by the third or fourth time, you won't even need the recipe anymore. You'll just know.