

Close your eyes for a second. Imagine the most incredible aroma wafting from a kitchen. It’s rich and savory, with a mysterious, warm hint of spice you can’t quite place.
That’s the magic of Pastitsio. This isn’t your average weeknight pasta bake. This is a legendary Greek casserole, a labor of love that feels like a celebration on a plate.
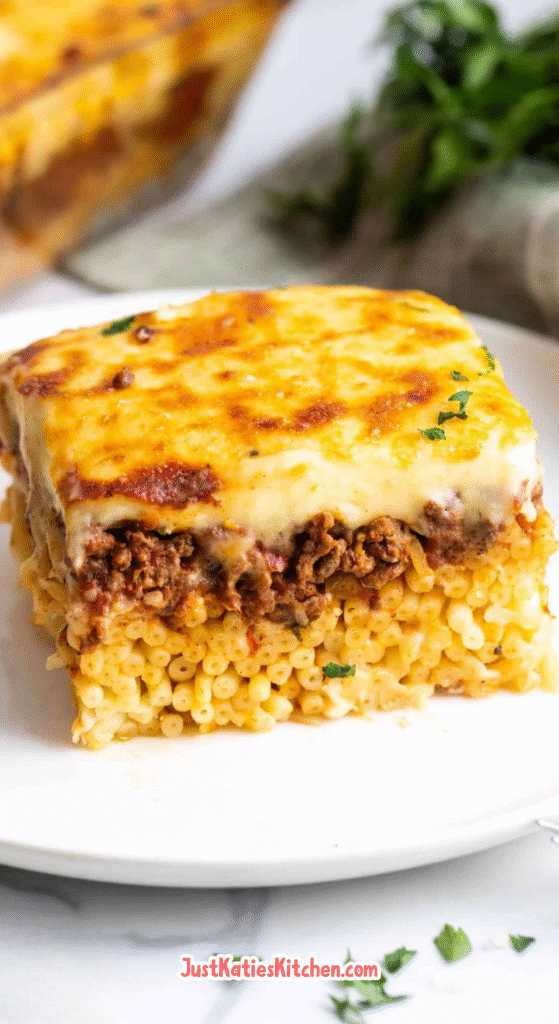
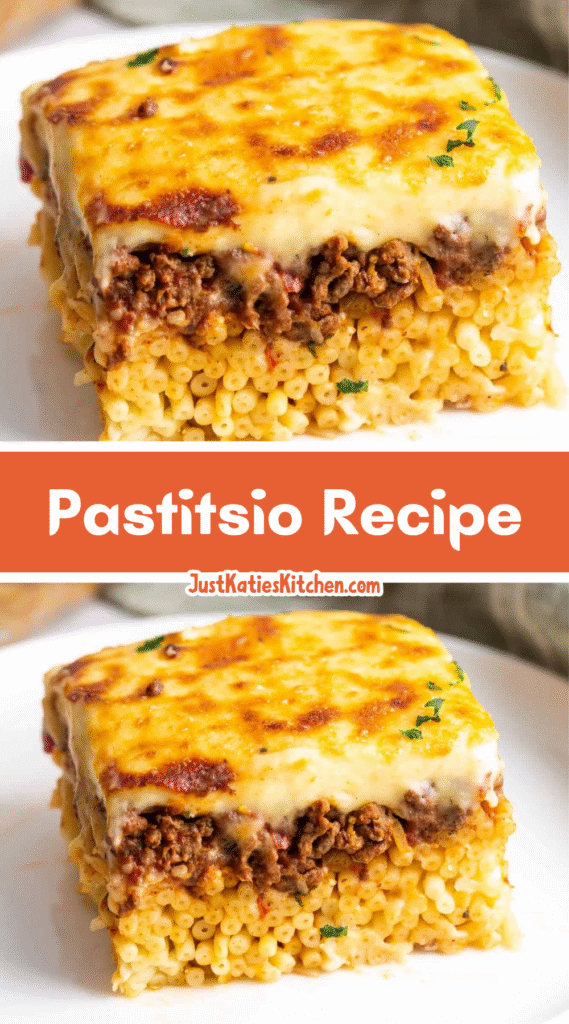
We’re talking layers upon layers of comfort: tubular pasta, a deeply flavored meat sauce kissed with cinnamon, sharp, salty cheese, and a luxuriously creamy béchamel blanket on top. It’s hearty, it’s elegant, and it’s absolutely unforgettable.
Why This Dish Feels Like a Hug
There’s something truly special about dishes that are passed down through generations. They carry stories in their ingredients and love in their method.
Pastitsio is one of those dishes. It’s the centerpiece at family gatherings, the star of holiday feasts, and the ultimate comfort food that welcomes everyone to the table.
Yes, it requires a little time and patience. But the result is so much more than just dinner. It’s an experience, a taste of pure, unadulterated Greek hospitality.
Ingredients Needed for the Recipe
Gathering these ingredients is the first step toward creating something magnificent. Here’s your shopping list for this culinary adventure.
• Ground Beef (3 lbs): The hearty foundation of our sauce. A good, lean sirloin works wonderfully, providing robust flavor without too much grease.
• Large Onion (1), chopped: The aromatic base that builds a sweet, savory depth in the meat sauce. Don’t rush sautéing it!
• Canned Tomato Sauce (2, 15-oz cans): Provides the saucy, tangy liquid that the meat simmers in for hours, becoming incredibly tender and flavorful.
• Ground Cinnamon (1 tbsp): The secret weapon! This is the signature flavor that makes Greek pastitsio unique. It adds a warm, complex sweetness that is not at all dessert-like.
• Coarse Kosher Salt: Essential for seasoning every layer. Its coarse grains distribute flavor better than fine table salt.
• Pastitsio Noodles (1 package): These are long, thick tubular pasta. Their structure is perfect for holding up to the heavy sauces. Mostaccioli is a great substitute if you can’t find them.
• Kasseri Cheese (½ lb or more), grated: This is the star cheese. It’s a Greek sheep’s milk cheese that’s sharp, salty, and melts beautifully. It’s absolutely worth seeking out.
• Eggs (4): They play two roles. One is mixed into the cooked pasta to help bind it, and three are used to enrich and thicken the béchamel sauce.
• Unsalted Butter (1 ½ sticks): The rich base for our béchamel sauce. Using unsalted allows you to control the salt level yourself.
• All-Purpose Flour (1 cup): Combined with the melted butter to create a roux, which will thicken our béchamel into a luxurious, creamy sauce.
• Whole Milk (5 ½ cups): The liquid base for the béchamel. Whole milk is non-negotiable for achieving that classic, rich creaminess.
Ingredient Substitutions
No kasseri cheese? Don’t let that stop you. While it provides an authentic flavor, a good quality grated Asiago cheese will bring a similar sharp, salty punch.
In a real pinch, a pre-shredded Italian cheese blend can work. You’ll lose some authenticity, but you’ll still end up with a wonderfully cheesy, delicious dish.
If pastitsio noodles are elusive, mostaccioli is your best bet. Avoid penne with ridges, as they can make the pasta layer too dense. The goal is smooth tubes that the sauce can slip into.
How to make Pastitsio (Greek Lasagna)?
This process is a journey, best broken down into stages. Embrace it! Making the sauce a day ahead is a brilliant strategy that makes assembly day a breeze.
Step 1: Building the Deeply Flavored Meat Sauce
Start this the day before you plan to bake. In a large pot, heat a drizzle of olive oil over medium heat. Add your chopped onion with a generous pinch of salt.
Cook until the onions are soft and translucent, but not browned. This sweetness is your foundation. Now, add the ground beef, breaking it up as it cooks until no longer pink.
Pour in the two cans of tomato sauce and add that glorious tablespoon of cinnamon. Give it a good stir, bring it to a gentle simmer, and then reduce the heat.
Step 2: The Simmer and The Wait
Partially cover the pot with a lid, leaving it slightly askew. Let this mixture stew for a full three hours, stirring occasionally. Yes, three hours!
This long, slow cooking is what transforms simple ingredients into something extraordinary. The flavors meld, the meat becomes fork-tender, and the sauce reduces into a thick, rich masterpiece.
Let it cool completely, then cover and refrigerate overnight. This rest period allows the flavors to develop even further.
Step 3: Prepping the Pasta and Cheese
On baking day, take your meat sauce out to come to room temperature. Bring a large pot of well-salted water to a boil for your pasta.
Cook the pastitsio noodles until they are just al dente, even a minute or two less than the package says. They will continue cooking in the oven.
Drain the noodles and let them cool just enough so you can handle them. In a large bowl, toss the warm noodles with one beaten egg. This helps create a cohesive base layer.
Step 4: Mastering the Béchamel Sauce
This seems fancy, but it’s straightforward. In a heavy-bottomed pot, melt one stick of unsalted butter over medium heat.
Whisk in the flour until it forms a smooth paste, a roux. Cook this for just a minute to get rid of the raw flour taste. Now, slowly pour in five cups of milk, whisking constantly.
Keep whisking until the mixture thickens and just begins to bubble. Remove it from the heat. In a separate bowl, whisk the remaining three eggs with the last half-cup of milk.
Step 5: Tempering for a Smooth Sauce
This is the key to avoiding scrambled eggs in your sauce! Slowly drizzle the egg and milk mixture into the warm béchamel, whisking vigorously the entire time.
Return the pot to medium-high heat. Continue to cook and whisk until the sauce becomes thick, creamy, and bubbly. Remove from heat and let it sit for a few minutes; it will thicken a bit more.
Step 6: The Grand Assembly
Preheat your oven to 350°F. Grab your largest baking dish—this makes a lot! Lightly grease the bottom.
Spread the egg-tossed noodles evenly in the dish. Sprinkle a full third of your grated cheese over the noodles. This creates a glorious cheesy barrier.
Next, using a slotted spoon to avoid excess liquid, spread all of the meat sauce over the cheese layer. Now, sprinkle another third of the cheese over the meat.
Step 7: The Finishing Touches
Carefully pour the warm béchamel sauce over everything, spreading it gently to the edges with a spatula. Sprinkle the remaining cheese evenly over the top.
Finally, melt the remaining half-stick of butter. Drizzle this melted butter all over the top cheese layer. This is the secret to that beautiful, golden-brown, crispy top.
Step 8: The Final Bake
Place the baking dish on a sheet pan to catch any potential bubbling over. Bake for one hour, or until the center is hot and the top is a deep, gorgeous golden brown.
If the top isn’t browned to your liking after an hour, turn on the broiler for just 2-3 minutes. Watch it like a hawk—it can burn in seconds!
This is the hardest part: let it rest for at least 10-15 minutes before cutting into it. This allows the layers to set, so you get a clean, beautiful slice.
Best Time to Serve This Dish
Pastitsio is the undisputed champion of make-ahead meals. It’s the perfect dinner party main because all the work is done beforehand.
It shines as a spectacular Sunday supper, filling the house with incredible aromas all afternoon. The leftovers, frankly, might be even better the next day.
This is also the ultimate dish to bring to a potluck or to a family who needs a meal. It travels well, serves a crowd, and feels incredibly special.
Tips
- A few insider secrets will ensure your pastitsio is legendary. Follow these for guaranteed success.
- Don’t skip the long simmer on the meat sauce. This is not the step to rush. It develops a depth of flavor that you simply cannot achieve any other way.
- When making the béchamel, constant whisking is your best friend. It prevents lumps and ensures a silky-smooth, luxurious sauce every single time.
- Let the baked pastitsio rest! Cutting into it too soon will cause the layers to slump. Waiting ensures those picture-perfect, distinct layers.
How to Store and Reheat
Leftovers are a precious commodity. Store cooled pastitsio covered tightly in the refrigerator for up to 4 days.
To reheat, the oven is best for reviving that crispy top. Cover with foil and warm at 350°F for about 20-30 minutes, until heated through.
For a single serving, the microwave works fine. Place a portion on a plate and heat in 60-second intervals, covering it loosely to prevent splatters.
Pairing Ideas
This is a rich, hearty dish, so you’ll want sides that provide a fresh contrast. A simple, crisp Greek horiatiki salad with tomatoes, cucumber, red onion, and olives is a classic choice.
Some crusty, warm bread is essential for mopping up every last bit of sauce from your plate. It’s a non-negotiable part of the experience.
For a drink, a medium-bodied red wine like a Agiorgitiko or a Sangiovese stands up to the rich meat and cheese flavors beautifully. Or, keep it simple with sparkling water with lemon.
So there you have it. Pastitsio is more than a recipe—it’s a project worth undertaking, a taste of Greece, and a surefire way to create a memorable meal. Yassou!
Pastitsio (Greek Lasagna) Recipe
Description
Easy one pan Spanish chicken and rice is made with simple seasoning that come together with zesty, bold flavors in this one pot, 30-minute meal. Perfect for busy weeknights, this dish combines juicy chicken, aromatic spices, and fluffy rice — all cooked in a single skillet for minimal cleanup and maximum flavor!
Ingredients
Spanish Seasoning Mix
For Garnish
Instructions
-
In a small bowl, whisk together all ingredients for the Spanish seasoning mix. Divide the mixture in half and set aside.
-
Cut the lemon in half. Thinly slice one half for garnish and reserve the other half for juicing.
-
Place chicken in a medium bowl. Drizzle with 2 tablespoons of oil and toss to coat. Rub half of the seasoning mix evenly onto both sides of each chicken piece.
-
Heat a large skillet over medium heat and drizzle with the remaining 1 tablespoon of oil. Add the chicken and cook for 2–3 minutes per side until golden brown. Remove from skillet and place on a plate (it will finish cooking later).
-
Add the rice, chicken broth, juice from half the lemon, and the remaining half of the seasoning mix to the same skillet. Stir to combine.
-
Return the chicken to the skillet, placing it on top of the rice mixture. Cover and reduce heat to low. Simmer for 20–25 minutes, or until the liquid is absorbed, rice is tender, and chicken is fully cooked (internal temperature of 165°F).
-
Remove from heat. Let sit covered for 5 minutes, then fluff rice with a fork.
-
Garnish with fresh chopped cilantro or parsley and lemon slices. Serve immediately.
Nutrition Facts
Servings 4
Serving Size 1 serving (chicken + rice)
- Amount Per Serving
- Calories 420kcal
- % Daily Value *
- Total Fat 15gg24%
- Saturated Fat 3gg15%
- Trans Fat 0gg
- Cholesterol 95mgmg32%
- Sodium 680mgmg29%
- Potassium 520mgmg15%
- Total Carbohydrate 38gg13%
- Dietary Fiber 2gg8%
- Sugars 2gg
- Protein 34gg68%
- Calcium 45mg mg
- Iron 3.2mg mg
* Percent Daily Values are based on a 2,000 calorie diet. Your daily value may be higher or lower depending on your calorie needs.
Note
- Chicken Thighs Option: For juicier, more flavorful results, use boneless chicken thighs instead of breasts.
- Rice Tip: Use long-grain white rice for best texture. Avoid instant rice as it may become mushy.
- Spice Level: Adjust chili powder to taste. For extra heat, add a pinch of cayenne pepper.
- Make it Creamy: Stir in 2–3 tablespoons of sour cream or Greek yogurt at the end for a richer finish.
- Leftovers: Store in an airtight container for up to 3 days. Reheat with a splash of broth to refresh the rice.
Frequently Asked Questions
Can I use brown rice instead of white rice?
Yes, but note that brown rice takes longer to cook (about 40–45 minutes) and requires more liquid. Use 3 cups of broth and extend simmer time, keeping the skillet covered and checking for doneness.
Can I make this in advance?
Absolutely! Cook as directed, cool, and refrigerate for up to 3 days. Reheat gently on the stove with a splash of broth to prevent drying out.
Is this recipe gluten-free?
Yes! This recipe is naturally gluten-free as long as your chicken broth is certified gluten-free. Always check labels to be sure.
What can I serve with Spanish chicken and rice?
Great pairings include a simple green salad, roasted vegetables, garlic bread, or avocado slices for a fresh contrast.