

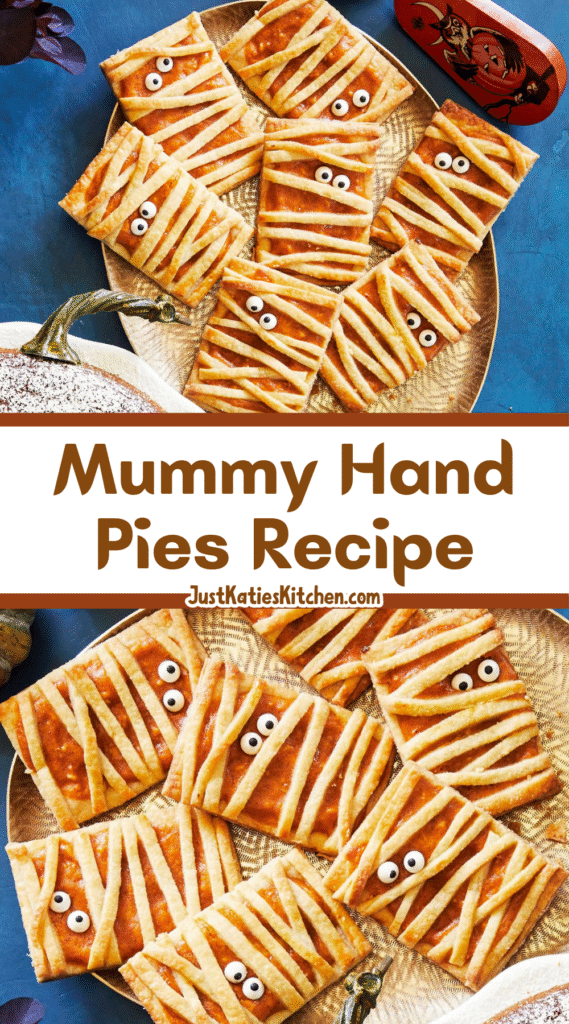
There’s something magical about a dessert that tells a story. These mummy hand pies aren’t just a treat; they’re a tiny, edible performance.
Imagine unrolling a pastry bandage to reveal a sweet, spooky surprise inside. It’s a project, a conversation starter, and a delicious payoff all rolled into one.
This is the kind of baking that feels more like play than work. You get to be a sculptor, a painter, and a pastry chef all at once.
Why These Hand Pies Are a Halloween Must-Make
Let’s be honest, Halloween baking can be intimidating. But this recipe is different. It’s forgiving, fun, and deeply satisfying.
You aren’t chasing perfection here. In fact, the more ragged and uneven your “bandages” are, the more authentic your mummy looks.
It’s a fantastic activity to do with others. Assign tasks, laugh at the lopsided faces, and create a memory that’s just as sweet as the dessert itself.
Ingredients Needed for the Recipe
Gathering your components is the first step in this delicious adventure. Here’s what you’ll need to bring your mummies to life.
For the Dough:
• Pastry for a 9″ double-crust pie: This is your blank canvas. A homemade or store-bought version both work beautifully. A pro tip is that a pastry made with shortening tends to be a bit sturdier, which helps the delicate mummy wrappings hold their shape better during their baking transformation.
For the Fillings (The Mummy’s Guts!):
• 1/2 cup strawberry jam or cherry pie filling: The jam offers a classic, fruity sweetness. Cherry pie filling, with its deep red color, is the ultimate gory effect for a truly spooky mummy. It’s all about the visual drama.
• 1/4 cup Baker’s Cinnamon Filling mixed with 1 tablespoon water: This creates a warm, gooey cinnamon center that’s like the soul of a snickerdoodle cookie, wrapped up in pastry. It provides a lovely contrast to the fruit.
For Assembly (The Embalming Process):
• 1 large egg mixed with 1 tablespoon water: This is your edible glue. It’s crucial for sealing the dough strips to the base, ensuring your mummy doesn’t unravel in the oven.
• Melted butter: A simple brush of butter before baking gives the pastry a gorgeous, golden-brown sheen and helps the sugar stick.
• Coarse sparkling sugar or cinnamon sugar: This isn’t just for sweetness; it’s for texture and identity. The sparkly sugar on the jam pies and the cinnamon sugar on the cinnamon pies makes it easy to tell them apart.
• Sugar eyes: The pièce de résistance! These edible candy eyes are widely available and add an instant, playful personality to each creation. Don’t add them until after baking, or they might melt into a blind mummy.
How to make Mummy Hand Pies?
The fun is about to begin. Clear a space, dust your rolling pin with flour, and let’s get wrapping.
Step 1: Preheat and Prepare Your Workspace
Start by preheating your oven to 400°F. This ensures it’s perfectly hot and ready when your mummies are assembled.
Line a baking sheet with parchment paper. This little step is a lifesaver, preventing any sticky fillings from cementing themselves to the pan and making cleanup a breeze.
Step 2: Roll and Cut Your Mummy Bases
Take half of your prepared dough and roll it out on a lightly floured surface. Aim for a large rectangle, roughly 9 by 13 inches, and just a bit thinner than 1/4-inch.
You’re not looking for perfection here. A rustic, hand-shaped rectangle is perfectly charming. Use a sharp knife or a pastry wheel to cut out four rectangles, each about 5 by 2 inches.
Step 3: Create the Bandages
Now, gather all the dough scraps from your cutting. Combine them with the other half of your dough and roll it out again, this time much thinner—about 1/8-inch thick.
This thin layer is what will become your mummy wrappings. Use a pizza cutter or pastry wheel to slice the dough into a pile of thin, uneven strips, roughly 1/4-inch wide. Their imperfect, ragged edges are exactly what you want.
Step 4: Fill Your Mummy Bases
Lay out your eight dough rectangles on the prepared baking sheet. You’re going to create two different teams of mummies.
For the jam-filled ones, place a generous 2-tablespoon scoop right in the center of four rectangles. Gently spread it out, leaving a small, clean border around the edges.
For the cinnamon-filled team, use about a tablespoon of your prepared cinnamon filling on the remaining four rectangles. Again, keep that border clear.
Step 5: The Art of the Wrap
This is where the magic happens. Take your pastry brush and carefully paint the egg wash onto the bare edges of every single rectangle. This is your adhesive.
Now, grab your pile of dough strips. Tear or cut them into random lengths, from 2 to 4 inches long. Start laying them diagonally across the filling, pressing the ends firmly into the egg-washed edges.
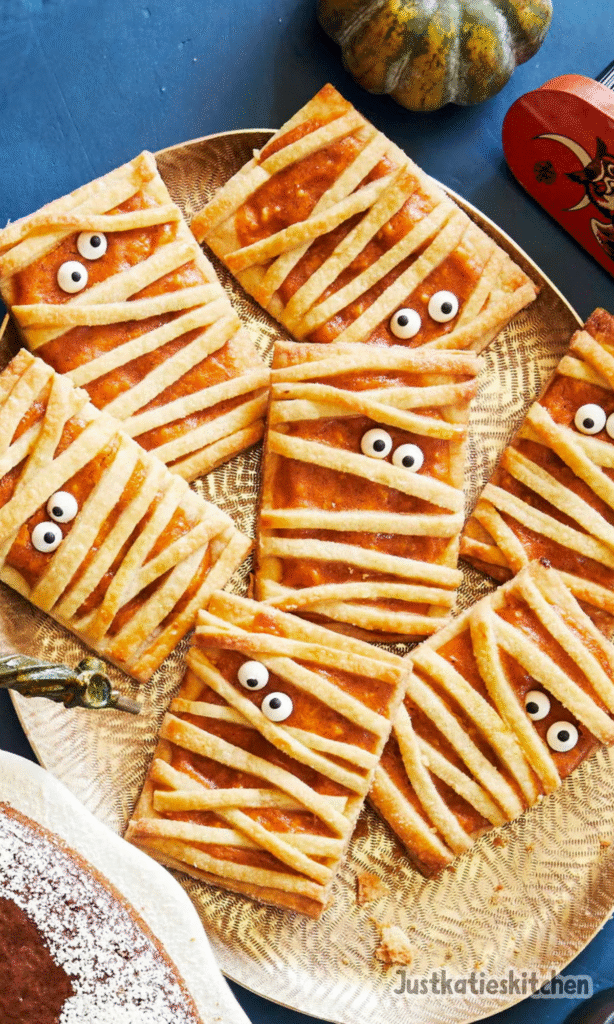
Layer them haphazardly, crisscrossing them and leaving small gaps. Remember to leave a little space near the top of the pie for where the eyes will go later. This controlled chaos is what creates the perfect mummy texture.
Adding the Final Spooky Touches
Once your mummies are securely wrapped, it’s time for their final pre-bake preparations. This is where they get their signature sparkle.
Give the tops a light but thorough brushing with the melted butter. This will help them achieve a beautiful golden color as they bake.
Now, for the sugar. Generously sprinkle the cinnamon-filled mummies with cinnamon sugar. Then, give the jam-filled mummies a coating of coarse sparkling sugar. You’ll see the difference immediately.
Bake to Golden Perfection
Slide the baking sheet into your preheated oven. Bake for 20 to 25 minutes. You’re waiting for that perfect moment when the pastry turns a lovely golden brown and the filling might just be starting to bubble sneakily through a gap.
The smell that will fill your kitchen is absolutely divine—a warm, buttery, and spiced aroma that signals something wonderful is happening.
The Grand Reveal
When the timer goes off, pull out your beautifully baked mummy hand pies. They should be gloriously golden. Immediately transfer the entire baking sheet to a wire rack to cool.
This is the most important step. While the pies are still warm, gently press the sugar eyes into the space you left for them. The slight warmth will help them adhere perfectly.
And there they are. Your mummy hand pies are complete, each with its own unique expression and character. Let them cool slightly before serving, as the fillings will be lava-hot.
Tips
- If you don’t have Baker’s Cinnamon Filling, don’t worry. Simply mix together 4 teaspoons of softened butter, 1/4 cup of brown sugar, and 1 1/2 teaspoons of ground cinnamon. This creates a fantastic, spreadable substitute that works like a charm.
- When applying the dough strips, don’t be afraid to really press the ends into the egg-washed base. A good seal prevents the strips from peeling back during baking.
- For the most dramatic “blood” effect, cherry pie filling is your best friend. The dark red jam oozing through the pastry bandages is a wonderfully gory touch that kids absolutely adore.
How to Store and Reheat
If, by some miracle, you have leftovers, they store beautifully. Let them cool completely first, then place them in a single layer in an airtight container.
They’ll keep at room temperature for a couple of days. For longer storage, freeze them on a parchment-lined sheet until solid, then transfer to a freezer bag.
To reheat, pop a frozen or room-temperature pie into a 350°F oven or toaster oven for about 5-10 minutes. This will crisp the pastry back up beautifully. The microwave will work in a pinch, but it will make the pastry soft.
Best Time to Serve This Dish
These hand pies are the undisputed star of any Halloween party. They make a fantastic centerpiece for a dessert table, arranged on a rustic platter maybe with a little extra cobweb decoration.
But their appeal isn’t limited to just one night. They are a perfect after-school project and treat in the week leading up to Halloween, building that delicious anticipation.
Consider them for a “Boo Breakfast” on Halloween morning. They’re a fun and festive way to start a day full of magic and make-believe.
Ingredient Substitutions
The beauty of this recipe is its flexibility. Don’t feel locked in by the suggested fillings. This is your chance to get creative.
For a nutty twist, a thick frangipane (almond cream) would be incredible. A smooth chocolate-hazelnut spread is always a crowd-pleaser. You could even use a prepared apple pie filling for a classic autumnal flavor.
If you can’t find sugar eyes, you can make your own with a tiny dab of icing and a chocolate chip or two. It’s a bit more work, but the homemade charm is undeniable.
Flavor Variations
Why stop at two fillings? Create a whole mummy army with different personalities. A combination of raspberry jam and dark chocolate chips creates a decadent, rich flavor.
For an adults-only version, consider adding a pinch of cayenne pepper to the cinnamon sugar for a surprising, warm kick. Or, mix a teaspoon of orange zest into the jam filling for a brighter, more complex fruit flavor.
You could also play with the dough itself. A dash of cocoa powder in half the dough would create spooky chocolate mummies, perfect for mixing and matching with the classic pastry.
Baking should be an adventure, and these mummy hand pies are a perfect expedition into the world of playful, thematic treats. They remind us that food is more than fuel; it’s a way to create joy, tell a story, and make an ordinary day feel a little bit enchanted.
Mummy Hand Pies Recipe
Description
No tricks, just treats! These Mummy Hand Pies are a fun, festive Halloween dessert that’s as delicious as it is adorable. Flaky pie dough is filled with either spiced cinnamon sugar or jam (blood-red cherry or strawberry for extra spookiness!), then wrapped in thin pastry “bandages” and baked until golden. Top with sugar eyes for a playful mummy face that’s sure to delight kids and adults alike!
ingredients
Dough
Filling
For Assembly
Instructions
-
Preheat oven to 400°F (204°C). Line a baking sheet with parchment paper.
-
Roll out half the pie dough into a 9" x 13" rectangle, about ¼" thick. Cut four 5" x 2" rectangles and place on the baking sheet. Repeat with remaining dough for 8 total rectangles.
-
Gather dough scraps, reroll to ⅛" thick, and cut into ¼"-wide strips (2"–4" long). Set aside.
-
For jam-filled pies: Spoon 2 tbsp jam onto the center of 4 rectangles, leaving a ⅛" border.
-
For cinnamon-filled pies: Mix cinnamon filling with 1 tbsp water (or use homemade: 4 tsp softened butter + ¼ cup brown sugar + 1½ tsp cinnamon). Spoon 1 tbsp onto each of the remaining 4 rectangles, leaving a border.
-
Brush egg wash along the bare edges of each rectangle.
-
Lay dough strips across the filling at varied angles to create a mummy wrap effect. Press ends onto egg-washed edges to seal. Leave a small gap near the top for eyes.
-
Trim excess dough. Lightly brush tops with melted butter. Sprinkle cinnamon pies with cinnamon sugar and jam pies with sparkling sugar.
-
Bake 20–25 minutes until golden brown. Cool on a rack.
-
While still warm, press 2 sugar eyes onto each pie in the reserved space. Serve once cooled slightly.
Nutrition Facts
Servings 8
Serving Size 1 hand pie
- Amount Per Serving
- Calories 290kcal
- % Daily Value *
- Total Fat 13g20%
- Saturated Fat 6g30%
- Cholesterol 45mg15%
- Sodium 210mg9%
- Potassium 90mg3%
- Total Carbohydrate 42g15%
- Dietary Fiber 1g4%
- Sugars 22g
- Protein 3g6%
- Calcium 20 mg
- Iron 1 mg
* Percent Daily Values are based on a 2,000 calorie diet. Your daily value may be higher or lower depending on your calorie needs.
Note
- Make ahead: Assemble unbaked pies and freeze on a tray. Once solid, transfer to a freezer bag. Bake from frozen, adding 3–5 minutes to bake time.
- Shortening tip: Dough made with shortening (vs. all-butter) holds bandage shapes better during baking.
- Gluten-free? Use your favorite gluten-free pie crust recipe—ensure it’s pliable enough to roll and cut.
- Kid-friendly: Let children arrange the bandages and add eyes—great for Halloween baking fun!
Frequently Asked Questions
Can I use store-bought pie crust?
Yes! Use two sheets of store-bought crust (thawed if frozen). Shortening-based crusts work best for clean bandage lines.
How do I store leftovers?
Store at room temperature, loosely covered, for up to 2 days. For longer storage, freeze in an airtight container for up to 1 month.
Can I make these dairy-free?
Absolutely! Use dairy-free pie dough, egg wash substitute (like plant-based milk), and vegan butter for brushing.