

The first time I made mini pavlovas, I was fully expecting them to fail. Meringue always sounded like one of those things that only professional bakers could pull off without crying into a mixing bowl. But I wanted something light, pretty, and a little different from the usual cakes I tend to fall back on.
What came out of the oven that day completely surprised me. Crisp little shells with soft, marshmallowy centers. Not overly sweet. Not heavy. Just airy and delicate and honestly kind of magical.
Now I make them whenever I need a dessert that feels special but doesn’t actually require complicated work. They look fancy. They taste incredible. And they are way easier than they appear.
Why I Keep Coming Back to These
There is something about the texture that gets me every time. The outside has this fragile crunch that gives way to a soft center that almost melts. Add whipped cream and fruit and suddenly you have balance. Sweet, creamy, fresh, and light all at once.
I also love that they are naturally portioned. No slicing. No worrying about presentation. Everyone gets their own little dessert and somehow that makes people extra happy.
They are the kind of thing I make the night before guests come over, leave in the oven overnight, and finish the next day while pretending I planned everything far in advance.
Ingredients I Used for the Recipe
- 4 large egg whites – this is the base of the meringue and what creates that fluffy structure.
- 1/4 teaspoon cream of tartar – helps stabilize the egg whites so they whip up strong and hold their shape.
- 1 teaspoon vanilla extract – adds a soft warmth so the pavlovas don’t taste flat.
- 2/3 cup granulated sugar – sweetens and gives the meringue its glossy, crisp finish.
- 1 1/2 teaspoons cornstarch – keeps the centers soft and slightly chewy instead of dry.
- 1 1/4 cups heavy whipping cream – whipped for the topping, bringing richness to balance the light shells.
- 1/3 cup powdered sugar – sweetens the cream without making it grainy.
- 1 teaspoon vanilla extract – stirred into the whipped cream for extra flavor.
- Fresh fruit like strawberries, blueberries, raspberries, kiwi, or mango – adds freshness and color.
- Optional toppings like mint, chopped pistachios, or toasted coconut – for a little texture and personality.
How to make Starbucks Medicine Ball Recipe?
Step 1 – Separate the Eggs Carefully
I always separate the eggs while they are still cold because it is easier to keep the yolks from breaking. Even a tiny bit of yolk can ruin the whipping process, so I take my time here.
Once separated, I let the whites sit for about 15 minutes to come to room temperature. They whip up much better this way.
Step 2 – Start Whipping the Base
I add the egg whites and cream of tartar to a clean, completely dry bowl. Then I beat them until they start to look foamy and form soft peaks.
This is where patience matters. Rushing makes the texture weird later.
Step 3 – Add Sugar Slowly
With the mixer running, I sprinkle in the sugar a little at a time. Not dumping. Sprinkling. This helps it dissolve properly and keeps the mixture smooth and glossy.
After a few minutes, it turns thick and shiny. When I lift the beaters and the peaks stand straight up, I know it is ready.
Step 4 – Fold in the Cornstarch
I gently fold in the cornstarch using a spatula. No aggressive stirring. Just slow folding so I don’t deflate all that air I worked to build.
Step 5 – Shape the Mini Pavlovas
I spoon the mixture onto a parchment lined baking sheet into little mounds, about 3 to 4 inches wide. Then I use the back of a spoon to make a shallow dip in the center.
That little indent becomes the perfect spot for whipped cream later.
Step 6 – Bake Low and Slow
They bake at a low temperature for about an hour. The goal is to dry them out, not brown them.
When the timer ends, I turn the oven off and leave the door closed. No peeking. Letting them cool slowly inside the oven keeps them from cracking.
Step 7 – Let Them Rest
I usually leave them in there for at least an hour, sometimes overnight. This is one of those rare desserts that actually benefits from being ignored.
Step 8 – Add Whipped Cream and Toppings
I whip the cream, powdered sugar, and vanilla until soft and fluffy. Then I spoon it into each pavlova and pile on fresh fruit.
They are best served shortly after assembling so everything stays crisp and light.
What I Learned After Making These More Times Than I Can Count
The first time I made them, I overmixed the egg whites because I thought thicker meant better. It does not. Overbeaten meringue turns grainy and refuses to behave.
Now I stop mixing as soon as the peaks hold. Learning when to stop was honestly the biggest improvement.
I also learned humidity matters. On really humid days they take longer to dry out, so I just plan ahead and give them extra cooling time in the oven.
Another thing I didn’t expect was how forgiving they are when it comes to shape. They do not need to look perfect. Rustic ones actually look prettier once topped with cream and fruit.
Tips
Make sure your bowl is completely clean before whipping the egg whites. Any grease at all will keep them from fluffing properly.
Add the sugar slowly. This is not the step to rush. Slow addition creates that smooth, marshmallow texture inside.
Do not open the oven while they bake or cool. Sudden temperature changes can cause cracking or collapsing.
You can make the shells a day or two ahead and store them in an airtight container. I do this all the time when I want to get dessert out of the way early.
If you want the whipped cream to hold longer, you can mix in a little mascarpone. It stays stable without changing the flavor much.
Top them right before serving whenever possible. That keeps the crisp exterior from softening too soon.
And don’t stress about perfection. Pavlovas are supposed to look a little natural and uneven. That is part of their charm.
Every time I set these out, people assume they took way more effort than they did. I just smile and accept the compliment. These are one of those desserts that quietly make you look like you know exactly what you’re doing, even if you were doubting yourself the whole time.
That is probably why I keep making them. They are simple, a little elegant, and somehow always feel like a small win.
Mini Pavlova Recipe
Description
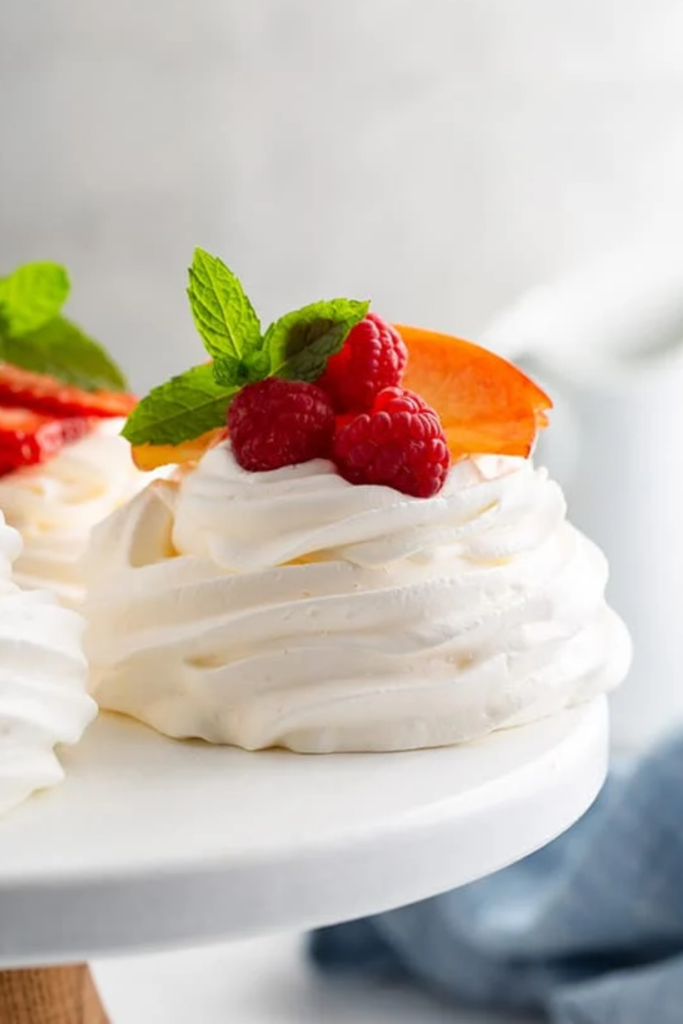
This Mini Pavlova recipe is as delicious as it is beautiful! A light, whipped meringue mixture baked then topped with whipped cream and fresh berries. It has a delicate, crisp exterior with a marshmallow-like center. It's everyone's favorite dessert!
ingredients
Meringue
Whipped Cream Topping
Decorative Topping Ideas
Instructions
-
Separate Eggs
Use cold eggs to separate yolks from whites (easier when cold). Measure exactly 130ml of egg whites. Ensure NO yolk gets into whites or they won't whip properly.Tip: Save yolks for custard or lemon curd! -
Bring to Room Temperature
Set egg whites aside to come to room temperature, about 15 minutes. Room temperature whites whip to fluffier volume than cold ones. -
Prepare Pan
Preheat oven to 225°F (110°C). Line an 18×13 inch half sheet pan with parchment paper or silicone baking mat. Use a dot of whipped meringue to 'glue' parchment to the pan. -
Beat Egg Whites
In a clean, dry bowl, beat egg whites and cream of tartar on high speed 1-2 minutes until soft peaks form. With mixer running, add vanilla, then gradually add sugar over ~5 minutes. Continue mixing until glossy stiff peaks form (1-4 more minutes). Stop when peaks stand straight to avoid over-beating.Stiff peaks = mixture holds shape when beaters are lifted -
Fold in Cornstarch
Gently fold cornstarch into meringue using a rubber spatula until just combined.Fold gently to maintain airiness -
Shape Pavlovas
Divide mixture into 6 mounds on prepared baking sheet. Use back of spoon to smooth each into a 3½-inch wide dome with flat top. Create a shallow indent in the center of each for filling.Or pipe using a piping bag with large round tip -
Bake & Cool
Bake at 225°F (110°C) for 60 minutes. DO NOT open oven door. Turn oven off and let pavlovas cool completely inside oven, at least 1-2 hours or up to overnight.Critical: Opening door causes cracking! -
Prepare Whipped Cream
Whip heavy cream, powdered sugar, and vanilla until fluffy peaks form.Keep cream cold for best results -
Assemble & Serve
Gently lift pavlovas with metal spatula onto serving plates. Spoon whipped cream into indent, top with fresh fruit and garnishes. Serve immediately or refrigerate up to 30 minutes.Edges are delicate—handle from bottom
Nutrition Facts
Servings 6
Serving Size 1 mini pavlova
- Amount Per Serving
- Calories 299kcal
- % Daily Value *
- Total Fat 18gg28%
- Saturated Fat 11gg56%
- Trans Fat 0gg
- Cholesterol 47mgmg16%
- Sodium 52mgmg3%
- Potassium 82mgmg3%
- Total Carbohydrate 31gg11%
- Dietary Fiber 0gg0%
- Sugars 29gg
- Protein 4gg8%
- Calcium 31mg mg
- Iron 0.2mg mg
* Percent Daily Values are based on a 2,000 calorie diet. Your daily value may be higher or lower depending on your calorie needs.
Note
- Make Ahead: Store baked unfilled meringues in airtight container in cool, dry place up to 2 days. Fill just before serving.
- Stabilize Cream: Fold ⅓ cup (76g) mascarpone into whipped cream to hold up to 2 hours ahead without weeping.
- Large Pavlova: Shape as one 8-inch round; bake 75-90 minutes, cool same way.
- Humidity Warning: Meringues absorb moisture—store in dry place. Avoid making on rainy days if possible.
- Gluten-Free: Naturally gluten-free! Just verify all add-ins (like extracts) are GF-certified if needed.
Frequently Asked Questions
Why did my pavlova crack?
Cracking usually happens from opening the oven door during baking/cooling, rapid temperature changes, or over-beating the meringue. Always let pavlovas cool completely inside the turned-off oven with the door closed.
Can I make these ahead of time?
Yes! Bake the meringue shells up to 2 days ahead and store unfilled in an airtight container at room temperature. Add whipped cream and fruit just before serving (or up to 30 minutes ahead if you stabilize the cream with mascarpone).
What if I don't have cream of tartar?
You can substitute with ½ teaspoon lemon juice or white vinegar per ¼ tsp cream of tartar. It helps stabilize the egg whites, so don't skip it entirely.
Can I use a different sweetener?
Granulated sugar is essential for proper meringue structure. Powdered sugar contains cornstarch which can affect texture, and liquid sweeteners won't whip properly. For best results, use regular granulated sugar.