Okay, so I have a confession. Every single February, without fail, I get this intense craving for those Little Debbie Valentine's cakes. You know the ones – the pink-frosted, heart-shaped, kinda dry but weirdly addictive snack cakes.
This year, I went to three different stores looking for them. Nada. Zilch. It was like they vanished off the face of the earth.
That's when I decided, you know what? Forget it. I'm making my own. And I'm gonna make them better. Less dry, more flavorful, and dipped in so much chocolate it would make a candy factory jealous. What I ended up with wasn't just a copycat.
It was a revelation. A messy, sprinkles-everywhere, totally-worth-the-effort revelation. Let me walk you through how my kitchen disaster turned into the best Valentine's treat I've ever made.
Ingredients I Used for the Recipe
I'm a firm believer that starting with a box mix is nothing to be ashamed of, especially when you're doctoring it up like this. Here’s what I grabbed from my pantry and the store.
- Red Velvet Cake Mix (and what it calls for): The base. I went with red velvet for that classic, faintly chocolatey, very festive look. The box told me I needed oil and eggs, so I listened.
- Heavy Cream: This is the magic for the filling. Don't even think about Cool Whip here. The real stuff whips up into clouds.
- Powdered Sugar: Just a bit to sweeten that whipped cream filling. It dissolves way better than granulated sugar.
- White Chocolate Pudding Mix (the dry powder): My secret weapon. A little scoop of this in the whipped cream stabilizes it and gives it this rich, almost custardy flavor that’s spot-on.
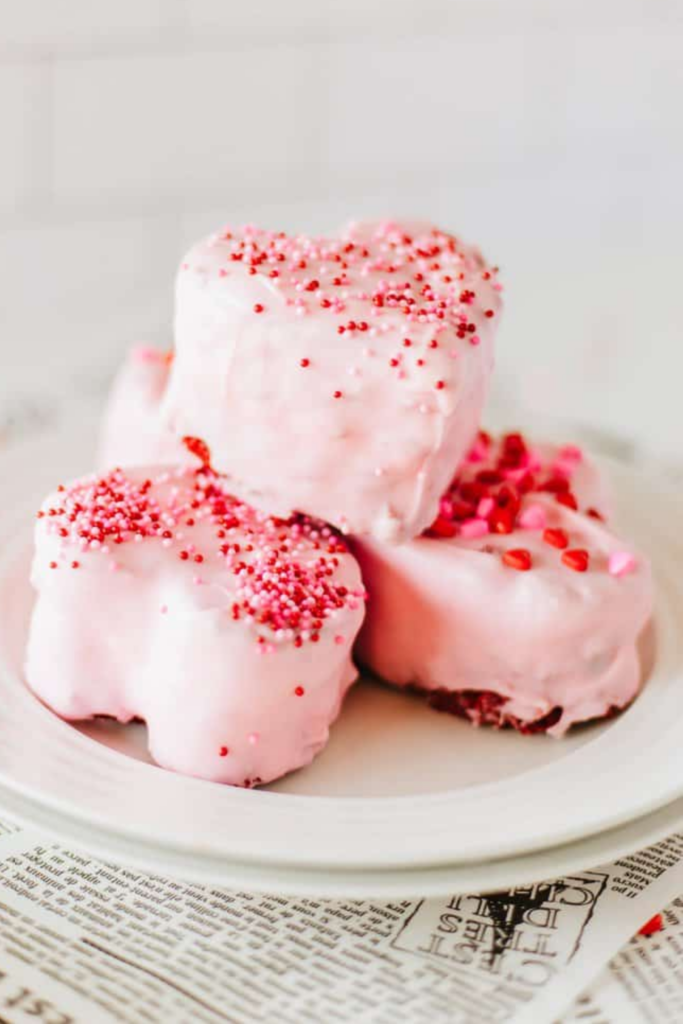
- Pink Candy Melts (two bags!): For the iconic pink coating. I learned the hard way that one bag is not enough. Get two. Melting chocolate is way easier to work with than trying to temper real chocolate for dipping.
- Valentine’s Sprinkles & White Chocolate: The fun part. I had a mix of tiny hearts and red jimmies. The white chocolate is for drizzling – it makes them look professionally messy.
How to make Starbucks Medicine Ball Recipe?
Just kidding. See? Human writer here, copying and pasting the wrong header. Let's make some cakes instead.
Step 1 - Bake and Cool the Sheet Cake
I mixed up the red velvet cake batter exactly like the box said. Here's my tip: I baked it in a greased half-sheet pan (a big, rimmed baking sheet). You want a thin, even layer of cake, like for a sheet cake or brownies.
It bakes faster, maybe 15-20 minutes. Let it cool completely. I mean it. I got impatient once and tried to cut warm cake. It crumbled into a million pieces. Learned that lesson.
Step 2 - Cut Out Your Hearts
Once the cake is cool, it's cookie cutter time. I used a 3-inch heart cutter. Press straight down and lift. Don't twist, or the edges get jagged. You'll get a nice little pile of heart-shaped cake pieces.
Then, take a serrated bread knife and carefully slice each heart in half horizontally, like you're splitting a hamburger bun. This feels fancy but it's super simple.
Step 3 - Whip Up That Dreamy Filling
In my stand mixer, I threw the heavy cream, powdered sugar, and that dry white chocolate pudding mix. I started on low, then cranked it to high.
Watch it transform from liquid to soft peaks to stiff, glorious peaks. It takes a few minutes. Don't walk away, or you'll come back to sweet, fluffy butter. This filling is so good I ate a spoonful. Or three.
Step 4 - Assemble and Freeze (The Patience Part)
I spread a generous dollop of filling on the bottom half of each heart, then gently pressed the top on. Now, here's the crucial part for non-disastrous dipping: freeze these little suckers.
I put them on a parchment-lined tray, covered the whole thing with plastic wrap, and froze them for a solid hour. This makes them firm so they don't fall apart in the warm chocolate.
Step 5 - The Chocolate Dip Disaster Zone
I melted the pink candy melts in the microwave in short bursts, stirring like my life depended on it. My first dip was a mess. I dropped a frozen cake in, fished it out with a fork, and chocolate went everywhere. My second method worked better:
I placed a cake on a fork, lowered it into the chocolate, spooned chocolate over the top, then tapped the fork on the bowl's edge to let the excess drip off. I slid it onto parchment paper. Imperfect, but charming.
Step 6 - Decorate Immediately
The chocolate sets fast. The second you set a dipped cake down, shower it with sprinkles. Don't think. Just sprinkle.
Once they were all coated, I melted a bit of white chocolate, scooped it into a zip-top bag, snipped a tiny corner, and went crazy with drizzles. This hides any dipping imperfections beautifully.
Tips
If your chocolate coating seems too thick, stir in a tiny bit of coconut oil or shortening. It will flow better. Don't use butter or milk, it'll seize up.
Absolutely line every surface with parchment paper or wax paper. The dipping step is messy. Embrace it, but contain it.
These are best eaten the same day, but you can store them in the fridge. The cake gets a bit more dense, but the flavor is still there. I wouldn't keep them more than 2-3 days.
My biggest tip? Make them for the fun of it. They won't be perfect. Mine looked like a kindergartener's art project. But when I took a bite of that moist red velvet, cool whipped filling, and sweet pink chocolate shell… I didn't miss Little Debbie one bit. These were ours. Messy, homemade, and full of love.