

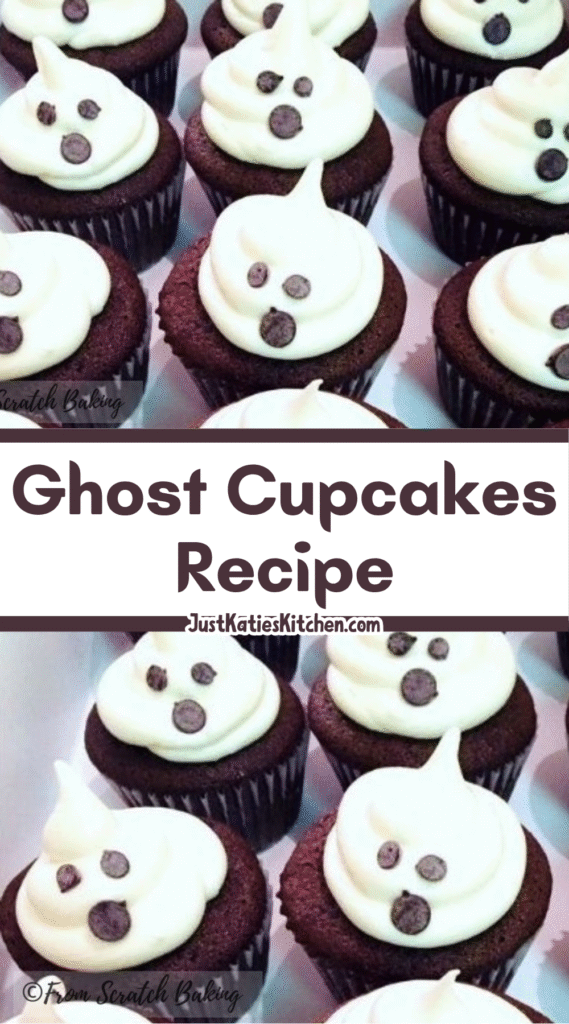
Picture this: a platter of adorable, slightly spooky cupcakes, each one topped with a friendly little ghost made entirely of frosting. They’re the kind of treat that makes both kids and adults stop in their tracks, a perfect blend of creepy and cute that just screams Halloween.
Now, you might be thinking that these look like they require some serious pastry chef skills. But here’s the secret: they’re deceptively simple. We’re starting with a little shortcut—a boxed cake mix—but we’re going to doctor it up with a couple of special ingredients that will have everyone asking for your recipe.
The magic is in the transformation. With a simple piping technique and a handful of mini chocolate chips, a humble chocolate cupcake becomes a ghostly apparition. The result is a dessert that’s as fun to make as it is to eat, guaranteed to be the star of any Halloween spread.
Ingredients Needed for the Recipe
Let’s gather our ghostly crew. The beauty of this recipe is that it uses a simple box mix as a foundation, but the additions are what make it truly special and memorable.
For the Cupcakes:
- Devil’s Food Cake Mix: This provides the deep, dark chocolate base. Its specific blend of cocoa and leavening gives us a fluffy yet rich cupcake without any guesswork.
- Brewed Coffee, Cooled: This is the secret weapon. You won’t taste the coffee itself; it just amplifies the chocolate flavor, making it taste richer and more complex.
- Salted Butter, Melted: Replacing the oil often called for on the box adds a wonderful, rich flavor and helps create a more tender crumb.
- Large Eggs: They provide structure and richness, helping to bind everything together for a perfect cupcake texture.
- Mini Chocolate Chips: These little pockets of melted chocolate scattered throughout the cake are a delightful surprise. Their small size ensures they don’t all sink to the bottom.
For the Frosting:
- Salted Butter, Slightly Softened: This is the base of our ghostly figures. It needs to be cool but pliable—think the texture of cold ice cream—so it can hold a stiff, piped shape.
- Powdered Sugar: It sweetens and stabilizes the buttercream, giving the frosting its body and making it pipeable.
- Vanilla Extract: A must for any good buttercream, it provides a warm, sweet aroma that perfectly complements the chocolate.
- Heavy Cream: Just a couple tablespoons are used to slightly loosen the frosting, making it fluffy and easy to pipe while still holding its shape.
- Mini Chocolate Chips, for Decorating: These become the ghost’s eyes. Their tiny size is just right for creating an expressive, cute face.
How to make Ghost Cupcakes?
This is where the fun begins. We’ll build our cupcakes from the bottom up, creating a moist, chocolaty base before bringing our friendly ghosts to life.
Step 1: Preparing Your Kitchen and Batter
First, preheat your oven to 350°F. This is a crucial first step—a properly heated oven is what gives our cupcakes that perfect initial rise. Line two standard muffin tins with 24 paper liners.
In a large bowl, combine the devil’s food cake mix, cooled brewed coffee, melted (and slightly cooled) butter, and the three eggs. The reason we cool the coffee and butter is to prevent them from accidentally cooking the eggs when we mix everything together.
Step 2: Mixing and Baking to Perfection
Now, beat the mixture with an electric mixer on medium speed for a full two minutes. This might seem like a long time, but it’s essential for incorporating air into the batter, which gives the cupcakes a light and airy texture.
After two minutes, turn off the mixer and gently stir in the half-cup of mini chocolate chips with a spatula. This ensures they’re evenly distributed without getting pulverized by the beaters. Spoon the batter into the prepared liners, filling each one about halfway.
Step 3: The Crucial Baking Stage
Slide the pans into your preheated oven and bake for about 18 to 20 minutes. Start checking at the 18-minute mark. You’ll know they’re done when a toothpick inserted into the center of a cupcake comes out with just a few moist crumbs attached.
Let the cupcakes cool in the pans for exactly 5 minutes. This allows them to firm up enough to handle without falling apart. Then, carefully transfer them to a wire rack to cool completely. Frosting a warm cupcake is a recipe for a melted, messy ghost.
Step 4: Creating the Ghostly Buttercream
While the cupcakes cool, let’s make the frosting. In a large bowl, beat the slightly softened butter with a mixer on medium speed until it’s smooth, pale, and creamy. This should take about two minutes. Don’t rush this step—creamy butter is the foundation of a fluffy frosting.
Reduce the mixer speed to low and gradually add the powdered sugar. I mean it—gradually! Adding it all at once will result in a sugary cloud erupting from your bowl. Once all the sugar is incorporated, beat in the vanilla extract.
Step 5: Finishing the Frosting Base
Now, increase the mixer speed back to medium and beat for two full minutes. You’ll see the frosting become noticeably lighter in color and texture. This is what we want.
Turn the mixer to low again and gradually beat in the two tablespoons of heavy cream. Once it’s in, crank the speed back up to medium for one final, glorious minute of beating. Your frosting should be incredibly fluffy, stiff, and ready to hold the shape of our spectral friends.
Step 6: Bringing the Ghosts to Life
Spoon all of the frosting into a large pastry bag fitted with a large, round piping tip. If you have one, an Ateco #807 tip is perfect for this. If you don’t have a piping bag, see the tip section for a clever workaround.
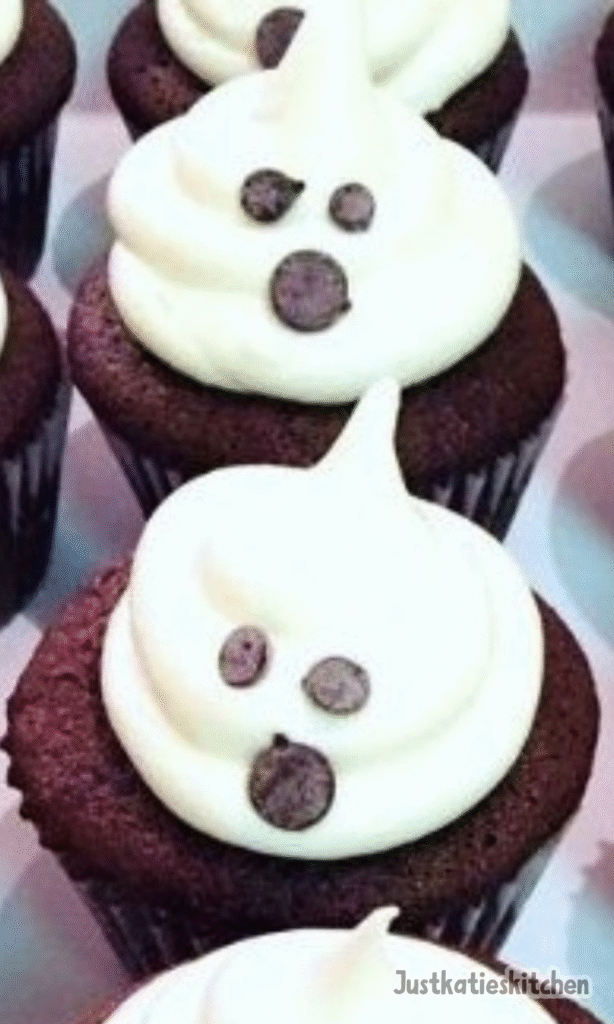
Hold the bag perpendicular to the top of a completely cooled cupcake. To form the ghost, pipe three flat, round dollops directly on top of each other. Start with the base dollop, which should be about 2 ½ inches wide, then a slightly smaller one in the middle, and finish with a top dollop about 1 inch wide.
Step 7: The Final, Soulful Touch
Take two mini chocolate chips and gently press them into the base of the top (the smallest) frosting dollop to create the eyes. That’s it! You’ve just made a ghost. Repeat this process for all 24 cupcakes.
Once decorated, store your ghost cupcakes in a cool spot. If your kitchen is warm, it’s best to refrigerate them. The buttercream will hold its shape beautifully as long as it doesn’t get too hot.
Why Brewed Coffee is the Secret to Rich Chocolate Flavor
You might be wondering why we’re using coffee in a chocolate cupcake. It’s a classic baker’s trick. Coffee, in the right quantity, doesn’t make the cake taste like coffee. Instead, it acts as a flavor enhancer for the cocoa.
It deepens the chocolate notes, making them taste more intense and rounded. Think of it like adding a pinch of salt to a sweet dish—it doesn’t make it salty, it just makes the sweetness pop. The coffee works the same way for the chocolate.
If you’re really against using coffee, you can substitute it with an equal amount of warm water. The cupcakes will still be delicious, but you’ll lose that extra layer of deep, rich flavor that makes them truly exceptional.
Tips
- The single most important tip for this recipe concerns your butter. For the frosting, your butter must be “slightly softened.” This means it’s cool to the touch but your finger can leave a slight indentation. If it’s too soft and warm, your ghosts will slump and lose their shape.
- When piping, don’t lift the piping tip too high off the cupcake. Keep it close to the surface and use steady, even pressure to create those flat, round dollops. If you make a mistake, no worries! Just scrape the frosting back into the bag and try again. Frosting is very forgiving.
- To store these, keep them in a single layer in an airtight container. They can stay at a cool room temperature for a day, but if you need to keep them longer, the refrigerator is your best friend. Just let them sit out for an hour before serving to take the chill off.
Ingredient Substitutions for Last-Minute Changes
Don’t have brewed coffee? As mentioned, warm water is a fine substitute. Alternatively, you can use a teaspoon of instant coffee granules dissolved in 1 ¼ cups of warm water. It will work just as well to enhance that chocolate flavor.
If you only have unsalted butter, that’s perfectly okay. Just add a quarter teaspoon of fine salt to the cake batter and another quarter teaspoon to the frosting mixture. This will balance the sweetness and bring out the flavors just like salted butter would.
No pastry bag? No problem. Take a large, heavy-duty zip-top bag and spoon the frosting into one bottom corner. Twist the bag above the frosting to push it down, then use scissors to snip off just the very tip of that corner. You now have a makeshift piping bag.
How to Store and Reheat Your Spooky Treats
These cupcakes are best enjoyed within 2-3 days. The key is to protect them from air, which can dry out the cake, and heat, which can melt the buttercream. An airtight container is non-negotiable.
If you’ve refrigerated them, the buttercream will firm up. Let them stand at room temperature for about 45-60 minutes before serving. This allows the frosting to soften back to its intended creamy, fluffy texture.
I do not recommend freezing the fully assembled cupcakes, as the buttercream can become sticky and the chocolate chip eyes might bleed color. However, you can absolutely freeze the un-frosted cupcakes for up to a month. Thaw them overnight in the refrigerator and bring them to room temperature before frosting.
Best Time to Serve This Dish
Obviously, these are a Halloween superstar. They’re perfect for classroom parties, trick-or-treat gatherings, or as a project to do with your own kids on a crisp October afternoon. The fun, interactive decorating is a huge part of their appeal.
But don’t limit these ghostly treats to just one holiday! They make a wonderfully fun surprise for a “Boo!” birthday party or a spooky movie night with friends any time of the year. The theme is playful rather than truly frightening.
For the best experience, serve them the same day you frost them. The texture of the cupcake and the frosting will be at its peak. Set them out on a platter and watch them disappear—almost like real ghosts.
The Simple Science of a Stiff Buttercream
Why does the temperature of the butter matter so much? It all comes down to the science of an emulsion. When you beat butter and sugar together, you are trapping tiny air bubbles. These air bubbles are what give the frosting its light, fluffy structure.
Butter that is too warm cannot hold these air bubbles. The fat molecules are too loose, and the emulsion will break, resulting in a greasy, soft frosting that can’t hold a shape. Cooler butter creates a stronger, more stable network that traps the air and holds the piped form.
This is also why we beat the frosting for several minutes after adding all the ingredients. We are incorporating more and more of those tiny air bubbles, which expands the volume of the frosting and makes it lighter, stiffer, and perfect for piping our tall, stable ghosts.
Ghost Cupcakes Recipe
Description
These Ghost Cupcakes are a spooktacular Halloween treat that’s as easy to make as it is adorable! Rich devil’s food cupcakes—enhanced with brewed coffee and melted butter—are topped with fluffy homemade buttercream piped into playful ghost shapes and finished with mini chocolate chip eyes. Perfect for parties, school treats, or a fun family baking project!
ingredients
For the Cupcakes
For the Frosting
Instructions
-
Preheat oven to 350°F (175°C). Line 24 muffin cups with paper liners.
-
In a large bowl, combine cake mix, cooled coffee, melted butter, and eggs. Beat with a mixer on medium speed for 2 minutes until smooth.
-
Stir in ½ cup mini chocolate chips. Spoon batter evenly into liners, filling each about halfway.
-
Bake for 18–20 minutes, or until a toothpick inserted in the center comes out clean.
-
Cool cupcakes in pans for 5 minutes, then transfer to wire racks to cool completely (about 30–40 minutes).
-
For the frosting: In a large bowl, beat butter on medium speed until creamy (about 2 minutes).
-
With mixer on low, gradually add powdered sugar. Mix in vanilla. Increase speed to medium and beat for 2 minutes until light and fluffy.
-
On low speed, add heavy cream. Beat on medium for 1 more minute until smooth and stiff enough to hold shape.
-
Spoon frosting into a large piping bag fitted with a ½-inch round tip (e.g., Ateco #807).
-
Pipe 3 stacked, flat round dollops onto each cupcake: large base (~2.5"), medium middle, small top (~1").
-
Press 2 mini chocolate chips into the top dollop as ghost eyes.
-
Store in a cool place or refrigerate for up to 24 hours. If chilled, let sit at room temperature for 1 hour before serving.
Nutrition Facts
Servings 24
Serving Size 1 cupcake
- Amount Per Serving
- Calories 420kcal
- % Daily Value *
- Total Fat 21g33%
- Saturated Fat 13g65%
- Trans Fat 0.8g
- Cholesterol 85mg29%
- Sodium 320mg14%
- Potassium 140mg4%
- Total Carbohydrate 58g20%
- Dietary Fiber 1g4%
- Sugars 42g
- Protein 4g8%
- Calcium 4 mg
- Iron 8 mg
* Percent Daily Values are based on a 2,000 calorie diet. Your daily value may be higher or lower depending on your calorie needs.
Note
- No piping bag? Use a resealable plastic bag: spoon in frosting, twist the top, and snip a small corner to pipe.
- Keep cool: Buttercream melts easily—avoid warm rooms or cars. Refrigerate if needed, but bring to room temp before serving for best texture.
- Make ahead: Bake cupcakes 1–2 days ahead; frost day-of for freshest look.
Frequently Asked Questions
Can I use a different cake mix?
Yes! While devil’s food gives the richest chocolate base, you can use regular chocolate or even vanilla cake mix for a different twist—just keep the coffee for moisture and depth.
Why use coffee in chocolate cupcakes?
Coffee enhances the chocolate flavor without making the cupcakes taste like coffee. It deepens the richness and keeps the crumb moist.