

Okay, let’s be real. Valentine’s Day is fine. But Galentine’s Day? That’s the holiday that actually fills my cup. It’s the one where the pressure is off, the wine is chilled, and the only expectation is to laugh too loud with your favorite people.
Last year, I decided our little brunch needed a centerpiece. Something that screamed “celebration” but also “I made this for you because I love you, not because Hallmark told me to.” So I embarked on a mission to make a cake. N
ot just any cake. A big, beautiful, chocolate-strawberry situation that looked like it came from a fancy bakery.
I am not, by nature, a cake decorator. The thought of perfectly smooth sides gives me hives. I’m more of a “dump it in a pan and hope for the best” baker. But for my girls? I was willing to try. And you know what? It worked.
It was a little lopsided, the frosting was definitely not magazine-perfect, but the moment I put it on the table, surrounded by all our brunch snacks, it felt like a triumph.
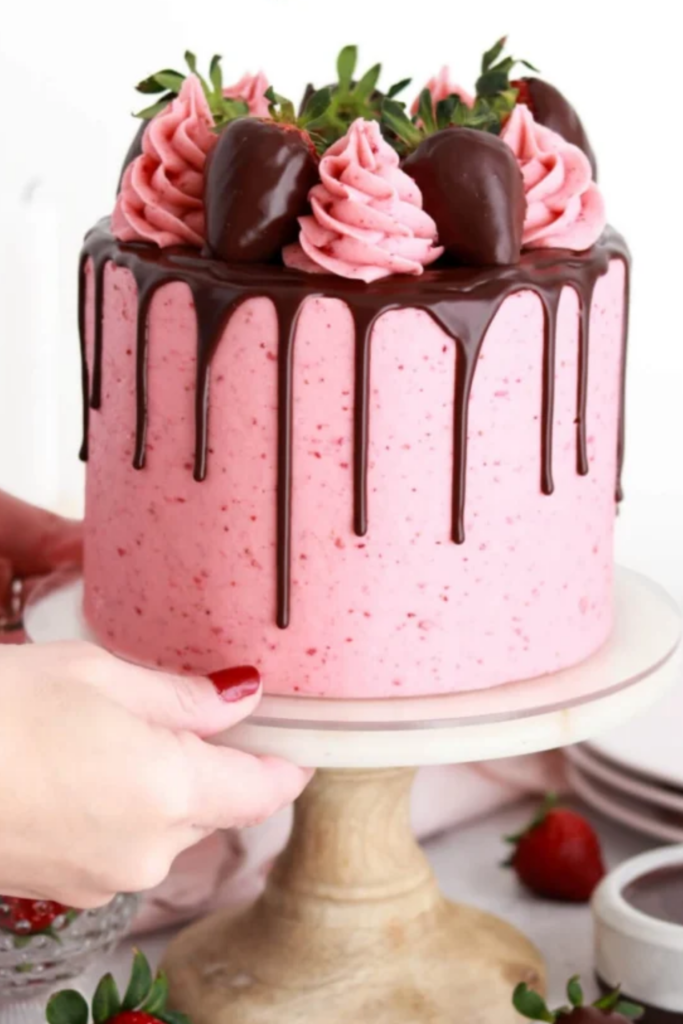
The combination of that deep, dark chocolate with the sweet-tart strawberry buttercream is just… perfection. It’s rich, it’s moist, and topping it with those chocolate-covered strawberries? Pure showstopper magic.
Ingredients I Used for the Recipe
Here’s what went into my cake. A few notes from my kitchen disasters, so you can avoid them.
- All-purpose flour: The backbone. I once used bread flour by accident. Don’t be like me.
- Granulated sugar: For sweetness and, importantly, for keeping the cake tender and moist. Don’t skimp.
- Unsweetened cocoa powder: The chocolate soul of the whole thing. I used a natural cocoa powder, not Dutch-process. It matters for the chemistry with the baking soda.
- Baking soda & baking powder: The lift team. They make sure we get a cake, not a brownie brick.
- Fine sea salt: To balance all the sweet and make the flavors pop. I don’t use table salt for baking anymore.
- Buttermilk: This is non-negotiable, I learned the hard way. That tang and fat create an unreal moisture. No substitutes.
- Vegetable oil: Makes the cake incredibly moist. Butter is great for flavor, but oil keeps it soft for days.
- Eggs: Binds it all together. Room temperature is key so they mix in smoothly.
- Pure vanilla extract: The flavor enhancer. Always use real stuff.
- Hot coffee: This sounds weird, I know. But you don’t taste coffee. It just makes the chocolate flavor deeper and richer. Trust the process.
- Powdered sugar: For the buttercream. Sift it. Unless you enjoy battling lumps.
- Unsalted butter: Room temp, soft but not melted. This is the base of our frosting.
- Seedless strawberry preserves: The flavor hero for the frosting. Seedless is important unless you want little crunchy bits.
- Red gel food coloring (optional): A tiny bit gives you that perfect pink blush. Liquid coloring can thin your frosting.
- Chocolate-covered strawberries: For garnish. I made my own, which was easier than I thought, and looks so impressive.
How to make Starbucks Medicine Ball Recipe?
Just kidding. We’re making a cake, not a drink. I just wanted to see if you were paying attention. Let’s bake.
Step 1 – Pan Prep and Dry Mix
First, heat your oven to 350°F. Grab your two 8-inch round pans. Butter them like you’re painting, get into every corner. Then add a spoonful of flour and shake it around until the whole thing is coated. Dump out the extra. This is your insurance policy against stuck cake.
In your mixer bowl, sift together the flour, sugar, cocoa powder, baking soda, and baking powder. Whisk in the salt. Sifting feels fussy, but it gets rid of lumps and mixes everything evenly.
Step 2 – The Wet Stuff and the Weird Thin Batter
In a separate jug or bowl, whisk together the buttermilk, oil, eggs, and vanilla until it’s one homogenous yellow liquid. With your mixer on low, slowly pour this into the dry ingredients. Let it just barely combine. Now, with the mixer still on low, slowly pour in the hot coffee.
The batter will be super thin. Like, “did I mess this up?” thin. You didn’t. This is right. It’s going to bake up incredibly moist. Just mix until it’s combined, then stop. Overmixing is the enemy.
Step 3 – Bake and Cool (Patience is Key)
Pour that runny batter evenly into your prepared pans. Slide them into the oven. Bake for 35-40 minutes. A toothpick should come out with just a few moist crumbs. Here’s a thing: these ultra-moist cakes might sink a tiny bit in the middle. Totally normal.
Don’t panic. Let them cool in the pans for a full 30 minutes. Then, run a knife around the edge and flip them out onto a wire rack. Let them cool completely. I even pop them in the freezer for about 45 minutes before frosting. Cold cakes are way easier to handle.
Step 4 – Whip Up the Pink Frosting
While the cakes chill, make the buttercream. In your clean mixer bowl, beat the room-temperature butter and sifted powdered sugar on low until it’s combined. Then crank it up to medium-high and let it go for a good 3 minutes. You want it pale and fluffy.
Scrape down the bowl. Add the strawberry preserves, salt, and vanilla. Beat for another minute. If you want a pinker color, add a tiny dab of red gel food coloring and beat it in. Taste it. It should be like strawberry cloud.
Step 5 – The Crumb Coat (Your Secret Weapon)
Place one cold cake layer on your plate or stand. Dollop a big scoop of frosting on top and spread it evenly to the edges. Place the second layer on top, flat side up. Now, take a small amount of frosting and spread a very, very thin layer over the entire cake—top and sides.
This is the “crumb coat.” It’s not pretty. It’s meant to trap all the loose crumbs. Once it’s on, pop the whole cake back in the fridge for 20 minutes. This sets the crumbs in place.
Step 6 – The Final Frost and Garnish
This is the fun part. Use the rest of your frosting to cover the chilled cake. An offset spatula is a game-changer here, but a butter knife works too. Don’t stress about it being perfectly smooth. I think a slightly rustic, “homemade” look has more charm.
Once you’re happy, pile on your chocolate-covered strawberries in the center. Maybe add some Valentine’s sprinkles around the base if you’re feeling fancy. And you’re done.
Tips
Use room temperature ingredients. It just makes everything blend together smoothly without overmixing.
If you hate the idea of coffee, use 1 cup of hot water with a teaspoon of instant espresso powder mixed in. You still get the flavor boost without a coffee taste.
That crumb coat step? It seems extra. But it’s the single thing that made my frosting look 100% better. Don’t skip the chill time.
Making your own chocolate-covered strawberries is easy. Melt good chocolate, dip, let set on parchment paper. It elevates the whole thing from “cake” to “occasion.”
Leftovers? Ha. But if you have them, store them covered in the fridge. Let a slice sit out for 20 minutes before eating so the frosting softens up.
Most importantly, have fun with it. My cake was a bit drunk. The layers weren’t perfectly level. But it was made with genuine joy for my friends, and that’s what they tasted. That’s the real Galentine’s spirit, right there.
My Galentine’s Day Cake Recipe
Description
This Galentine’s Day cake is a showstopper—rich, moist chocolate cake layered with luscious strawberry buttercream and crowned with chocolate-covered strawberries. Perfect for celebrating friendship, love, or any special occasion, this dessert balances decadence with playful charm. With foolproof instructions and pro tips, even beginner bakers can create a bakery-worthy masterpiece.
Ingredients
For the Chocolate Cake
For the Strawberry Buttercream
For Garnish
Instructions
For the Cake
-
Preheat oven to 175°C (350°F). Butter and flour two 8-inch round cake pans.
-
In the bowl of a stand mixer fitted with a paddle attachment, sift together flour, sugar, cocoa powder, baking soda, baking powder, and salt. Whisk to combine.
-
In a separate bowl, whisk buttermilk, oil, eggs, and vanilla. With mixer on low, slowly add wet ingredients to dry. Then add hot coffee and mix just until combined—batter will be thin.
-
Divide batter evenly between pans. Bake 35–40 minutes, or until a toothpick inserted comes out clean. Cool in pans 30 minutes, then transfer to wire racks to cool completely. Refrigerate or freeze until firm before frosting.
For the Strawberry Buttercream
-
In a stand mixer with paddle attachment, beat butter and powdered sugar on low until blended, then medium for 3 minutes until light and fluffy.
-
Add strawberry preserves, salt, and vanilla. Beat 1 minute until smooth. Add red gel food coloring if desired; mix until evenly tinted.
To Assemble
-
Place first cake layer (flat side up) on a cake stand. Spread 1/3 of buttercream over top, pushing slightly past edges.
-
Top with second layer (flat side up). Apply a thin crumb coat over entire cake. Chill 15–20 minutes until set.
-
Frost cake with remaining buttercream. Smooth sides and top with an offset spatula. Decorate with chocolate-covered strawberries and sprinkles.
-
Store at room temperature up to 1 day or refrigerated up to 3 days. Bring to room temperature before serving.
Nutrition Facts
Servings 12
Serving Size 1 slice
- Amount Per Serving
- Calories 680kcal
- % Daily Value *
- Total Fat 35g54%
- Saturated Fat 20g100%
- Cholesterol 115mg39%
- Sodium 480mg20%
- Potassium 290mg9%
- Total Carbohydrate 88g30%
- Dietary Fiber 3g12%
- Sugars 68g
- Protein 7g15%
- Calcium 8 mg
- Iron 15 mg
* Percent Daily Values are based on a 2,000 calorie diet. Your daily value may be higher or lower depending on your calorie needs.
Note
- Make ahead: Cake layers can be frozen (wrapped tightly) for up to 2 months. Thaw overnight in fridge before frosting.
- No coffee? Substitute with 1 cup hot water + 1 tsp espresso powder—or just hot water if preferred.
- Want less sweetness? Use high-fat cocoa powder and dark chocolate for garnish to balance flavor.
- Cupcake version: Makes ~24 cupcakes; bake 17–20 minutes.
Frequently Asked Questions
Can I make this cake gluten-free?
Yes! Substitute the all-purpose flour with a 1:1 gluten-free baking blend (like Bob’s Red Mill or King Arthur). Keep all other ingredients the same.
My cake sank in the middle—what happened?
This ultra-moist cake sometimes sinks slightly due to its tender crumb. It’s normal! Flip layers upside down when stacking or level with a serrated knife. For prevention tips, see our guide on preventing cake sinkage.