There's something about this time of year that just makes me want to bake. Summer is winding down, even if you wouldn't know it from the weather where I am – it's still heat wave central here in Austin. But I can feel the shift coming. That craving for cozy things, for tea and warm blankets and the smell of something sweet in the oven.
So when I came across the idea for this chocolate swirl bread, I knew I had to try it. It’s that perfect in-between thing, not quite a cake but definitely not your average sandwich bread. Something you can slice up and toast, or just tear into while it's still warm.
I've made a version of this before with cinnamon, which I loved, but the chocolate version just hits different. It came from a place of wanting to combine two of my favorite things – that soft, enriched bread you get with Danish pastries and the deep chocolate flavor from those triple chocolate snail buns.
The result is this loaf that feels special but isn't actually that hard to pull off. It’s the kind of bake that makes your kitchen smell incredible and fills that little void when you just need something comforting.
Ingredients I Used for the Recipe
Here's everything I gathered before I started. I learned the hard way that having it all prepped makes the process so much smoother, especially when you're dealing with yeast dough and don't want to be scrambling for something while your hands are covered in flour.
- 120 ml (1/2 cup) milk – For the liquid base of the dough. You'll warm this up to wake up the yeast.
- 30 ml (~1 shot) espresso – This is my secret weapon. It doesn't make the bread taste like coffee, it just makes the chocolate taste more like itself. Richer, deeper.
- 2 tsp instant yeast (or 2.25 tsp active-dry) – To get that rise. I used instant so I could just throw it in with the dry stuff, but either works.
- 1 large egg + 1 egg yolk – These add richness to the dough, giving it that soft, brioche-like texture.
- 50 grams (1/4 cup) sugar – Just a touch of sweetness in the dough itself.
- 1 tsp vanilla extract – For that warm background note.
- 1/2 tsp salt – Balances everything out. Don't skip it.
- 325 grams (2 & 2/3 cups) all-purpose flour – The structure of the bread.
- 50 grams (~1/2 cup) unsweetened cocoa powder – This goes right into the dough, so the bread itself has a subtle chocolate flavor, not just the swirl.
- 57 grams (4 tbsp) unsalted butter, softened – For richness and that tender crumb.
- 1 egg for egg wash – Gives the loaf that beautiful golden brown shine on top.
For the filling (the good stuff):
- 1 egg white – You brush this on the rolled-out dough to help the sugar and cocoa stick. You can use melted butter too, but I like the egg white.
- 20 grams brown sugar + 20 grams granulated sugar – The mix gives a little caramel-y depth along with the sweetness.
- 10 grams (~1.5 tbsp) unsweetened cocoa powder – For that chocolate swirl.
- Pinch of salt – Same principle as before, it just makes the chocolate pop.
- 100 grams (~3/4 cup) chocolate chips – I used semi-sweet. You can chop up a chocolate bar if that's what you have.
And then the icing, which is optional but definitely recommended if you want it to look as good as it tastes:
- 113 grams (1 cup) powdered sugar
- 1 tbsp unsweetened cocoa powder
- Water or milk – To thin it out to a drizzle consistency.
- Extra chocolate chips for decoration – Because why not.
How to Make Chocolate Swirl Bread
The process is pretty straightforward – it's like making a really nice yeasted dough and then filling it with all that chocolatey goodness. The hardest part is waiting for it to rise.
Step 1 - Warm the Milk and Wake Up the Yeast
I started by warming my milk. The recipe calls for it to be "fingervarm," which is a Danish term that basically means it should feel warm to your finger but not hot. You don't want to kill your yeast. I just microwaved it in 10-second bursts until it felt right. If you're using active dry yeast, you'd add it to the milk with a teaspoon of sugar and let it sit for 5-10 minutes until it gets frothy. If it doesn't foam up, your yeast might be dead – I've had that happen and it's so frustrating. Luckily mine was good to go.
Step 2 - Mix the Wet Ingredients
In a large bowl, I whisked together the whole egg, the extra yolk, the remaining sugar, vanilla, and salt. Just until it was all combined and kind of uniform. Nothing fancy here.
Step 3 - Combine Everything Together
I poured the warm milk mixture into the egg mixture, then added that shot of espresso. It smelled amazing already, like the start of a really good mocha. I gave it a stir to combine.
Step 4 - Mix the Dry Ingredients
In a separate bowl, I whisked the flour and the 50 grams of cocoa powder together. This step is important because cocoa powder can be lumpy, and you don't want random dry pockets in your dough. I learned that one the messy way.
Step 5 - Knead the Dough
This is where the magic happens. I started adding the flour mixture to the wet ingredients slowly, using a wooden spoon first. Once it got too thick to stir, I switched to my stand mixer with the dough hook. The key here is to add the flour gradually because you might not need all of it. The dough should come together and be soft and smooth but not sticky. I ended up using almost all of it. Then I added the softened butter a little at a time and let the mixer knead for about 8 minutes. The texture changed from a sticky mess to this beautiful, elastic dough that felt alive. You can knead by hand if you want, but be prepared to work for it.
Step 6 - First Rise
I formed the dough into a ball, put it back in the bowl, and covered it with a clean kitchen towel. Then I let it sit for about 45 minutes. I actually set a timer because I tend to forget about things. The dough should double in size. The "poke test" is a good way to check – if you poke it with your finger and the indentation stays, it's ready. If it springs back fast, give it more time.
Step 7 - Roll Out the Dough
Once the dough had risen, I punched it down and turned it out onto a lightly floured surface. I rolled it into a rectangle, aiming for about 7.5 inches by 18 inches. The width is important because it needs to fit into your loaf pan. I used a standard 9x5 inch pan and it worked fine. I've tried a smaller pan before and the shape was better, but the loaf had a tendency to split on top, so I just stick with the larger one now.
Step 8 - Add the Filling
I took the egg white and used a pastry brush to paint it all over the surface of the dough. Then I mixed together the brown sugar, granulated sugar, the 10 grams of cocoa powder, and that pinch of salt in a small bowl and sprinkled it evenly over the dough. I probably could have used a little less, but I'm not one to skimp on sugar. Then came the chocolate chips. I scattered them all over, pressing them in gently so they wouldn't fall out when I rolled.
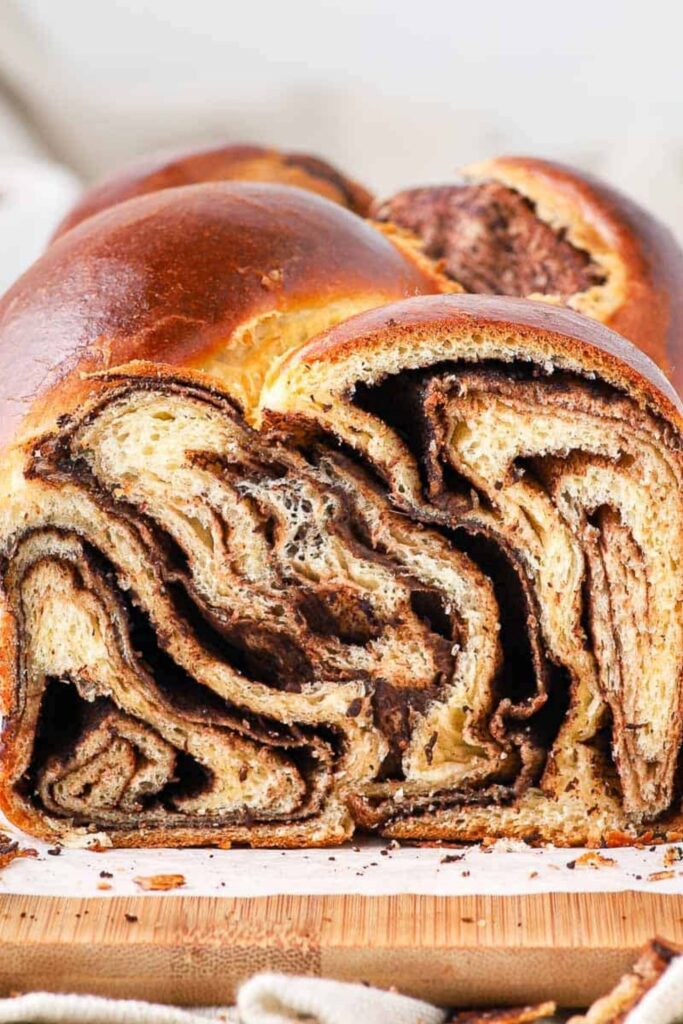
Step 9 - Roll It Up
This part takes a little patience. Starting from the shorter edge of the rectangle (so you get more swirls), I started rolling the dough into a tight log. You want it as tight as you can without tearing the dough. Once I got to the end, I pinched the seam shut really well, and did the same with the ends. Then I gently rolled the whole log back and forth on the counter to seal it even more. I learned that if you don't seal it well, the filling can burst out in the oven, and it's a sad sight.
Step 10 - Second Rise in the Pan
I lined my loaf pan with parchment paper, letting some hang over the sides so I could lift the bread out easily later. I placed the log in the pan, covered it, and let it rise for another 45 minutes. During the last 10 minutes of that, I preheated the oven to 350 degrees F.
Step 11 - Egg Wash and Bake
I whisked the remaining egg with a splash of water to make an egg wash and brushed it over the top of the risen loaf. This gives it that glossy, golden crust. Then I popped it in the oven for about 32 minutes. I checked it at 30 minutes and it looked good, but ovens vary. You want it to sound hollow when you tap the top.
Step 12 - Cool and Ice
I took the bread out of the oven and let it cool in the pan for about 10 minutes before lifting it out with the parchment to cool completely on a wire rack. For the icing, I mixed the powdered sugar, the tablespoon of cocoa powder, and a tiny splash of milk until it was thick but pourable. I drizzled it over the cooled loaf and sprinkled on a few extra chocolate chips for looks.
Tips
So I've made this bread a few times now, and I've had my share of small disasters that I want to save you from. The biggest one is the filling leaking out. Make sure you really pinch that seam closed. I'm talking give it a good firm press along the whole length. And then rolling the log lightly on the counter after helps flatten that seam into the rest of the dough so it's less likely to split open.
The espresso thing is non-negotiable for me. The first time I made it I thought "nah, I'll just skip it" and the bread was good, but it was missing something. That little bit of coffee makes the chocolate taste so much more intense. If you don't have espresso, strong brewed coffee works, or even a teaspoon of instant coffee dissolved in a tiny bit of hot water.
Oh, and about toasting. If you don't put icing on it (or even if you do, honestly), this bread is incredible toasted. But here's the thing – you can't put it in an upright toaster. The chocolate chips will melt and make a huge mess and probably ruin your toaster. I use a toaster oven or just do it in a skillet with a little butter. That's actually my favorite way. A warm slice with butter melting into those chocolate swirls? That's the whole point of this bread, I think.
One more thing – don't rush the cooling. I know it's hard. The smell is torture. But if you try to slice it when it's too warm, the swirl falls apart and you get a mess of chocolate and bread chunks. I usually let it sit for a good hour before I even think about cutting into it. If I can wait that long.