


Are melty, crispy, and wildly satisfying – a fast, comforting wrap that tastes like a grilled cheese met a garlicky chicken melt, then decided to be handheld and irresistible. These cook up in about half an hour, with juicy chicken tucked into creamy, garlicky cheese, and tortillas toasted to a golden crunch – yes, they’re that good. Meal-prep friendly, lunch-box ready, and weeknight-approved, with easy swaps if the fridge looks a little empty today.
Quick Notes
For best texture, pan-toast wraps 2–4 minutes per side, seam-side down first, and use a lid to melt the center fast without burning the exterior. It’s simple, but it delivers that gooey middle and crisp shell, every time. An air-fryer also works: 375°F (190°C) for 6–8 minutes, checking at the halfway point.
When Is the Chicken Done?
Cook or reheat chicken until it reaches an internal temperature of 165°F (75°C) in the thickest part; that’s the safety line that knocks out common pathogens and keeps anxiety off the plate. Use a thermometer, and take the reading while the chicken is still on heat – once it hits 165°F, it’s good to go.
Best Time to Serve This Dish
These wraps shine for quick weeknight dinners, late-lunch saves, or game-day trays cut on the diagonal – easy to grab, hard to put down. They travel well, too; make ahead, then crisp to order so the tortilla stays snappy, not soggy.
Ingredients Needed for the Recipe ( use list and use of them)
- Cooked chicken (2 cups, shredded or diced) – juicy base; rotisserie or leftover roast works beautifully, or cook fresh and shred.
- Shredded mozzarella or cheddar (1 1/2 cups) – mozzarella for pull; cheddar for a sharper, bolder bite; both melt into the garlic cream.
- Cream cheese (1/4 cup, softened) – adds body and that plush, creamy texture that hugs every strand of chicken.
- Butter (2 tbsp, melted) – to sauté garlic and to crisp wraps with flavor; butter browns, garlic sings.
- Garlic (3 cloves, minced) – fresh, fragrant, and the star of the show; don’t burn it, just kiss it with heat.
- Sour cream (1/4 cup) – tang to balance richness; keeps the filling luscious, not heavy.
- Garlic powder (1 tsp) – a second wave of garlic that rounds out the fresh bite with cozy depth.
- Italian seasoning (1 tsp) – oregano-basil-thyme warmth that lifts the dairy and wakes up the chicken.
- Large tortillas (4) – flour tortillas wrap and crisp best; warm first for easy rolling and fewer tears.
- Salt and pepper (to taste) – season in layers: chicken, creamy mix, and final taste check.
- Fresh parsley (optional) – a quick, bright finish; sprinkle after slicing for color and freshness.
Ingredient Substitutions & Smart Swaps
No mozzarella? Use Monterey Jack for mellow melt, or pepper jack for gentle heat; smoked cheddar brings campfire vibes. Swap sour cream with Greek yogurt, and butter with olive oil if that’s what’s on hand today.
No chicken prepped? Rotisserie shortcuts are perfect, or go turkey; shrimp works for a lighter, seaside twist – just quick-sauté first. Add-ins that play nice: spinach, sautéed mushrooms, bell peppers, or cooked bacon for crunch.
How to make Cheesy Garlic Chicken Wraps?
Step 1: Prepare or Warm the Chicken
If starting fresh, cook chicken in a slick of oil over medium-high, 6–8 minutes per side, to an internal temp of 165°F; rest, then shred or dice. Using leftovers? Bring to warm in the pan later with the filling so everything melts together.
Step 2: Sauté the Garlic Gently
Melt butter over medium heat; add minced garlic and sauté about 1 minute until fragrant, not browned – golden is good, burnt is bitter. Turn off heat to cool slightly so it doesn’t scorch the dairies in the next step.
Step 3: Mix the Creamy Filling
In a bowl, combine shredded cheese, softened cream cheese, sour cream, garlic powder, Italian seasoning, and a pinch of salt and pepper. Fold in the chicken and that buttery garlic; taste and adjust – it should be creamy, garlicky, and well-seasoned.
Step 4: Warm the Tortillas
Heat each tortilla in a dry skillet 20–30 seconds per side or microwave 10–15 seconds covered; warm tortillas flex instead of crack. This tiny step makes tidy rolling and tight sealing a breeze.
Step 5: Assemble Tight and Even
Lay a tortilla flat, add a line of filling slightly below center; don’t overstuff, it bursts. Fold sides in, roll snugly, and rest seam-side down – repeat until all wraps are built.
Step 6: Pan-Crisp to Golden
Warm a thin film of butter or oil over medium; place wraps seam-side down, cover with a lid, and cook 2–4 minutes per side until golden and melty. The lid traps heat, melts cheese quickly, and keeps the exterior from over-browning.
Step 7: Slice and Finish
Transfer to a board, rest 1 minute, then slice on the bias – those layers look gorgeous. Scatter parsley if using; serve hot while the middle is gooey and the edges snap.
Tips
- Shred cheese from a block for best melt; bagged shreds can include anti-caking starches that dull the ooze. Also, don’t overfill – tight wraps toast evenly and won’t blow out in the pan.
- Use a lid when pan-toasting; it speeds melt and warms the core so the tortilla doesn’t over-crisp before the center is lava. Air-fryer fans: 375°F for 6–8 minutes, flipping once.
- Make-ahead: Mix filling up to 3 days ahead, wrap and cook to order; stash cooked wraps in the fridge 1–2 days, then re-crisp in a skillet or air-fryer. Filling alone freezes up to a month.
How to Store and Reheat Without Sog
Refrigerate cooked wraps tightly wrapped for up to 2–3 days; place on a rack inside a container if possible to keep the bottoms from steaming. For freeze-ahead, wrap uncooked burrito-style in foil and freeze; thaw overnight for best texture.
Reheat in a skillet over medium with a touch of oil 3–4 minutes per side, or oven at 350°F for 15–20 minutes wrapped in foil, then uncover 2 minutes to re-crisp; air-fryer at 350–375°F for 5–8 minutes also nails the crunch. Seam side down first – always.
Serving & Pairing Ideas
Keep it classic with a crisp salad, Caesar wedge, or tangy slaw; the creamy wrap loves bright, crunchy sides. Or go cozy with oven fries, air-fryer potatoes, or a tomato-cucumber cup with lemon and herbs.
Dip roster: ranch for cool, salsa for bite, guacamole for richness, hot honey or chili crisp for that sweet-heat finish – a little drizzle goes far. Cut into halves or thirds for platters and kids’ plates; finger food rules.
Variations You’ll Actually Use
Heat lovers: add jalapeños, chili flakes, or a dash of hot sauce into the filling; pepper jack takes it further without overpowering the garlic. For garden comfort, fold in wilted spinach or sautéed mushrooms.
Low-carb mood: swap in low-carb tortillas or sturdy lettuce leaves; keep the pan-crisp for tortillas, and for lettuce, use warm filling but skip the pan step. Bacon? Oh yes – crispy bits mixed in for salty crunch.
FAQ: Can I Prep and Pack These for Lunch?
Absolutely – assemble the night before, keep chilled, then pan-crisp 2–3 minutes per side at lunch, or air-fry a few minutes until hot and crackly. If reheating from fully cooked, use a skillet or air-fryer to revive the crunch rather than a microwave, which softens tortillas.\
Safety Corner (Quick but Important)
Use a clean board and utensils for cooked chicken – never the raw chicken board – and chill leftovers within 2 hours (1 hour if it’s really hot out). Always confirm chicken hits 165°F in the thickest part; it’s the number that keeps everyone safe.
Why These Wraps Work
The garlic gets mellow and sweet in butter, then the cream cheese binds everything so each bite is saucy, not dry; mozzarella or cheddar brings stretchy joy or sharp tang. A covered pan melts the core while the tortilla crisps – fast, tidy, crave-worthy.
Credit
Inspired home-cooking notes adapted and written by katie; technique cues cross-checked with recent wrap methods and time-temperature guidance. Keep it golden, keep it gooey, and enjoy the quiet crunch before the garlic hits.
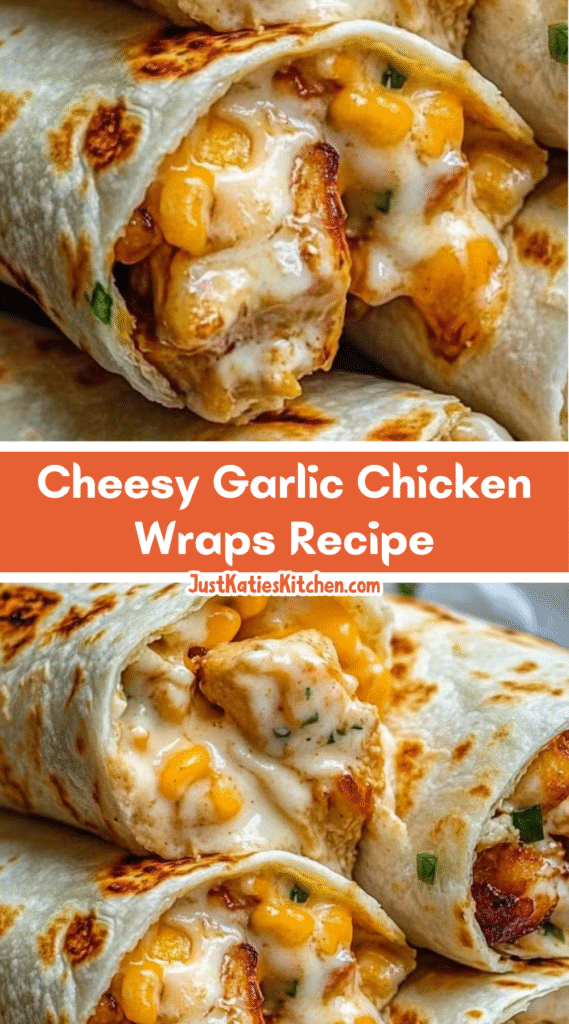
Cheesy Garlic Chicken Wraps Recipe
Description
These Cheesy Garlic Chicken Wraps are the ultimate comfort food, packed with tender chicken, a rich blend of melted mozzarella and cream cheese, and a bold punch of garlic. Cooked to golden perfection in a skillet, each wrap is crispy on the outside, irresistibly gooey on the inside, and ready in just 30 minutes. Perfect for busy weeknights, meal prep, or a satisfying lunch.
Ingredients
Instructions
-
Prepare the Chicken
If starting with raw chicken, season with salt, pepper, and garlic powder. Heat olive oil in a skillet over medium-high heat and cook chicken for 6–8 minutes per side until internal temperature reaches 165°F. Let rest, then shred or dice. Skip if using leftover or rotisserie chicken.Ensure chicken is fully cooked before shredding. -
Sauté the Garlic
In the same skillet, melt butter over medium heat. Add minced garlic and sauté for 1 minute until fragrant. Remove from heat and set aside.Do not burn the garlic to avoid bitterness. -
Make the Creamy Filling
In a large bowl, combine shredded cheese, softened cream cheese, sour cream, garlic powder, and Italian seasoning. Mix until smooth. Add the cooked chicken and sautéed garlic, stirring to combine. Season with salt and pepper to taste.The mixture should be creamy and well-blended. -
Warm the Tortillas
Heat each tortilla in a dry skillet for 20–30 seconds per side, or microwave for 10–15 seconds. This makes them soft and pliable for rolling.Prevents cracking when rolling. -
Assemble the Wraps
Lay a tortilla flat and spoon a generous amount of the cheesy chicken mixture into the center. Fold in the sides and roll tightly into a wrap. Repeat for remaining tortillas.Don’t overfill to prevent breakage. -
Cook the Wraps
Heat a bit more butter or oil in the skillet over medium heat. Place wraps seam-side down and cook for 2–3 minutes per side, until golden brown and crispy. The cheese should be melted and gooey inside.Press gently with a spatula for even browning. -
Serve
Transfer wraps to a serving plate. Slice in half if desired and garnish with fresh chopped parsley. Serve warm.Great with a side of salad or fries.
Nutrition Facts
Servings 4
Serving Size 1 wrap
- Amount Per Serving
- Calories 350kcal
- % Daily Value *
- Total Fat 20g31%
- Saturated Fat 11g56%
- Trans Fat 0.5g
- Cholesterol 95mg32%
- Sodium 680mg29%
- Potassium 420mg12%
- Total Carbohydrate 30g10%
- Dietary Fiber 2g8%
- Sugars 2g
- Protein 25g50%
- Calcium 300 mg
- Iron 2 mg
* Percent Daily Values are based on a 2,000 calorie diet. Your daily value may be higher or lower depending on your calorie needs.
Note
- Make It Spicier: Add diced jalapeños, a pinch of cayenne, or a drizzle of hot sauce to the filling.
- Variations: Try pepper jack or Monterey Jack cheese. Add sautéed mushrooms, spinach, or bell peppers.
- Low-Carb Option: Use keto tortillas or lettuce wraps instead of flour tortillas.
- Protein Swap: Substitute chicken with shredded turkey, pulled pork, or sautéed shrimp.
- Storage: Store cooled wraps in an airtight container in the fridge for up to 3 days.
- Freezing: Freeze uncooked wraps individually in foil. Cook from frozen, adding 5–7 minutes to cooking time.
- Reheating: Reheat in a skillet over medium heat for 3–4 minutes per side, or in the oven at 350°F for 15 minutes.
Frequently Asked Questions
Can I make these wraps ahead of time?
Yes! Assemble the wraps and store them in the fridge for up to 24 hours before cooking. You can also freeze uncooked wraps for up to 3 months.
Can I use different cheeses?
Absolutely! Mozzarella gives that classic gooey texture, but cheddar, pepper jack, or a blend work great for different flavor profiles.
Can I bake them instead of frying?
Yes. Preheat oven to 375°F. Place wraps on a parchment-lined baking sheet, brush with melted butter, and bake for 15–20 minutes, flipping halfway, until golden and heated through.
Are these wraps kid-friendly?
Yes! Kids love the cheesy, garlicky flavor. You can reduce the garlic or add mild cheese to suit their taste.
What can I serve with these wraps?
They pair perfectly with a fresh garden salad, coleslaw, roasted vegetables, or a side of fries. Serve with ranch, salsa, or guacamole for dipping.