Okay, let's be real. I love the idea of making fancy little cakes. I see those perfect Korean bento cakes online, all smooth frosting and cute sprinkles, and I think "yeah, I could do that." Then I remember my last layer cake attempt. The lopsided layers. The frosting that looked like it was applied during an earthquake. The sheer number of dishes.
That's why I became obsessed with finding a way to make these adorable lunchbox cakes without the meltdown. I wanted the wow factor, not the stress. After some serious trial and error (we'll get to the error part), I landed on a method that's basically cheating, but in the best way. No special skills needed. I promise.
What I love about these mini cakes is how personal they feel. It's not a whole cake you're handing someone, which can feel like a commitment. It's a perfect little "just for you" treat. A birthday surprise at the office, a congratulations for a friend, or just a Tuesday "I saw this and thought of you." The small size makes it special, not overwhelming.
What the Heck Even Is a Bento Cake?
So, the name comes from those Japanese bento lunch boxes, the single-serving kind. In Korea, bakers had the genius idea to put a single-serving cake in a similar box. A personal cake. No slicing, no plates, no fighting over who got the corner piece with the most flowers.
It's just a mini cake, usually 3 to 4 inches wide, decorated simply, and designed to fit in a little takeout-style container. The beauty is in its simplicity. You're not building a fondant Eiffel Tower. You're making something small and lovely that says you care. And you can do it on a weeknight without losing your mind.
Ingredients I Used for the Recipe
Here's the stuff I grabbed. The goal here was easy, not a grocery store scavenger hunt.
- A box of chocolate cake mix (and whatever it calls for - usually eggs, oil, water). This is the backbone. I used a standard one for a 9x13 pan. Chocolate is a crowd-pleaser, but vanilla or funfetti works great too.
- Salted butter - For the frosting. I like salted because it cuts the sweet a bit.
- Powdered sugar - The other half of the frosting equation.
- Unsweetened cocoa powder - To make that frosting chocolatey. If you're doing a vanilla cake, skip this.
- Vanilla extract - A splash for the frosting, always.
- A splash of milk - Just to get the frosting to a spreadable consistency.
- Cooking spray, butter, and a little flour - This is my non-negotiable for making sure the cake doesn't stick to the pan. Trust me on this one.
- A round cookie cutter or a glass - About 3.5 inches across. I used a wide-mouth mason jar lid in a pinch once. It worked.
- Parchment paper - Your best friend for clean removal and no-stick frosting.
- An offset icing spatula - This looks fancy but it's like a dollar. It makes smoothing frosting 1000% easier than a butter knife. A regular butter knife for loosening the cake edges is fine too.
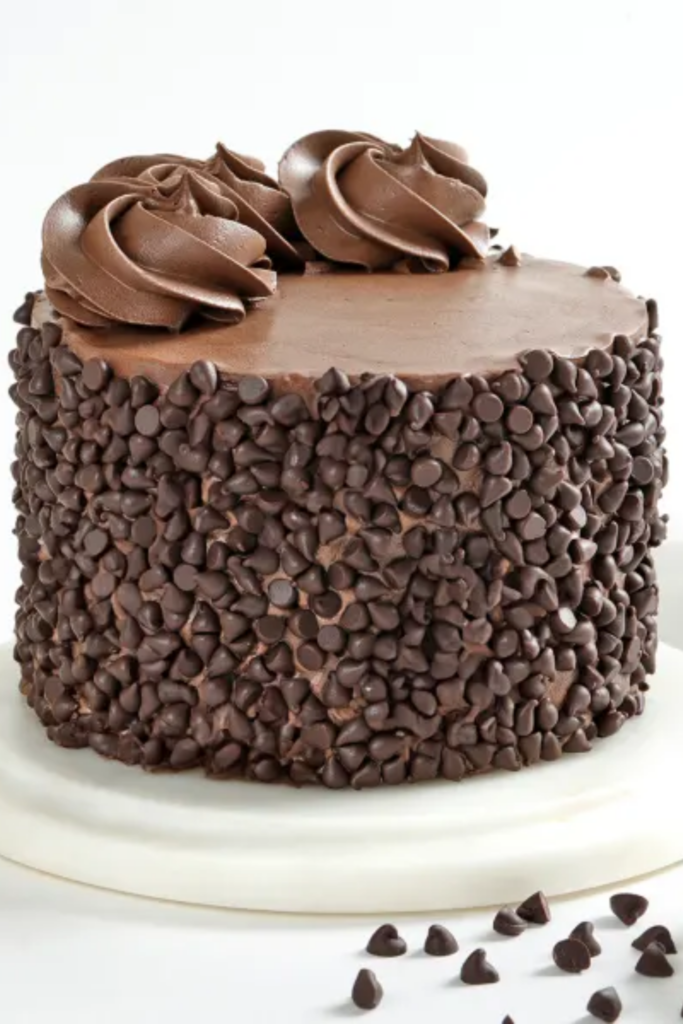
- Simple decorations - I'm talking a sprinkle of jimmies, a few nonpareils, maybe a single strawberry. Less is more.
- The bento boxes! - I got a stack of clear, clamshell-style ones online. They make it feel legit.
How to make Starbucks Medicine Ball Recipe?
Wait, what? That's not right. Let me fix that heading. My brain must have been on tea while writing this. I meant:
How to Make Your Easy Bento Cake
Step 1 - Bake Your Simple Sheet Cake
Preheat your oven like the box says. Now, here's my key move: line your 9x13 pan with parchment paper just on the bottom. Then spray the whole thing (sides and the paper) really well with cooking spray, or rub it with butter. Dust it with a little flour, tap out the excess. This seems like an extra step but it guarantees your cake will come out in one piece. Mix your box batter, pour it in, bake it. Let it cool completely. I mean completely. Walking away for an hour is smart.
Step 2 - Whip Up That Frosting
While the cake cools, make the frosting. Beat the softened butter in a bowl until it's creamy. Gradually beat in the powdered sugar on low speed unless you want a sugar snowstorm in your kitchen. Add the cocoa and vanilla. It'll look dry. That's okay. Start adding milk, just a teaspoon at a time, until it becomes spreadable. Then beat it on medium for a minute to make it fluffy. Cover it so it doesn't dry out.
Step 3 - Cut and Stack Your Circles
Run a butter knife around the edge of your cooled cake. Flip it out onto a cutting board. Use your cutter or glass to stamp out circles. You should get about six from a 9x13. Try to pick the three flattest ones for your bottom layers. If a top is domed, just slice a tiny bit off to level it. No one will know.
Step 4 - The First Frosting Coat (The Messy One)
Cut three squares of parchment paper. Put a tiny dollop of frosting in the center of each - this acts as glue. Place your first cake circle on it. Spread a layer of frosting on top. Now, carefully add your second cake circle. Frost the entire mini cake - top and sides - with a thin, messy coat. This is the "crumb coat." It doesn't have to be pretty. It just seals in crumbs. Do this for all three cakes.
Step 5 - The Chill-Out Session
Stick these frosted cakes in the freezer for 10 minutes, or the fridge for 30. This firms up that first layer of frosting. This step is magic. It turns a frustrating task into an easy one. Go tidy up your mixing bowls.
Step 6 - The Final, Smooth Coat
Pull your cakes out. Now, add a final, thicker layer of frosting. Because that first layer is firm, you can spread this one nice and smooth. Use your offset spatula, dip it in hot water, and smooth the sides. It's shockingly satisfying.
Step 7 - Box and Decorate
Line your clean bento boxes with a fresh piece of parchment. Gently move your cake from its working parchment into the box. Now, decorate. A sprinkle border, a few dots of leftover frosting, a single candy flower. Done. The box makes it look professional even if your lines aren't perfect.
Tips From My (Many) Mistakes
I learned these the hard way so you don't have to.
First, the parchment paper in the pan is not a suggestion. I skipped it once. I spent 20 minutes trying to pry out cake shards. Just do it.
Second, that chill time in the fridge is a game-changer. Trying to do a second coat on soft frosting just mixes crumbs in and makes a mess. Patience here saves your sanity.
Don't overthink the decorations. I bought fancy piping tips and then got stressed. A clean, smooth frosting job with a few elegant sprinkles looks more modern and intentional than a wobbly piped flower.
If your frosting gets too soft, just chill the bowl for a few minutes. If it's too thick, a drop more milk. You're in control.
Finally, taste as you go. Made vanilla frosting? Dip a finger in. It's your cake. Make it taste good to you.
Why This Became My Go-To Gift
I made these for three friends last month. The cost per cake was maybe seven bucks, once you break down the box mix and butter. A bakery would charge five times that. But it's not about the money.
It's about handing someone a whole, tiny cake that is just for them. Their face lights up every single time. They think you slaved away. Our little secret is that it was actually kind of fun, and barely harder than making muffins.
It feels like a real, tangible bit of kindness. And in a world that's so digital and fast, that feels pretty good. Plus, you get to eat the cake circle scraps with leftover frosting. That's the real chef's treat.