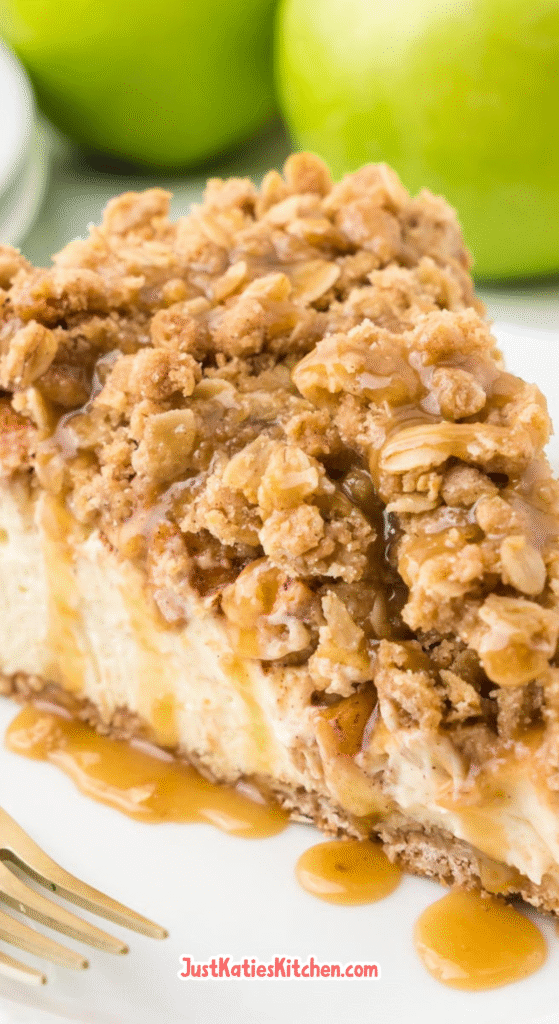
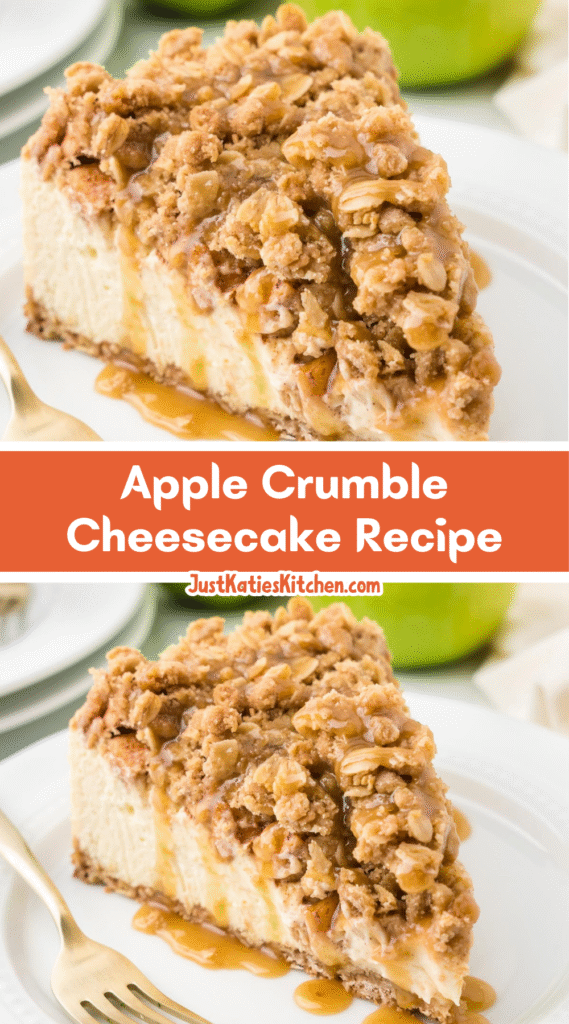
Imagine, if you will, the ultimate dessert mashup. It’s not just a pie. It’s not just a cheesecake. It’s something truly magical that happens when two classic comfort foods fall in love. That’s what you get with Apple Crumble Cheesecake.
Think about the cozy, heartwarming feeling of a perfect apple crumble, fresh from the oven. Now, picture the rich, indulgent, and impossibly creamy texture of a flawless cheesecake. Combining them isn't just a good idea—it's a stroke of genius. This dessert is a total showstopper.
Every single layer brings its own personality to the party. A buttery, crunchy biscuit base. A velvety smooth vanilla cheesecake filling. Sweet, spiced apples swirled right through it. And let's not forget that irresistible, crunchy, oaty crumble on top. Oh, and a generous drizzle of homemade salted caramel sauce? Absolutely yes.
Why This Recipe is a Game Changer
This isn't your average, everyday dessert. This is the one you make when you really want to impress. It’s perfect for autumn, when apples are at their absolute best, but let's be honest—it's welcome on any table, any time of year.
The best part? You can make almost all of it ahead of time. The cheesecake needs to chill for hours, ideally overnight, which means you can do all the work the day before. Talk about taking the stress out of entertaining!
It’s a guaranteed crowd-pleaser. Serve this at your next dinner party or family gathering, and just wait for the compliments to roll in. People will be asking for the recipe before they’ve even finished their slice.
Ingredients Needed for the Recipe
Gathering your ingredients beforehand is the first step to success. Here’s what you’ll need to create this masterpiece, and a little note on why each one matters.
• Digestive biscuits: These form the base of our cheesecake. Their slightly sweet, malty flavor is the perfect foundation. (Graham crackers are a great US alternative.)
• Unsalted butter: You’ll need this melted for the base and cold, cubed butter for the crumble topping. Using unsalted lets you control the salt level.
• Eating apples: Go for a sweeter, crisp variety like Honeycrisp or Gala. They hold their shape better and offer a lovely sweetness without being too tart.
• Soft light brown sugar: This adds a deep, caramel-like molasses note to both the spiced apples and the crumble topping.
• Ground cinnamon: The essential warming spice that makes the apples and the crumble taste like autumn in a spoon.
• Vanilla extract: A must for the cheesecake filling and the caramel sauce. It provides a warm, aromatic backbone of flavor.
• Full-fat cream cheese: This is non-negotiable. Full-fat gives you the creamiest, richest texture and ensures your cheesecake sets properly.
• Caster sugar: A fine sugar that dissolves effortlessly into the cheesecake filling and is also used for the caramel sauce.
• Large eggs: They bind the cheesecake filling together and give it structure as it bakes.
• Sour cream: This secret ingredient adds a wonderful tanginess and helps create an incredibly smooth, lush texture in the filling.
• Cornflour: Just a teaspoon helps stabilize the cheesecake filling, reducing the chance of cracking.
• Plain flour: Also known as all-purpose flour, this is the base for our crumble topping.
• Oats: Use old-fashioned rolled oats for the best texture in the crumble. They add a wonderful chewiness and heartiness.
• Double cream: Also called heavy cream, this is for the luxurious salted caramel sauce. Room temperature is safest to prevent splattering.
• Flaky sea salt: The "salted" part of salted caramel. A pinch in the crumble and a teaspoon in the sauce balances all the sweetness perfectly.
How to make Apple Crumble Cheesecake?
Don't let the list of components intimidate you. We're breaking it down into simple, manageable steps. Just take it one layer at a time.
Prepping Your Pan and Oven
First things first, preheat your oven to 180°C (350°F) for a standard oven or 160°C (320°F) for a fan-assisted one. This ensures it's perfectly hot when you're ready to bake.
Grease the sides of a 20-23 cm (8-9 inch) springform tin and line the base with a circle of non-stick baking paper. The springform is key for getting that beautiful cheesecake out in one piece later!
Creating the Biscuit Base
Blitz your digestive biscuits in a food processor until they resemble fine, sandy crumbs. No processor? No problem! A sturdy zip-top bag and a rolling pin work just as well.
Pour in the melted butter and pulse (or mix) until every crumb is coated and the mixture looks like damp sand. This buttery glue is what holds your base together.
Tip the mixture into your prepared tin. Use a glass or the flat bottom of a measuring cup to press it firmly and evenly into the base and a little up the sides. Pop it in the fridge to set while you work on the next steps.
Cooking the Cinnamon-Spiced Apples
Melt a knob of butter in a large frying pan over a low-medium heat. Once it's foaming gently, add your diced apples, brown sugar, and cinnamon.
Give everything a good stir to coat the apples in all that spicy, buttery goodness. Cover the pan and let them cook for about 10 minutes, until they're tender but not mushy.
This is a crucial moment—taste one! Depending on your apples, you might want a touch more sugar or cinnamon. Set them aside to cool slightly.
Mixing the Cheesecake Filling
In a large bowl, beat the full-fat cream cheese until it's completely smooth and lump-free. This is the foundation of your filling, so take a minute to get it right.
Add the caster sugar and beat again until it's fully incorporated. Now, add the eggs one at a time, beating well after each addition. This prevents the mixture from splitting.
Finally, gently mix in the vanilla extract, sour cream, and cornflour. Mix until just combined—overmixing can incorporate too much air and lead to cracks. Set this beautiful, creamy mixture aside.
Making the Crumble Topping
In a separate bowl, combine the plain flour, brown sugar, oats, cinnamon, and a pinch of salt. Give it a quick whisk to distribute everything evenly.
Now, add your cold, cubed butter. Use your fingertips to rub the butter into the dry ingredients until the mixture resembles rough, chunky breadcrumbs. Those little butter pieces are what will create that fantastic crunchy texture.
Assembling and Baking the Masterpiece
Take your chilled base out of the fridge. Pour the cheesecake filling over the base and smooth the top with a spatula. Dollop the spiced apples evenly over the filling.
Now, for the final layer! Take handfuls of the crumble topping and sprinkle it generously over the entire surface. Don't press it down—let it stay loose and craggy.
Bake for 35-40 minutes. The top should be golden, and the cheesecake should have a very slight wobble in the center when you gently shake the tin. It will continue to set as it cools.
The All-Important Cooling Process
This is the secret to a crack-free cheesecake. Turn off the oven, crack the door open, and let the cheesecake cool down inside for at least an hour. This gradual temperature change is everything.
After its oven nap, take it out and let it cool completely on the counter. Then, cover it and refrigerate for at least 6 hours, but overnight is truly best. This patience is rewarded with the perfect slice.
Whipping Up the Salted Caramel Sauce
While the cheesecake chills, make the sauce. Heat the caster sugar in a heavy-based pan over medium heat. Stir initially, then just swirl the pan as it melts into an amber liquid.
Once it's a beautiful copper color, take it off the heat and immediately whisk in the diced butter. Be careful—it will bubble up! Whisk until it's smooth.
Slowly pour in the room-temperature double cream, whisking constantly. Finally, whisk in the vanilla and flaky sea salt. Let it cool, then store it in the fridge. Gently reheat when you're ready to serve.
Serving Your Creation
Run a thin knife around the edge of the chilled cheesecake to loosen it, then unclasp the springform tin. Carefully transfer the cheesecake to a serving plate.
Slice with a sharp knife wiped clean between cuts for beautiful pieces. Drizzle each slice generously with the warm salted caramel sauce. Get ready for the applause.
Best Time to Serve This Dish
This cheesecake is the undisputed champion of autumn and winter gatherings. It just feels right when there's a chill in the air and the leaves are changing color. Think Thanksgiving, Christmas, or a cozy Sunday roast.
That said, its appeal is truly year-round. It’s a spectacular birthday dessert that feels far more special than a standard cake. Bring it to a potluck, and you'll instantly become everyone's favorite person.
It’s rich, so a little goes a long way. It's perfect for finishing off a big meal where you want a dessert that feels indulgent and impressive without being overly fussy or complicated to eat.
Tips
• Room Temperature is Key: Ensure your cream cheese, eggs, and sour cream are at room temperature before making the filling. This prevents lumps and helps everything blend together smoothly and seamlessly.
• Don't Overmix: Once you add the eggs to the cheesecake filling, mix on low speed and only until everything is combined. Overbeating incorporates air, which can cause the cheesecake to puff up and then crack as it cools.
• Cold Butter for Crumble: For the perfect crunchy, crumbly topping, your butter must be cold. If it's soft or melted, you'll end up with a greasy, doughy layer instead of that delightful crunch.
• The Slow Cool: Do not skip the step of letting the cheesecake cool in the turned-off oven with the door ajar. This gradual cooling is the single best defense against a giant crack running through your beautiful dessert.
• Chill Thoroughly: I know it's hard to wait, but you must let the cheesecake chill for the full time, ideally overnight. This sets the structure completely, making it firm enough to slice into clean, beautiful pieces.
Ingredient Substitutions
No digestive biscuits? Graham crackers are the direct US substitute. For a different flavor, try ginger nut biscuits for a spicy kick, or Hobnobs for a heartier, oaty base. The base is very forgiving.
If you're not a cinnamon person, you can easily swap it for ground ginger, nutmeg, or even a pre-mixed pumpkin pie spice blend. The warm spice is the goal, so use your favorite.
While apples are the star, firm pears make a wonderful, elegant alternative. You could even do a half-and-half mix. Just make sure whatever fruit you use is diced small so it distributes evenly.
For a nuttier crumble topping, feel free to stir in a handful of chopped walnuts, pecans, or almonds into the crumble mixture before sprinkling it over the cheesecake.
How to Store and Reheat
This cheesecake is a fantastic make-ahead dessert. Once assembled and cooled, you can keep it covered in the refrigerator for up to 3 days. The flavors actually improve over time.
The salted caramel sauce can be stored in a sealed jar or container in the fridge for up to a week. You can gently reheat it in a microwave in short bursts or in a small saucepan over low heat, adding a splash of cream if it becomes too thick.
I do not recommend freezing the fully assembled cheesecake, as the texture of the creamy filling and the crunchy crumble can suffer. However, you can freeze the baked cheesecake (without the caramel sauce) for up to a month. Thaw it overnight in the fridge before serving.
Leftover slices can be kept covered in the fridge for a few days. They taste delicious cold straight from the fridge, or you can let them sit out for 15 minutes to take the chill off.
Flavor Variations
Feeling adventurous? This recipe is a wonderful canvas. For a deeper, more caramel-like flavor, try using dark brown sugar instead of light brown in both the apples and the crumble.
A "Cherry Bakewell" version could be incredible. Swap the apples for a jar of morello cherries (well-drained), use amaretti biscuits for the base, and add a drop of almond extract to the filling.
For a festive twist perfect for the holidays, add a handful of dried cranberries to the spiced apples as they cook. The little bursts of tartness are a fantastic contrast to the sweet, creamy cheesecake.
Chocolate lovers, I haven't forgotten you. Add a tablespoon of cocoa powder to the biscuit base mixture, or even fold some chocolate chips into the crumble topping before baking.
This Apple Crumble Cheesecake is the ultimate autumn dessert, combining two classics into one show-stopping treat. It features a buttery digestive biscuit base, a rich and creamy vanilla cheesecake layer, tender cinnamon-spiced apples, and a crunchy oaty crumble topping. Served with a luscious homemade salted caramel sauce, this indulgent dessert is perfect for special occasions or easy entertaining — and it tastes even better the next day!
Ingredients
For the biscuit crust:
300g digestive biscuits
115g unsalted butter (melted)
For the cinnamon-spiced apples:
20g unsalted butter
500g eating apples (peeled and diced into small cubes)
Preheat oven to 180°C (350°F) standard / 160°C (320°F) fan. Grease the sides and line the bottom of a 20 cm (8-inch) or 23 cm (9-inch) springform tin with non-stick baking paper.
2
Make the biscuit crustPlace digestive biscuits in a food processor and blitz into fine crumbs. Add melted butter and blend until mixture resembles damp sand.
Alternatively, place biscuits in a sealed bag and crush with a rolling pin.
3
Press the mixture firmly into the base and slightly up the sides of the prepared tin. Chill in the fridge while making the filling.
Use a glass or spoon to compact the crust evenly.
4
Prepare the cinnamon-spiced applesMelt butter in a large non-stick pan over low-medium heat. Add diced apples, brown sugar, cinnamon, and vanilla extract. Stir to coat.
5
Cover and cook gently for about 10 minutes, until apples are tender. Taste and adjust sweetness or spice as needed. Set aside to cool slightly.
Avoid overcooking; apples should hold their shape.
6
Make the cheesecake fillingIn a large bowl, beat cream cheese until smooth and creamy. Add caster sugar and beat again until combined.
7
Add eggs one at a time, beating well after each addition. Mix in vanilla, sour cream, and cornflour until just smooth. Do not overmix.
Overmixing can introduce too much air and cause cracks.
8
Prepare the crumble toppingIn a bowl, combine flour, brown sugar, oats, cinnamon, and a pinch of salt. Rub in cold cubed butter until mixture forms a crumbly texture.
Keep butter cold for best results.
9
Assemble and bakePour cheesecake filling over the chilled crust. Smooth the top with a spatula. Spoon spiced apples evenly over the filling.
10
Sprinkle crumble topping evenly over the apples. Bake for 35–40 minutes, or until set with only a slight wobble in the center.
Baking time may vary depending on tin size.
11
Turn off the oven, crack the door open slightly, and let the cheesecake cool inside for at least 1 hour to prevent cracking.
Slow cooling is key to a smooth surface.
12
Make the salted caramel sauceIn a heavy-based saucepan, melt caster sugar over medium heat, swirling occasionally. Cook until it turns a deep amber color.
Do not stir once sugar begins melting to avoid crystallization.
13
Remove from heat and whisk in butter until smooth. Carefully pour in cream (it will bubble) and whisk until glossy.
Use room-temperature cream to minimize splattering.
14
Stir in vanilla and salt. Let cool completely. Transfer to a jar and refrigerate if not using immediately.
Reheat gently before serving.
15
Chill and serveOnce cooled, cover and refrigerate the cheesecake for at least 6 hours, preferably overnight.
This ensures a firm, sliceable texture.
16
Run a knife around the edge, release the springform, and transfer to a serving plate. Slice and drizzle with warm salted caramel sauce.
Wipe the knife between slices for clean cuts.
Nutrition Facts
Servings 8
Serving Size 1 slice
Amount Per Serving
Calories520kcal
% Daily Value *
Total Fat27g42%
Saturated Fat16g80%
Trans Fat0.5g
Cholesterol135mg45%
Sodium420mg18%
Potassium210mg6%
Total Carbohydrate61g21%
Dietary Fiber2g8%
Sugars45g
Protein8g16%
Calcium 75 mg
Iron 1.8 mg
* Percent Daily Values are based on a 2,000 calorie diet. Your daily value may be higher or lower depending on your calorie needs.
Note
Make ahead: This cheesecake tastes even better the next day! Prepare up to 2 days in advance.
Salted caramel storage: Keep in an airtight container in the fridge for up to 3 days. Reheat gently before serving.
No water bath needed: Thanks to the cornflour and slow cooling, this cheesecake sets beautifully without one.
Butter tip: Use cold butter for the crumble topping to achieve maximum crunch.
Serving suggestion: Pair with extra whipped cream or vanilla ice cream for an indulgent finish.
Keywords:
apple crumble cheesecake, baked cheesecake, apple dessert, autumn dessert, salted caramel cheesecake, easy entertaining dessert, no water bath cheesecake