

There’s something incredibly fun about making a cake that’s meant to look a little bit gross. It breaks all the rules of pretty, delicate baking and lets you embrace the messy, the creative, and the wonderfully weird.
This brain cake is the perfect example. It’s a showstopper that will have everyone gasping before they start laughing. And the best part? It’s far easier to create than it looks.
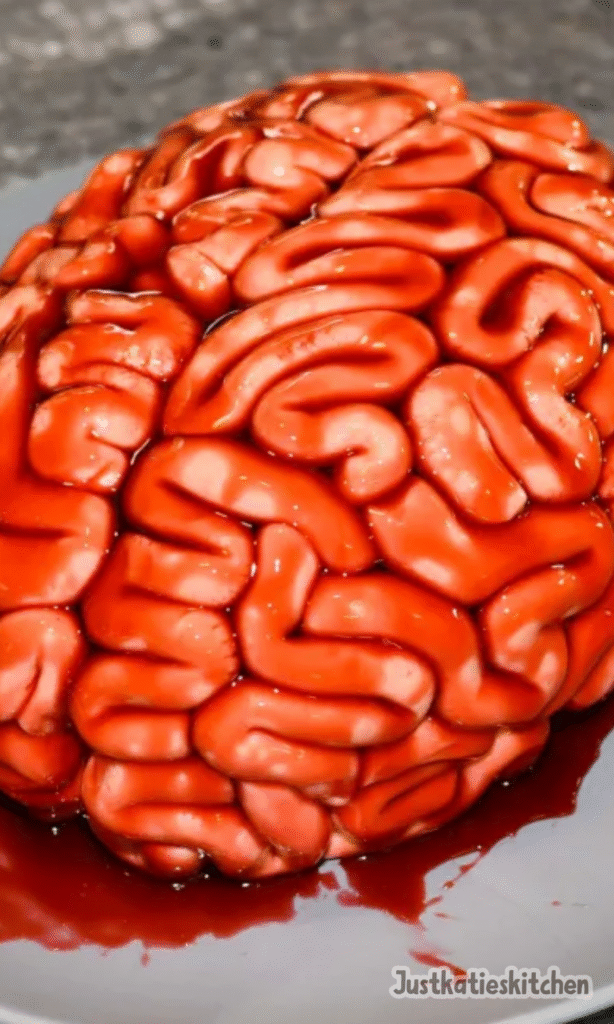
Imagine slicing into a deep red velvet cake, only to reveal a tender, moist crumb that perfectly contrasts with the pink, squiggly exterior. It’s a delicious surprise hiding inside a spooky masterpiece. This project is an adventure, and I’m here to walk you through every single step.
Ingredients Needed for the Recipe
Gathering everything before you start is the secret to a stress-free baking experience. Here’s what you’ll need to bring this brilliant, brainy creation to life.
For the Red Velvet Cake:
- Cake Flour: This gives the cake its signature soft, tender, and fine crumb. If you’re in a pinch, you can make a substitute with all-purpose flour and cornstarch.
- Unsweetened Cocoa Powder: Just a couple of tablespoons! It doesn’t make the cake taste chocolatey, but it deepens the color and adds a subtle, complex background flavor.
- Baking Soda & Fine Salt: The baking soda is our leavening agent, helping the cake rise. The salt balances all the sweetness and enhances the other flavors.
- Unsalted Butter & Granulated Sugar: The classic start to any great cake, creamed together to create a light and fluffy base.
- Eggs: They bind everything together and add structure and richness. Make sure they’re at room temperature for the best incorporation.
- Buttermilk: This is the magic ingredient for a supremely moist cake. Its tanginess also complements the cream cheese frosting beautifully.
- Vegetable Oil: Adding oil to a butter-based cake is a baker’s trick for guaranteeing an incredibly moist texture that stays that way for days.
- Vanilla Extract & White Vinegar: Vanilla for warmth and flavor. The vinegar reacts with the baking soda to give the cake an extra lift and helps intensify that gorgeous red color.
- Red Gel Food Coloring: Gel is highly recommended over liquid. It’s more potent, so you need less, and it won’t throw off the liquid balance in your batter.
For the Cream Cheese Buttercream:
- Unsalted Butter & Cream Cheese: The dream team. Use the full-fat, brick-style cream cheese for the best stability and flavor. Let them both soften at room temperature for a smooth, lump-free frosting.
- Powdered Sugar: This sweetens and thickens the buttercream to a spreadable, pipeable consistency.
- Heavy Cream: A little bit of cream helps thin the frosting to just the right texture. You can adjust the amount as needed.
- Vanilla Extract & Salt: Never underestimate the power of salt in frosting! It cuts the sweetness and makes the vanilla and cream cheese flavors pop.
- Red Gel Food Coloring: Just a tiny squirt to turn our frosting a lovely, brain-like pastel pink.
For the Edible “Blood”:
- Seedless Raspberry or Strawberry Jam: This forms the base of our blood. The seeds would look a little odd, so seedless is the way to go.
- Water & Red Gel Food Coloring: We thin the jam with water to a paintable consistency. The extra food coloring makes it a vibrant, shocking red.
How to Make a Brain Cake That’s Shockingly Good!
This is where the magic happens. Don’t be intimidated by the process. We’re going to build this cake step-by-step, and I promise, it’s a whole lot of fun.
Step 1: Baking the Perfect Red Velvet Layers
Start by preheating your oven to 350°F (175°C). Properly prepare your three 8-inch round cake pans by greasing them, lining the bottoms with parchment paper, and giving them a light dusting of flour. This guarantees a clean release every single time.
In a medium bowl, whisk together your dry ingredients: the cake flour, sifted cocoa powder, baking soda, and salt. Sifting the cocoa is important to avoid any little lumps in your final cake batter. Setting this mixture aside lets us move quickly once the wet ingredients are ready.
In the bowl of a stand mixer fitted with a paddle attachment, or using a hand mixer, cream the room-temperature butter and granulated sugar together. Mix on a medium-high speed for a good 2 minutes. You’re not just combining them; you’re beating air into the mixture until it becomes pale and fluffy.
Step 2: Combining Wet and Dry Ingredients
Add the eggs to the creamed butter and sugar one at a time, mixing well after each addition. Scrape down the bowl to ensure everything is perfectly combined. The mixture should look smooth and cohesive.
Now, it’s time for the messy part! Pour in the buttermilk, vegetable oil, vanilla extract, white vinegar, and that generous teaspoon of red gel food coloring. Mix on a low speed until it’s just combined. Don’t worry if it looks a bit curdled or separated at this stage—this is completely normal and it will all come together beautifully once you add the flour.
With the mixer on low, gradually add your pre-whisked dry ingredients. Mix only until you can no longer see streaks of flour. Overmixing at this stage can lead to a tough cake, so a few final stirs by hand with a spatula is a safe bet.
Step 3: Baking and Shaping the Brain
Divide the batter evenly between your three prepared pans. A kitchen scale is the most accurate tool for this, aiming for about 415 grams per pan. This ensures your layers bake evenly and are all the same height.
Bake for 24-28 minutes. Ovens can be tricky, so start checking at the 24-minute mark. The cakes are done when a toothpick inserted into the center comes out with a few moist crumbs attached. Let the layers cool in their pans for about 10-15 minutes before turning them out onto a wire rack to cool completely.
Once completely cool, it’s time for the first transformation. Stack the three round layers on top of each other. Using a small, sharp knife, trim about an inch off two opposite sides to create an oval shape. Then, gently round off the top. This is the basic form of our brain.
Step 4: Preparing the Pink Buttercream
While the cakes are cooling, make the frosting. In a clean mixer bowl, beat the room-temperature butter and cream cheese together with the paddle attachment until they are completely smooth and creamy. This should take about a minute.
Add the vanilla extract and salt, mixing on low to combine. Then, gradually add the powdered sugar with the mixer running on low. To avoid a sugar-dust explosion, drape a clean kitchen towel over the top of your mixer.
Once all the sugar is incorporated, add the heavy cream and a small squirt of red gel food coloring. Mix on medium speed until the frosting is light, fluffy, and uniformly pink. If it’s too thick, add a touch more cream. If it’s too thin, add a bit more powdered sugar.
Step 5: Assembling and Crumb Coating
Place a small dab of frosting on your cake board or serving plate to anchor the first layer. Place your first trimmed cake layer down. Spread an even layer of buttercream, then repeat with the remaining layers.
Now, with your stacked and filled cake, do any final trimming to perfect that oval, rounded brain shape. Don’t worry about being too precise—brains are naturally a bit lumpy!
Apply a very thin layer of frosting over the entire cake. This is the “crumb coat.” Its job is to trap any loose crumbs, creating a clean canvas for our final decoration. Smooth it out as best you can, then chill the cake for 20 minutes in the fridge (or 5 in the freezer) until the frosting is firm to the touch.
Step 6: The Fun Part: Piping the Brain Matter
Fit a large piping bag with a large round tip, like a Wilton 1A or Ateco 805, and fill it with the remaining pink buttercream. Remove the chilled cake from the refrigerator.
Take an offset spatula or a butter knife and gently score a wavy line down the center of the cake. This divides it into the left and right hemispheres of the brain. Now, starting on one side of this line, pipe continuous, squiggly lines from the top of the cake down to the bottom. Repeat on the other side, covering the entire cake in these ropy, brain-like folds.
Don’t stress about perfection here! Gaps and uneven lines are totally fine. Once the “blood” is on, no one will notice minor imperfections. Once piped, chill the cake again until the frosting is firm.
Step 7: Adding the Gory Final Touch
While the cake chills, whisk together the seedless jam, water, and a little extra red gel food coloring in a small bowl. You’re aiming for a thin, paintable consistency that’s a vivid, bloody red.
Take your chilled cake and, using a silicone pastry brush, generously paint the jam mixture all over the piped buttercream. Get it into every nook and cranny between the squiggles. For extra effect, drizzle some around the base of the cake to look like it’s pooling. And just like that, your masterpiece is complete!
Ingredient Substitutions
Baking should be accessible, so don’t worry if you’re missing an ingredient or have dietary restrictions. Here are some simple swaps that work well.
For the cake, if you don’t have cake flour, you can use a 1:1 gluten-free flour blend. You can also make a DIY version by replacing 2 tablespoons of all-purpose flour in each cup with cornstarch.
If you need a dairy-free version, use vegan butter sticks and a dairy-free milk mixed with a little lemon juice to replace the buttermilk. For the eggs, a commercial egg replacer is your best bet for maintaining the cake’s structure.
In the frosting, you can absolutely use all butter if you’re not a fan of cream cheese. The flavor will be different, but it will still be delicious and hold its shape perfectly for piping. If you don’t have heavy cream, whole milk or even a dairy-free milk alternative can be used to thin the frosting to the right consistency.
Best Time to Serve This Dish
This cake is, of course, the undisputed champion of any Halloween party. It makes for an incredible centerpiece that will be the talk of the night. But its appeal isn’t limited to just one holiday.
Consider it for a neuroscience student’s graduation party, a fun cake for a doctor or psychologist, or a hilariously unexpected birthday cake for someone with a great sense of humor. It’s a conversation starter, no matter the occasion.
It’s best served at room temperature. If you’ve stored it in the fridge, take it out about an hour or two before you plan to serve it. This allows the buttercream to soften up, making it easy to slice and ensuring the red velvet layers are at their most tender and flavorful.
Tips for a Flawless (and Fun) Brain Cake
A few little pieces of advice can make the difference between a good cake and a great one. Here are my top tips for success.
- Chilling your cake layers before you trim and assemble them is a game-changer. About 20 minutes in the freezer firms them up, making them less likely to crumble and much easier to handle and shape.
- Stick with gel food coloring. Liquid food coloring can add too much moisture to your batter and frosting, and you need a lot more of it to achieve a vibrant color, which can sometimes lead to a bitter aftertaste.
- Don’t throw away those cake trimmings! They are a baker’s treat. Crumble them up, mix with a little leftover frosting, and roll into cake pops. Or, just snack on them as a reward for all your hard work.
- Remember, the final step with the jam is incredibly forgiving. It covers a multitude of sins. So if your piping isn’t as neat as you’d hoped, don’t panic. The “blood” will hide everything and make it look brilliantly gruesome.
How to Store and Reheat
Because of the cream cheese frosting, this cake needs to be stored in the refrigerator. It will stay fresh and delicious for up to a week. Just make sure it’s covered well, either in a cake carrier or with a large bowl overturned on top of it, to protect it from absorbing any fridge odors.
You can also freeze this cake for up to a month. Freeze it uncovered until the frosting is solid, then wrap it tightly in a couple layers of plastic wrap and then aluminum foil to prevent freezer burn. Thaw it overnight in the refrigerator before serving.
If you’ve already cut into the cake and have leftovers, a great trick is to use a little extra frosting to “seal” the cut edges. Press a piece of plastic wrap directly onto the exposed cake to keep it from drying out.
Flavor Variations
While the classic red velvet and cream cheese combination is a winner, don’t be afraid to get creative with the flavors inside your brain.
For a chocolate-lover’s version, use a rich devil’s food cake for the layers. The dark brown interior would create a stunning contrast when sliced. A vanilla or even a funfetti cake would also work wonderfully.
You can play with the “blood” too. While raspberry jam offers a nice tang, you could use a seedless blackberry jam for a deeper, darker “venous” blood look. A little melted dark chocolate mixed into the jam could also create a more coagulated effect.
For the buttercream, a dash of strawberry or raspberry extract could enhance the berry notes in the jam. The goal is to make a cake that not only looks amazing but tastes exactly how you like it.
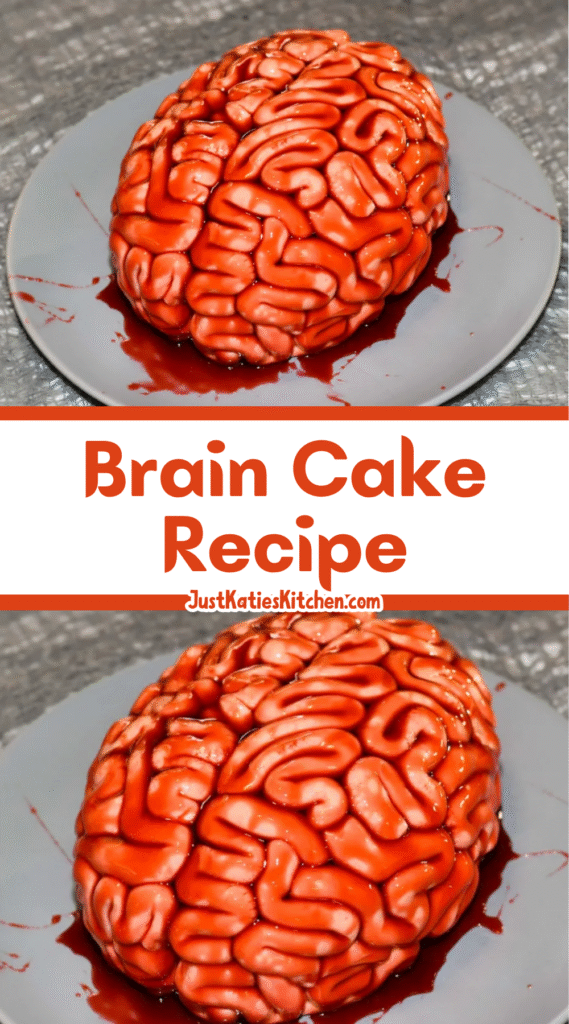
Brain Cake Recipe
Description
This Brain Cake is the ultimate Halloween showstopper—spooky, fun, and surprisingly easy to make! Featuring tender red velvet cake layers, creamy pink cream cheese buttercream piped into brain-like squiggles, and glossy raspberry “blood” drizzled throughout, it’s a ghoulishly delicious dessert that’s perfect for parties or themed celebrations. No special molds needed—just round cake pans and a little creativity!
ingredients
Red Velvet Cake
Cream Cheese Buttercream Frosting
Edible Fake Blood
Instructions
-
Bake the Cake
Preheat oven to 350°F (175°C). Grease and line three 8-inch round cake pans with parchment paper. In a bowl, sift together cake flour, cocoa powder, baking soda, and salt. Set aside. -
In a stand mixer, cream butter and sugar until light and fluffy (1–2 min). Add eggs one at a time, mixing well after each.
-
Mix in buttermilk, oil, vanilla, vinegar, and red food coloring until combined (batter may look curdled—this is normal).
-
Gradually add dry ingredients in two batches, mixing just until incorporated. Divide batter evenly (about 415g per pan). Bake 24–28 minutes, or until a toothpick comes out with moist crumbs.
-
Cool in pans 10 minutes, then transfer to wire racks. Once cool, stack layers and trim sides to form an oval brain shape. Freeze 20 minutes if needed for easier handling.
-
Make the Frosting
Beat butter and cream cheese until smooth. Add vanilla and salt. Gradually add powdered sugar and heavy cream. Adjust consistency as needed. Tint with red gel coloring to achieve a soft pink. Cover and set aside. -
Assemble & Crumb Coat
Stack trimmed cake layers on a cake board with frosting between. Reshape into a rounded brain form if needed. Apply a thin crumb coat of pink frosting. Chill 20 min (fridge) or 5 min (freezer). -
Pipe the Brain Texture
Fit a piping bag with a large round tip (Wilton 1A or Ateco 805). Draw a center line to divide hemispheres. Pipe squiggly lines on both sides to mimic brain folds. Don’t worry about perfection—jam will cover gaps! -
Add the 'Blood'
Whisk jam, water, and optional red coloring until smooth and pourable. Brush generously over piped frosting, filling all crevices. Drizzle extra around the base for dramatic effect. -
Chill 30 minutes before serving to set the jam. Serve at room temperature for best flavor and texture.
Nutrition Facts
Servings 20
Serving Size 1 slice
- Amount Per Serving
- Calories 520kcal
- % Daily Value *
- Total Fat 27g42%
- Saturated Fat 16g80%
- Cholesterol 95mg32%
- Sodium 420mg18%
- Potassium 180mg6%
- Total Carbohydrate 68g23%
- Dietary Fiber 1g4%
- Sugars 52g
- Protein 5g10%
- Calcium 8 mg
- Iron 1 mg
* Percent Daily Values are based on a 2,000 calorie diet. Your daily value may be higher or lower depending on your calorie needs.
Note
- Make ahead: Cake layers freeze beautifully for up to 3 months. Frosting keeps in the fridge for 1 month or freezer for 3 months.
- No cake flour? Make a substitute: for each cup, use 14 Tbsp all-purpose flour + 2 Tbsp cornstarch, sifted twice.
- Dairy-free? Use vegan butter, dairy-free cream cheese, almond milk + vinegar for buttermilk, and plant-based heavy cream alternative.
- Serve chilled or room temp: Remove from fridge 1–2 hours before serving for optimal texture and flavor.
Frequently Asked Questions
Can I make this cake without red velvet?
Yes! Use chocolate or vanilla cake layers instead. Just adjust the frosting color and jam accordingly for a different spooky effect.
How do I store leftovers?
Cover cut edges with extra frosting to lock in moisture. Store in an airtight container in the fridge for up to 5 days.
Can I use store-bought frosting?
You can, but homemade cream cheese buttercream gives better texture for piping and holds the jam better. If using store-bought, chill the cake well before adding jam.