

Let’s be honest. A regular brownie is already a perfect thing. It’s a dense, fudgy, chocolate-packed square of joy. But Halloween? Halloween demands a little more. It asks for a touch of the theatrical, a whisper of the weird, and a whole lot of fun.
That’s where these Halloween brownies come in. They’re not just a dessert; they’re a project, a conversation starter, and the undisputed star of any spooky spread. Imagine the classic, crackly-topped brownie you love, transformed into a canvas for adorable mummies and intricate spider webs.
The magic here is in the contrast. You get the rich, almost grown-up depth of the chocolate base, followed by the playful, sweet crunch of royal icing and candy eyes. It’s a combination that delights kids and earns knowing nods from adults. This is the treat that makes a Halloween party memorable.
Why This Recipe is a Spooky Success
What makes this particular recipe so special is its brilliant simplicity. The brownie base uses cocoa powder instead of melted chocolate, which is not only easier but also delivers an intense, direct chocolate flavor. There’s no fussing with a double boiler or worrying about chocolate seizing.
Furthermore, the method is straightforward and forgiving. You’re essentially whisking and stirring your way to brownie bliss. This means you can focus your creative energy on the best part: the decorating. The final designs—the webs and the mummies—look impressively professional but are surprisingly simple to execute.
It’s a recipe that builds confidence. Even if you’re a baking novice, you’ll finish with a tray of treats that look like they came from a professional bakery. The joy on people’s faces when they see them is absolutely worth the effort.
Ingredients Needed for the Recipe
Gathering your ingredients is the first step to brownie nirvana. Using room-temperature ingredients, especially eggs and butter, is a small secret that makes a big difference in achieving a smooth, perfectly emulsified batter.
For the Brownies:
• Unsalted Butter: It gives the brownies their luxurious, moist texture and rich flavor. Using unsalted allows you to control the salt level perfectly.
• All-Purpose Flour: This provides the structure. A light hand when mixing it in is key to avoiding tough brownies.
• Kosher Salt: This is crucial for balancing the sweetness and making the chocolate flavor pop. Don’t skip it.
• Granulated Sugar: This sweetens the brownies and helps create that beautiful, shiny, crackly top we all love.
• Light Brown Sugar: This is the flavor secret weapon. It introduces a subtle, warm molasses note that adds complexity.
• Unsweetened Cocoa Powder: This is where the deep chocolate soul of the brownie comes from. Use a good-quality one for the best results.
• Large Eggs: They bind the batter and contribute to the fudgy, cake-like structure. Room temperature eggs blend in more evenly.
• Pure Vanilla Extract: A splash enhances all the other flavors, rounding out the chocolate and sweetness beautifully.
• Candy Eyeballs: The pièce de résistance for the mummies! They’re widely available and add an instant, hilarious spook factor.
For the Royal Icing:
• Confectioners’ Sugar: Also known as powdered sugar, it dissolves instantly to create a smooth, hard-drying icing perfect for piping.
• Meringue Powder: This is a safe and easy alternative to raw egg whites. It gives the icing its stable, fluffy structure and allows it to harden.
• Water: This thins the mixture to the perfect piping consistency. Add it slowly to avoid making the icing too runny.
How to make Halloween Brownies?
The process is a joyful ritual. Read through all the steps first, preheat your oven, and clear a space. You’re about to create something wonderful.
Step 1: Preheat Oven and Prep the Pan
Start by preheating your oven to 325°F. This lower temperature is ideal for a dense, fudgy outcome. Now, take your 9×13-inch pan and butter it generously.
The parchment paper sling is a game-changer. Line the bottom and the two long sides, letting the paper hang over the edges. Butter and flour the parchment. This simple step guarantees you can lift the entire brownie slab out perfectly later.
Step 2: Combine the Dry Ingredients
In a medium bowl, grab your whisk. Whisk together the flour and kosher salt. You’re not just mixing here; you’re aerating the flour and ensuring the salt is evenly distributed throughout the batter.
Set this bowl aside. It’s your dry team, ready to be called into the game later. Having it pre-mixed prevents you from over-stirring the batter later, which is a common cause of tough brownies.
Step 3: Melt the Butter and Add Sugars and Cocoa
Create a double boiler by placing a large heatproof bowl over a pot of gently simmering water. Make sure the bottom of the bowl isn’t touching the water. Add the two sticks of butter and let them melt slowly.
Once melted, take the bowl off the heat. Whisk in both the granulated and light brown sugars. The mixture will look thick and gritty. Now, whisk in the cocoa powder. The aroma at this stage is absolutely divine.
Step 4: Incorporate the Eggs and Vanilla
Let the butter mixture cool for a minute so you don’t scramble the eggs. Then, add the eggs one at a time, whisking vigorously after each addition until the batter becomes smooth and glossy.
This gloss is a sign that the eggs are fully emulsified into the fats and sugars. Now, mix in the vanilla extract. It’s the final flavor layer before the flour comes in.
Step 5: Fold in the Flour Mixture
Switch to a spatula for this part. Add the flour and salt mixture to the wet ingredients. Gently fold it in, using broad, sweeping motions.
Stop as soon as you no longer see streaks of white flour. A few faint lumps are okay. Overmixing is the enemy of a fudgy texture, so show some restraint here.
Step 6: Bake to Perfection
Pour the thick, luxurious batter into your prepared pan. Use the spatula to spread it evenly into all the corners. A smooth, level top will bake more evenly.
Slide the pan into the preheated oven. Bake for about 30 minutes. You’ll know they’re done when the top is crackly and a tester inserted into the center comes out with just a few moist crumbs attached.
Step 7: Cool and Cut the Brownies
This step requires patience. Place the hot pan on a wire rack and let the brownies cool for 30 minutes right in the pan. This allows them to set up properly.
Then, use the parchment paper overhang to carefully lift the entire brownie slab onto the wire rack. Let it cool completely. A warm brownie is a fragile thing; cutting it now would be a messy disaster.
Step 8: Prepare the Royal Icing
While the brownies cool, make your decorating medium. In the bowl of a stand mixer fitted with a paddle attachment, combine the confectioners’ sugar and meringue powder.
Start on low speed and slowly add the water. Then, increase the speed to medium-high and beat for a full 7 to 8 minutes. The icing is ready when it’s fluffy, dense, and holds stiff peaks.
Creative Decoration Techniques
This is where the magic happens. Divide your icing if you want to make both designs. Keep any icing you’re not using immediately covered with a damp cloth to prevent it from drying out.
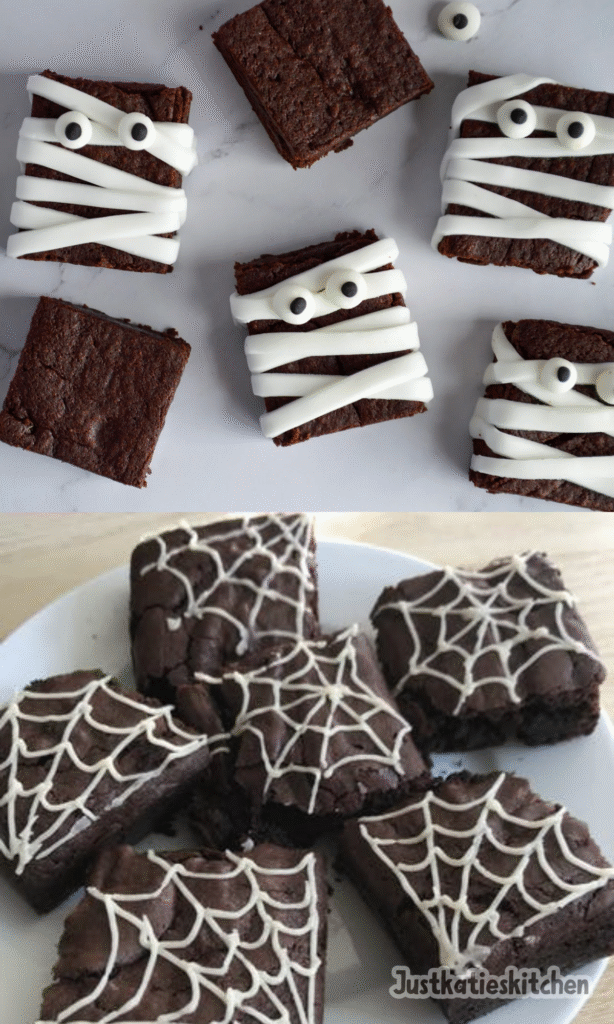
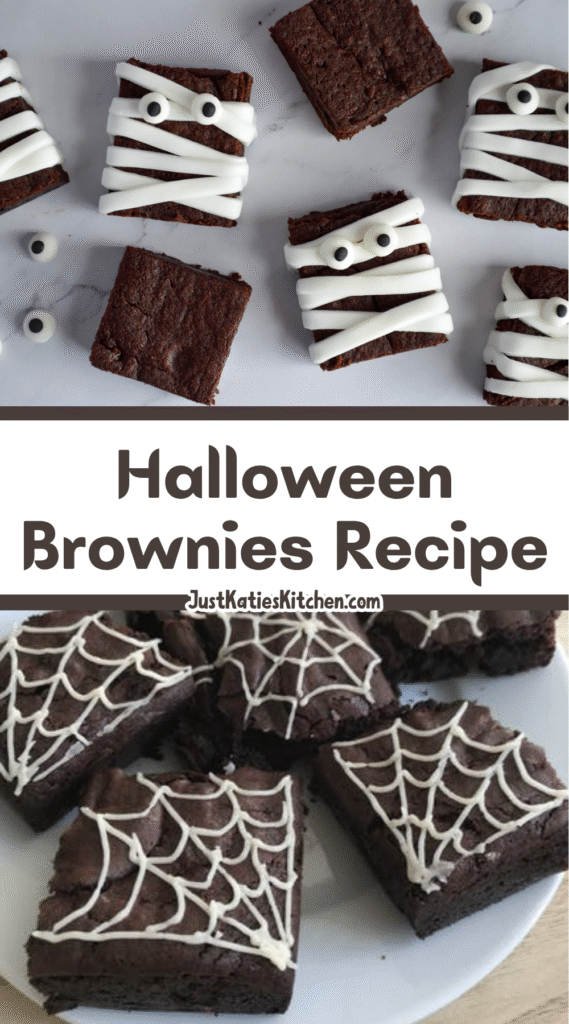
Create the Spooky Spider Webs
For this design, you should have cut your brownies into squares. Fit a piping bag with a small round tip. Fill the bag with the royal icing.
On a square brownie, pipe a small dot in the center. Then, pipe four or five straight lines radiating out from the dot to the corners and edges. Now, connect these lines by piping concentric curved lines between them, creating the classic web pattern.
Assemble the Frightening Mummies
For the mummies, you’ll need rectangular brownies. Switch your piping tip to a small ribbon tip. This gives the icing a flat, bandage-like appearance.
Pipe zig-zagging lines of icing across the brownie, leaving small, random gaps to suggest old, tattered wrappings. While the icing is still wet, gently press two or three candy eyeballs into one of the exposed “gaps.” And just like that, your mummy has come to life.
Best Time to Serve This Dish
These brownies are incredibly versatile. They are, of course, the ultimate Halloween party dessert. Place them on a tiered stand for a dramatic centerpiece that will have guests reaching for their phones before their plates.
But don’t stop there. They make a fantastic project for a kids’ Halloween baking party. Let the little ones decorate their own—the results are always charming and full of personality. They’re also the perfect treat to bring to a school event or a neighborhood potluck.
Honestly, they’re a joy to make and eat any chilly autumn afternoon. The process of baking and decorating is a wonderful way to lean into the festive spirit of the season, creating memories along with the treats.
Tips
- For the cleanest, most professional cuts, you can even pop the completely cooled brownie slab into the freezer for about 20 minutes before slicing. Use a sharp knife and wipe it clean between cuts.
- If your royal icing is too thick, add water a single drop at a time. If it’s too thin and runny, add a little more confectioners’ sugar. You’re aiming for a consistency that holds its shape when piped.
- Don’t have piping bags? No problem. You can use sturdy plastic zip-top bags. Just spoon the icing into a bag, push it down to one corner, and snip a very tiny piece off the corner to create a DIY piping bag.
- Let the decorated brownies sit out, uncovered, for a few hours to allow the royal icing to harden completely. This makes them much easier to stack, store, and transport without smudging your beautiful designs.
How to Store and Reheat
Storage is straightforward but important. Once the royal icing has fully set, you can store these brownies in a single layer in an airtight container at room temperature. They will keep beautifully for up to 3 days.
If you need to store them for longer, you can freeze them. Place the decorated brownies in a single layer on a baking sheet to freeze them solid, then transfer them to a freezer-safe bag or container. They can be frozen for up to a month.
Thaw them overnight in the refrigerator or for a few hours at room temperature. I do not recommend reheating them, as the heat will melt the icing and make the candy eyes weep. They are truly best enjoyed at room temperature.
Ingredient Substitutions
Baking is a science, but there’s a little wiggle room. If you’re in a pinch, you can use salted butter. Just reduce the added kosher salt in the recipe by half to account for the extra salt in the butter.
If you don’t have light brown sugar, dark brown sugar will work. It will impart a stronger molasses flavor, making the brownies even richer and slightly darker in color. It’s a delicious variation.
For a gluten-free version, a 1-to-1 gluten-free all-purpose flour blend can typically be used in place of the regular flour with excellent results. Just ensure your cocoa powder is also certified gluten-free.
And what about the candy eyes? If you can’t find them, you can make simple eyes with a tiny dot of black icing gel on a small white chocolate chip. It requires a steadier hand, but it’s a perfectly cute alternative.
The journey from simple ingredients to a spectacular platter of Halloween brownies is one of the most satisfying baking experiences. It combines the comfort of a classic recipe with the pure joy of seasonal creativity. So, preheat your oven, and get ready to make something spooktacular.
Halloween Brownies Recipe
Description
These Halloween brownies are the spookiest, most delicious treat around! Start with rich, fudgy homemade brownies, then decorate them as eerie spider webs or adorable mummy faces using royal icing and candy eyeballs. Perfect for parties, trick-or-treat favors, or a festive family dessert—these frightfully fun treats are a hit with kids and adults alike.
ingredients
Brownies
Royal Icing & Decoration
Instructions
-
Preheat oven to 325°F (163°C). Butter a 9x13-inch baking pan. Line bottom and long sides with parchment paper, leaving a 2-inch overhang. Butter and lightly flour the parchment; tap out excess.
-
In a bowl, whisk together flour and salt. Set aside.
-
In a large heatproof bowl set over a pot of simmering water (double boiler), melt butter. Remove from heat and whisk in granulated and brown sugars until combined.
-
Whisk in cocoa powder until smooth. Add eggs one at a time, whisking well after each. Mix in vanilla extract.
-
Gently fold in the flour mixture until just combined—do not overmix.
-
Pour batter into prepared pan and smooth the top with a spatula.
-
Bake for 30 minutes, or until the top is crackly and a toothpick inserted in the center comes out clean.
-
Cool in pan for 30 minutes on a wire rack. Use parchment overhang to lift brownies out. Cool completely before cutting.
-
While brownies cool, make royal icing: Beat confectioners’ sugar, meringue powder, and water with an electric mixer on low for 7–8 minutes until thick and glossy.
-
For spider webs: Cut brownies into squares. Fit piping bag with small round tip (#3). Pipe straight lines from corners toward center, then connect with curved lines to form webs.
-
For mummies: Cut brownies into rectangles. Use a ribbon tip (#44) to pipe zig-zag 'bandages' across each. Press 1–2 candy eyeballs into the icing before it sets.
Nutrition Facts
Servings 24
Serving Size 1 brownie
- Amount Per Serving
- Calories 180kcal
- % Daily Value *
- Total Fat 8g13%
- Saturated Fat 5g25%
- Cholesterol 45mg15%
- Sodium 125mg6%
- Potassium 90mg3%
- Total Carbohydrate 27g9%
- Dietary Fiber 1g4%
- Sugars 19g
- Protein 2g4%
- Calcium 2 mg
- Iron 1 mg
* Percent Daily Values are based on a 2,000 calorie diet. Your daily value may be higher or lower depending on your calorie needs.
Note
- Make ahead: Brownies can be baked up to 2 days ahead and stored at room temperature in an airtight container. Royal icing can be made 1–2 days ahead—cover surface with plastic wrap and refrigerate.
- No piping tips? Use a zip-top bag with a tiny corner snipped off for simple web or bandage designs.
- Storage: Decorated brownies keep at room temperature for up to 2 days. Do not refrigerate—icing may soften.
- Kid-friendly activity: Let children decorate their own mummy or spider brownies for a fun Halloween baking project!
Frequently Asked Questions
Can I use store-bought brownie mix instead?
Yes! Use a high-quality fudge brownie mix (9x13 size) and follow package instructions. Let cool completely before decorating with royal icing.
Where can I find candy eyeballs?
Candy eyeballs are available at craft stores (like Michaels or Hobby Lobby), baking supply shops, major supermarkets in the seasonal aisle, or online (Wilton brand is widely recommended).
Can I make these gluten-free?
Yes—substitute the all-purpose flour with a 1:1 gluten-free baking flour blend and ensure all other ingredients (especially cocoa and icing sugar) are certified gluten-free.