

There’s something magical about Halloween treats that look spooky but are secretly sweet and simple. These Graveyard Pudding Cookie Cups are exactly that. They capture the playful, eerie spirit of the season without any complicated baking.
Imagine individual cups filled with chocolatey “dirt,” a creamy, ghostly pudding center, and adorable cookie tombstones. They’re a project that feels creative and fun, whether you’re making them with kids or prepping for a party. The best part is how they bring a smile to everyone’s face.
I first fell in love with this idea years ago, thanks to a friend’s mom. She brought a similar graveyard cake to a school party, and it felt like pure magic. We were all completely mesmerized by the little details. This is my take on that wonderful memory.
Ingredients Needed for the Recipe
Gathering your ingredients is the first step to creating your edible graveyard. You won’t need anything fancy, just a few key items that come together to create something wonderfully thematic. Here’s what you’ll need for about six servings.
• Chocolate Instant Pudding Mix (5.1 oz): This is the base of your creamy layer. It provides that rich, chocolate flavor and sets up beautifully. Using instant pudding means no cooking is required, which is a huge time-saver.
• Milk (3 cups): Whole milk works best for a creamier, thicker pudding consistency. It’s the liquid that activates the pudding mix and brings it all together.
• Cool Whip (8 oz), thawed: This lightens the pudding, giving it a mousse-like, airy texture. It makes the filling less dense and more cloud-like, which contrasts nicely with the crunchy cookie layers.
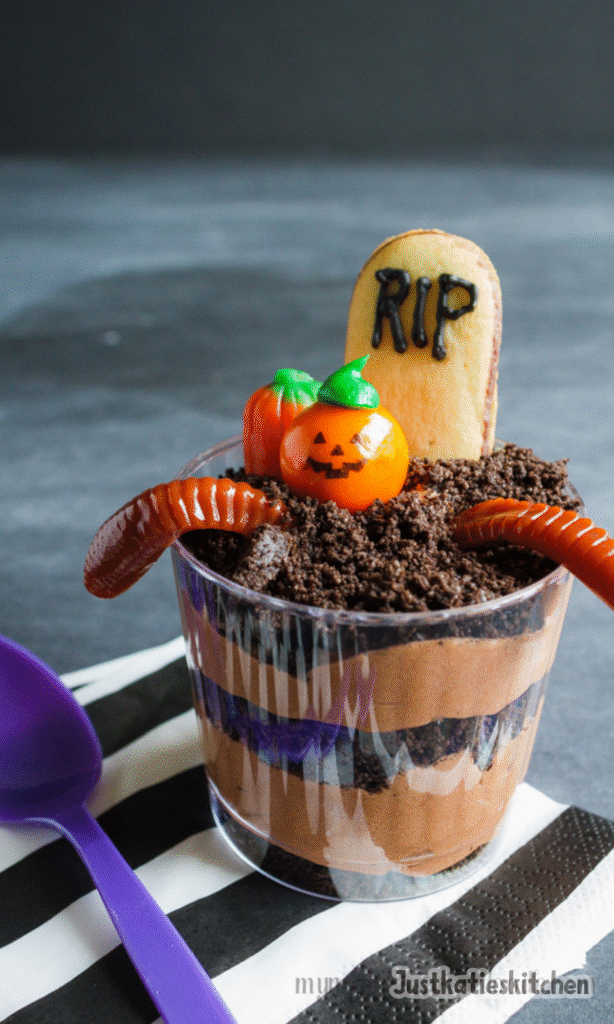
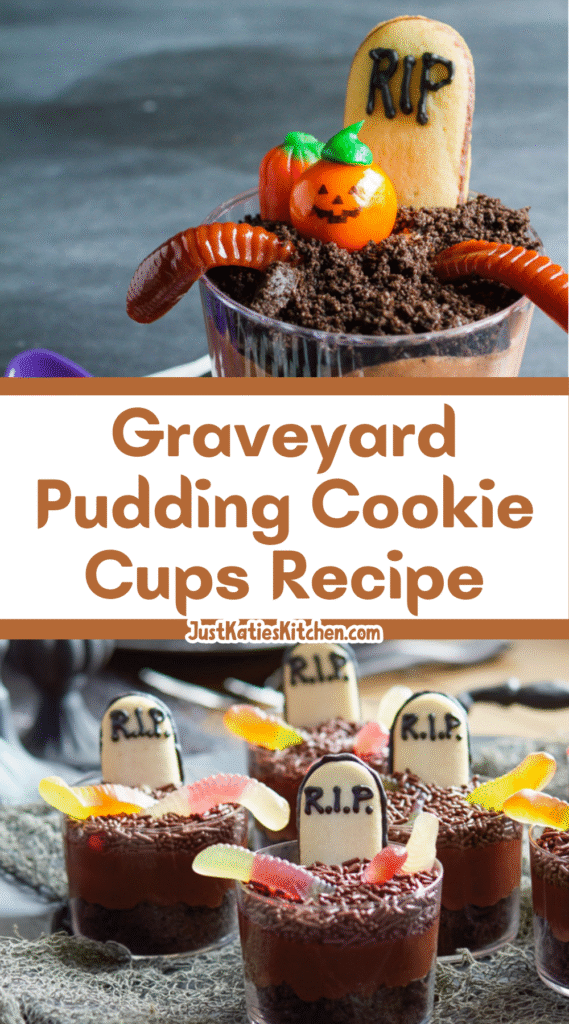
• Oreo Cookies (24): These are the star of the “dirt” layers. When crushed, they create that perfect, dark, crumbly soil. You don’t even need to remove the cream filling—it all gets blended in.
• Milano Double Chocolate Cookies (6): These are your tombstones. Their oblong shape is just right for writing “RIP” on. Their sleek chocolate finish makes them look wonderfully polished and tombstone-like.
• Black Frosting or a Black Edible Marker: This is for the tombstone detailing. A marker is less messy, but frosting in a piping bag with a very small tip gives you more of a classic, piped-on look.
• Candy Pumpkins (6): These add a classic Halloween pop of color. They represent the pumpkins you’d find scattered around a graveyard, and their chewy sweetness is a delightful surprise.
• Candy Googley Eyes: Press these into the cookie dirt to create the illusion of little monsters or creatures peeking out. They inject a dose of playful fun and are always a hit with kids.
• Gummy Worms (optional): For the final, wriggly touch. Poking a few of these out of the dirt makes the whole scene feel more alive, in a creepy-crawly kind of way.
The Best Time to Serve This Dish
These pudding cups are incredibly versatile for all your autumn gatherings. They shine brightest at a Halloween party, of course, placed proudly on a dessert table. The individual servings make them easy for guests to grab and enjoy.
They also make for a fantastic after-school surprise in October. Seeing these on the counter after a long day feels like a special event. It’s a small way to make an ordinary afternoon feel a little spooky and extraordinary.
Consider them for a themed movie night, too. Pair them with a classic Halloween film, some cozy blankets, and you have a perfect, memorable evening. They’re a treat that’s as much about the experience as they are about the taste.
How to make Graveyard Pudding Cookie Cups?
The process is straightforward and, honestly, a lot of fun. It’s about assembly and artistry, not difficult techniques. Let’s break it down into simple, manageable steps.
Step 1: Prepare Your Tombstones
Start by taking your Milano cookies and your black frosting or edible marker. Carefully write “RIP” on each one. You can make the letters look old and cracked for a more authentic feel, or keep them neat and clear.
Set these finished tombstones aside on a plate. This is a great step to delegate to little helpers, as it doesn’t involve any mess and lets them be creative. Just be sure the ink or frosting has a moment to set.
Step 2: Create the Creamy Pudding Filling
In a stand mixer fitted with the whisk attachment, combine the instant pudding mix and the cold milk. Whisk them together on a medium speed for a full two minutes. This ensures the pudding is smooth and has started to thicken properly.
Now, take your thawed Cool Whip and gently fold it into the pudding mixture. Use a spatula and a light hand, scooping from the bottom and folding over the top. You want to keep as much air in the mixture as possible until it’s uniformly blended.
Step 3: Build the Crumbly Dirt Layers
Place your Oreo cookies into a food processor and pulse until they become fine, dark crumbs. No food processor? No problem. You can also place them in a sturdy zip-top bag and crush them with a rolling pin.
Get your clear cups ready. Sprinkle 3 to 4 tablespoons of the Oreo crumbs into the bottom of each cup. Gently shake or tap the cup to create an even layer of “dirt” at the very bottom. This is your foundation.
Step 4: Assemble the Spooky Scenes
Now for the fun details. Take a few candy googley eyes and press them against the inside of the clear cup, nestled right into the crumbs. This makes it look like little creatures are buried in the dirt, watching you.
Spoon a layer of your creamy pudding mixture on top of the crumbs, being careful not to dislodge the eyes. You want this layer to be thick enough to hide the crumbs below but leave room for more layers.
Repeat the process: add another layer of Oreo crumbs, press in a few more eyes, and then another layer of pudding. Finally, top it all off with a final generous sprinkling of Oreo crumbs, almost up to the lip of the cup.
Step 5: Finalize Your Graveyard
Take one of your prepared tombstone cookies and firmly press it down into the center of the pudding cup. You want it to stand up straight and tall, so push it down until it feels secure.
Gently press a candy pumpkin into the dirt right beside the tombstone. If you’re using gummy worms, you can nestle them partly in the dirt so they look like they’re emerging. And just like that, your spooky dessert is complete.
Ingredient Substitutions
Don’t have every single item on the list? Don’t worry. This recipe is wonderfully adaptable. You can make several easy swaps without losing the spooky charm.
If you can’t find Milano cookies, any oblong cookie will work. Pepperidge Farm Pirouette cookies can be cut to size, or even simple rectangular butter cookies. The goal is just to have a good surface for your “RIP” message.
For a from-scratch twist, you can use homemade chocolate pudding and freshly whipped cream instead of the instant mix and Cool Whip. It will taste incredibly rich and decadent, though it will take a bit more time and effort.
Not a fan of chocolate? Use vanilla pudding and golden Oreos for a “sandy” graveyard instead of a dirt one. The candy pumpkins and googley eyes will still pop beautifully against the lighter background.
Tips
- A few small tricks can make a big difference in your final presentation. First, make sure your pudding has had a few minutes to set after mixing before you start assembling. This prevents the layers from bleeding into each other too much.
- When pressing the tombstone into the cup, angle it slightly if it feels unstable. You can also use the back of a spoon to create a small, firm pocket in the pudding and crumbs for the cookie to slide into. This helps it stay upright.
- For the absolute best visual impact, use truly clear plastic cups. The fun is in seeing all the layers and the hidden googley eyes peeking out from the sides. It’s a detail that really sells the whole graveyard effect.
How to Store and Reheat
Well, you don’t actually reheat these! They are a chilled dessert, meant to be served cold. Storage, however, is key to keeping them looking their best. They should be stored covered in the refrigerator.
If you need to make them ahead of time, you can assemble the cups up to a day in advance. However, wait to add the final cookie tombstone and candy pumpkin until just a few hours before serving.
This prevents the cookies from getting too soft and soggy from the pudding. The tombstones should have a little bite to them for the perfect texture contrast. The gummy worms are also best added right before serving.
Why This Recipe is a Halloween Staple
This recipe has endured for a reason. It hits that perfect sweet spot between being incredibly easy and wildly creative. There’s no baking involved, which removes a huge barrier for many people, especially during a busy holiday season.
It’s also a fantastic group activity. From crushing the Oreos to writing on the tombstones to pressing in the googley eyes, there’s a job for every age and skill level. It creates a fun, collaborative kitchen experience.
Finally, it’s just pure, nostalgic joy. The combination of chocolate, cream, and cookies is a timeless winner. Dressing it up in a spooky costume makes it feel new and exciting, year after year. It’s a tradition in the making for your own family.
Graveyard Pudding Cookie Cups Recipe
Description
Graveyard Pudding Cookie Cups are a spooktacular Halloween classic! These individual dessert cups feature layers of creamy chocolate pudding, Oreo “dirt,” cookie tombstones, candy pumpkins, and googly eyes for a fun, festive treat that’s as delicious as it is eerie. Perfect for school parties, after-school snacks, or your Halloween dinner spread!
ingredients
Instructions
-
Using black frosting (in a piping bag with a fine tip) or a black edible marker, write 'RIP' on each Milano cookie to create tombstones. Set aside to dry.
-
In a stand mixer or large bowl, whisk together chocolate pudding mix and milk on medium speed for 2 minutes until thickened.
-
Gently fold in the thawed Cool Whip until fully combined and smooth. Refrigerate while preparing other components.
-
Crush the Oreo cookies in a food processor or sealed bag until fine crumbs form (about 2 cups total).
-
Place 3–4 tablespoons of Oreo crumbs into the bottom of each of 6 clear 9 oz. plastic cups.
-
Press 2–3 googly eyes between the crumbs and the inside wall of each cup so they appear to be peeking out.
-
Spoon a layer of chocolate pudding mixture evenly over the crumbs in each cup.
-
Repeat the crumb, eyes, and pudding layers once more in each cup.
-
Top each cup with a final generous layer of Oreo crumbs, filling nearly to the rim.
-
Firmly insert one cookie tombstone into the center of each cup.
-
Gently press a candy pumpkin beside each tombstone. Add gummy worms sticking out of the 'dirt' if desired.
Nutrition Facts
Servings 6
Serving Size 1 cup
- Amount Per Serving
- Calories 320kcal
- % Daily Value *
- Total Fat 13g20%
- Saturated Fat 6g30%
- Cholesterol 15mg5%
- Sodium 380mg16%
- Potassium 220mg7%
- Total Carbohydrate 48g16%
- Dietary Fiber 2g8%
- Sugars 32g
- Protein 5g10%
- Calcium 15 mg
- Iron 2 mg
* Percent Daily Values are based on a 2,000 calorie diet. Your daily value may be higher or lower depending on your calorie needs.
Note
- Make ahead: Assemble up to 6 hours in advance; keep refrigerated and add tombstones just before serving to prevent sogginess.
- Allergy note: Use dairy-free pudding, milk, and whipped topping for a lactose-free version. Ensure candies are allergen-safe.
- Kid-friendly: Let children decorate their own cups for a fun Halloween activity!
- No Milano cookies? Use shortbread or graham crackers cut into rectangles as tombstones.
Frequently Asked Questions
Can I make these pudding cups ahead of time?
Yes! Assemble the layers up to 6 hours in advance and refrigerate. Add the cookie tombstones and candy pumpkins right before serving to keep them crisp.
Can I use homemade pudding instead of instant mix?
Absolutely! Use 3 cups of chilled homemade chocolate pudding in place of the instant mix + milk. Just ensure it’s thick enough to hold layers.
Are these suitable for nut allergies?
Oreos and Milano cookies are typically nut-free, but always check labels. Candy pumpkins and googly eyes may be processed in facilities with nuts—verify packaging if allergies are a concern.