

There’s something truly special about a cake that isn’t just dessert, but a story. This one is a tale of tart rhubarb, sweet raspberries, and a tender, buttery crumb that comes together in the most beautiful, marbled way.
It’s the kind of bake that feels both impressive and deeply comforting. You get the joy of creating something stunning with the simple pleasure of knowing it’s going to taste absolutely incredible.
This isn’t a fussy, complicated project. It’s a welcoming, forgiving recipe that celebrates the vibrant, tangy flavors of spring and summer. Let’s get started on making something wonderful.
Ingredients Needed for the Recipe
Gathering your ingredients is the first step to success. Using room temperature items is a small detail that makes a huge difference in creating a smooth, perfectly textured batter.
Here’s what you’ll need to bring this beautiful cake to life:
• All-Purpose Flour: The foundation of our cake. It provides the structure that holds all our lovely swirls together.
• Granulated Sugar: Sweetens the deal and helps create a tender crumb by interacting perfectly with the butter.
• Unsalted Butter: Softened to room temperature. This is key for a light and fluffy cake texture and that rich, classic flavor we all love.
• Eggs: Also at room temperature. They bind everything together and add moisture and richness to the batter.
• Whole Milk: Adds necessary moisture for a soft, delicate cake that isn’t the least bit dry.
• Vanilla Extract: A must for any great cake. It provides a warm, aromatic base note that complements the fruit.
• Baking Powder: Our leavening agent. This is what gives the cake its lift and makes it beautifully light.
• Salt: A pinch to balance all the sweetness and make the other flavors pop. Don’t skip it!
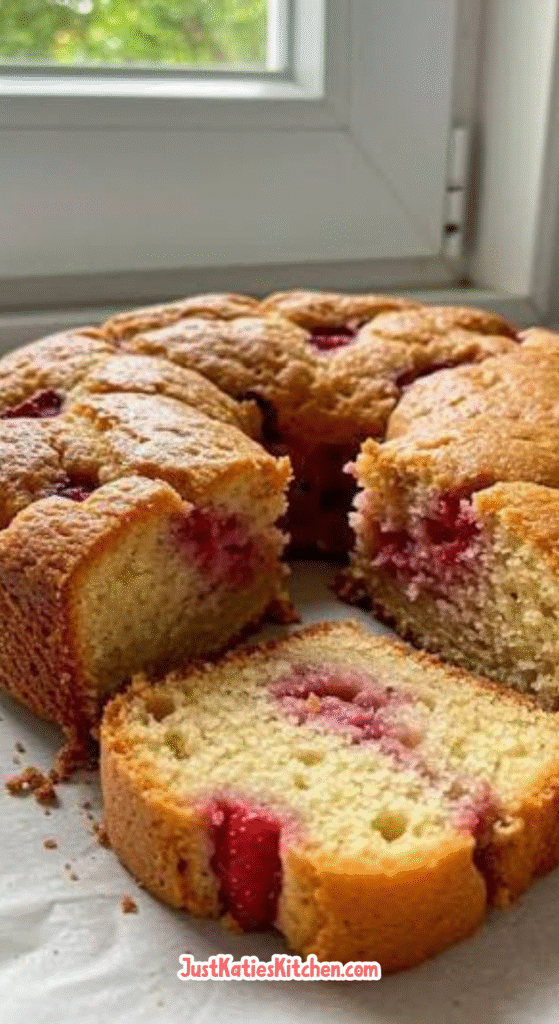
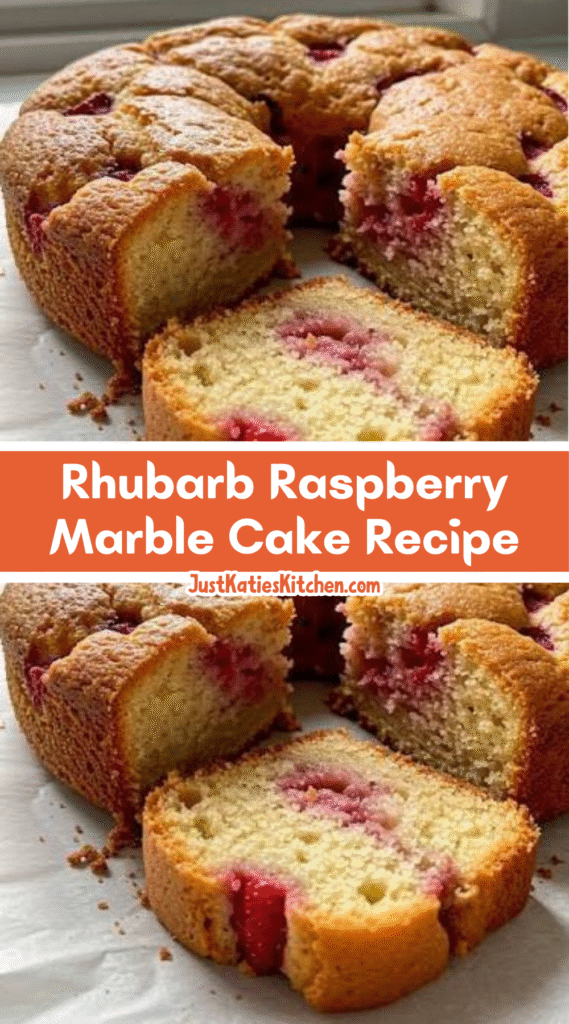
• Fresh Rhubarb: The star of the show! Look for firm, crisp stalks with a vibrant red color for the best flavor and a gorgeous pink hue.
• Fresh Raspberries: Their sweet-tart jamminess is the perfect partner for the rhubarb. They create a vibrant, flavorful swirl.
• Cornstarch: Just a little bit to thicken the fruit mixture so it stays in pretty ribbons and doesn’t sink.
How to make Rhubarb Raspberry Marble Cake?
The process is a joy. It’s about gently folding and swirling, not strenuous mixing. Embrace the process and don’t worry about making it perfect.
The beautiful, random patterns you create are what make this cake so uniquely charming. Let’s walk through it step by step.
Preparing Your Fruits and Pans
Start by preheating your oven to 350°F (175°C). Grease and line a 9×5 inch loaf pan or a 9-inch round cake pan with parchment paper, letting the edges overhang for easy removal later.
Now, chop the rhubarb into small, half-inch pieces. In a small bowl, toss the rhubarb and raspberries with a tablespoon of sugar and the cornstarch. This will draw out their juices and help the swirl hold its shape.
Creating the Cake Batter
In a medium bowl, whisk together the flour, baking powder, and salt. Set this dry mixture aside for a moment.
In a larger bowl, use an electric mixer to cream the softened butter and sugar together until it’s light, pale, and fluffy. This should take about 3-4 minutes. Don’t rush this step—it creates air pockets for a light cake.
Combining the Wet and Dry
Beat the eggs into the butter-sugar mixture one at a time, making sure each is fully incorporated before adding the next. Mix in the vanilla extract.
Now, gently add the flour mixture and the milk to the batter. Do this in three parts, alternating between them: start and end with the dry ingredients. Mix on low speed until *just* combined. A few streaks of flour are okay—overmixing is the enemy of a tender cake.
The Marbling Magic
Pour about two-thirds of the batter into your prepared pan and smooth the top. Scatter about half of your sugared fruit mixture over this layer.
Dollop the remaining batter over the fruit, then top with the rest of the rhubarb and raspberries. Take a knife or a skewer and gently swirl it through the batter in a figure-eight pattern. Just a few passes is all you need!
Baking to Perfection
Place the pan in the center of your preheated oven. Bake for 50-60 minutes, or until a skewer inserted into the center of the cake comes out clean, perhaps with a few moist crumbs attached.
The top should be a lovely golden brown. If it’s browning too quickly, you can tent it loosely with a piece of aluminum foil for the last 15 minutes of baking.
Cooling and Serving
Once baked, let the cake cool in the pan for at least 20 minutes. This allows it to set so it doesn’t fall apart when you take it out.
Then, use the parchment paper overhang to lift it out onto a wire rack. Let it cool completely before slicing. This is the hardest part, but it’s worth the wait for clean slices.
Best Time to Serve This Dish
This cake is incredibly versatile. It’s a brilliant centerpiece for a weekend brunch, sitting proudly next to a pot of coffee.
It also makes for a stunning afternoon tea cake, served in modest slices on pretty plates. Honestly, it’s a welcome treat any time of day.
Its bright, fruity flavor makes it a quintessential spring and summer dessert. It’s the perfect thing to bring to a picnic or a potluck barbecue.
Tips
- Always ensure your butter, eggs, and milk are truly at room temperature. This helps them emulsify into the batter better, creating a finer crumb.
- When marbling, less is more. A few gentle swirls with a knife create a beautiful pattern. Over-swirling will muddle the colors and textures.
- Resist the urge to open the oven door during the first 40 minutes of baking. The rush of cold air can cause the cake to fall.
- For an extra flavor boost, add a teaspoon of orange or lemon zest to the cake batter. The citrus notes pair beautifully with the rhubarb and raspberry.
- Let the cake cool completely before slicing. This allows the structure to set, ensuring you get those beautiful, clean slices that show off the marble.
Ingredient Substitutions
No fresh rhubarb? Frozen works in a pinch! There’s no need to thaw it first; just toss it directly with the sugar and cornstarch.
You can also use frozen raspberries. Again, use them straight from the freezer to prevent them from turning into complete mush in the batter.
If you need a dairy-free version, a plant-based milk and a good vegan butter substitute will work well in this recipe. The fruit is the real star here.
For a gluten-free cake, a 1-to-1 gluten-free baking flour can be used instead of all-purpose flour with great success.
How to Store and Reheat
This cake will keep beautifully at room temperature, covered tightly, for up to two days. After that, it’s best to refrigerate it due to the fresh fruit.
It can be stored in the fridge for up to 5 days. Let a refrigerated slice come to room temperature for about 30 minutes before eating for the best texture and flavor.
You can also freeze this cake for up to 3 months. Wrap the fully cooled cake (or individual slices) tightly in plastic wrap and then in foil. Thaw overnight in the refrigerator.
Flavor Variations
The basic formula here is a fantastic canvas. Try swapping the raspberries for chopped strawberries or blackberries for a different twist.
A touch of warmth from ground ginger or a pinch of cinnamon in the batter can be a lovely complement to the tart rhubarb.
For a more decadent treat, a simple vanilla glaze drizzled over the top of the cooled cake adds a sweet finish and makes it extra special.
If you’re a fan of nuts, folding a half-cup of chopped pecans or walnuts into the batter adds a wonderful textural contrast.
A Final Thought
Baking this cake is an experience. It’s about embracing the beauty of imperfect, swirling patterns and the joy of seasonal flavors.
It’s the kind of recipe that feels like a hug from the kitchen. It’s meant to be shared, to be enjoyed slowly, and to create a little moment of sweetness in your day.
So preheat that oven, grab your favorite mixing bowl, and get ready to make something truly delightful. Every slice is a little piece of art.
Rhubarb Raspberry Marble Cake Recipe
Description
This Baked Ravioli recipe is a delicious, easy-to-make casserole that skips the boiling step! Perfectly tender ravioli bakes in a rich meaty marinara sauce with a hint of creaminess and layers of gooey mozzarella cheese. It's an ideal make-ahead meal for busy weeknights or family dinners.
ingredients
Instructions
-
Preheat oven to 350 degrees.
-
Season the ground beef with salt and pepper and add it to a large skillet over medium-high heat. Cook and crumble it for 3 minutes. Add the seasonings, hot sauce, Worcestershire sauce, and the onions and cook for 5 more minutes. Add the garlic and cook for 1 more minute. Tilt the skillet and spoon out any excess grease. Reduce heat to low.
-
Spread 3/4 cup of marinara sauce on the bottom of a 9 x 13-inch casserole dish and add the rest to the skillet with the meat. Add the half and half and stir to combine. Remove from heat.
-
Arrange half of the ravioli on the bottom of the casserole dish and top with half of the meat sauce, then top with ½ cup mozzarella cheese.
-
Top with remaining ravioli, then the meat sauce and remaining mozzarella.
-
Cover and bake for 35 minutes. If covering with foil, spray one side with non-stick cooking spray to prevent it from sticking to the cheese while it bakes.
-
Remove cover and broil at 450 to brown the top slightly. It’ll take just 1-2 minutes, watch it closely during this time.
-
Remove from heat and serve!
Nutrition Facts
Servings 6
Serving Size 1 serving
- Amount Per Serving
- Calories 549kcal
- % Daily Value *
- Total Fat 22g34%
- Saturated Fat 10g50%
- Trans Fat 1g
- Cholesterol 108mg36%
- Sodium 1507mg63%
- Potassium 675mg20%
- Total Carbohydrate 52g18%
- Dietary Fiber 6g24%
- Sugars 9g
- Protein 37g74%
- Calcium 377 mg
- Iron 5 mg
* Percent Daily Values are based on a 2,000 calorie diet. Your daily value may be higher or lower depending on your calorie needs.
Note
- Pro Tips:
- Frozen ravioli may also be used, add 15 minutes of additional baking time, or until the cheese is melted when you lift up the cover for broiling.
- I use Rana 4-cheese refrigerated ravioli for this recipe, but any filling option that you like will work!
- If you love extra saucy ravioli or anticipate leftovers, consider using up to 1 additional cup of sauce. (32 oz. total.) The ravioli absorbs sauce during cooking and even more after it’s been baked/during storage.
- A combination of ground beef, pork, and/or sausage can be used in this recipe.
- The hot sauce/Worcestershire sauce act as flavor enhancers and can’t be tasted outright.
- Ensure that your casserole dish is safe for broiling, do not broil if using a glass casserole dish.
- Make-Ahead Method:
- Refrigerator: Assemble the ravioli as outlined and cover it tightly. Store in the fridge for up to 2 days. Let it sit for 30 minutes prior to baking, or add 5-10 minutes to the baking time.
- Freezer: Assemble as outlined and cover it tightly. Freeze for up to 3 months and let it fully thaw in the fridge for 24 hours prior to baking. Let it sit for 30 minutes prior to baking, or add 5-10 minutes to the baking time.
- Storage:
- Store in an airtight container and refrigerate for up to 3 days or freeze for up to 3 months.