
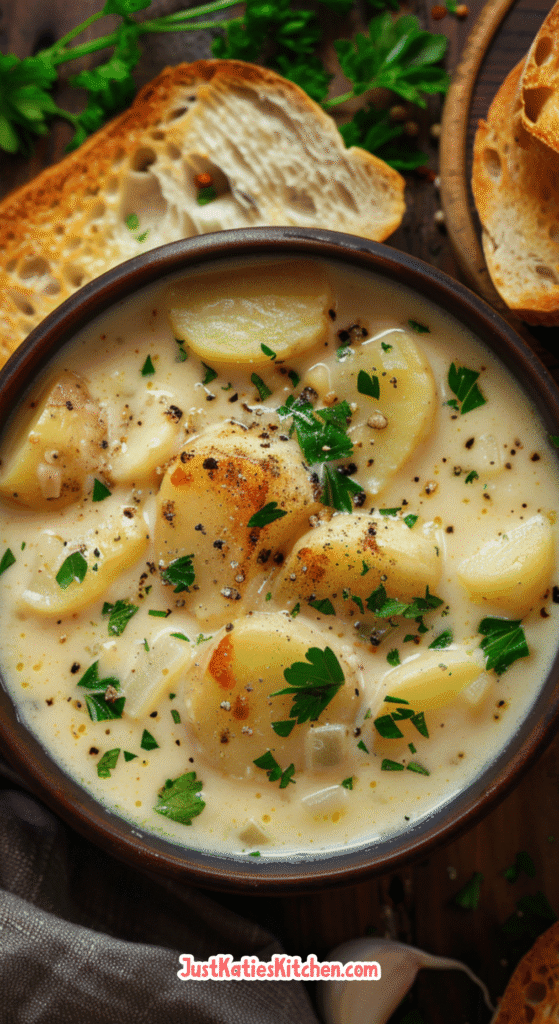

Classic comfort, but polished – Yukon Gold potatoes, sharp cheddar, and fresh herbs come together in a velvety soup that’s hearty without feeling heavy, easy without feeling plain. The method is simple, the payoff is grand, and the texture… unforgettable when dairy goes in low and slow, never boiling.
Partial blending builds body while preserving those tender potato bits, and adding cheese off-heat keeps it glossy, not gritty; it’s a small technique shift with big results. Store gently, reheat slowly, and the soup will reward patience with second-day richness that tastes even better than day one.
Ingredients Needed for the Recipe (use list and use of them)
- Yukon Gold potatoes – the gold standard for creamy, sturdy texture; they thicken naturally and won’t go mealy when partially blended. Their starch helps stabilize dairy, which means smoother soup and fewer curdling woes on gentle heat.
- Unsalted butter or olive oil – butter brings richness; olive oil lightens things a touch while still carrying flavor. Fat content also cushions dairy later in the pot, making breakage less likely when temperatures stay moderate.
- Yellow onion – slow-sautéed till translucent for gentle sweetness; this is the flavor base that makes the soup feel long-simmered. Keep it soft, not browned, to avoid bitterness and let cheddar and herbs shine.
- Garlic cloves – minced and added after onions, cooked just to fragrant; watch the heat, burnt garlic turns harsh fast. A low, steady flame protects those aromas and keeps the soup mellow.
- All-purpose flour – stirred into the aromatics to create a roux that thickens and stabilizes dairy, preventing separation. Cook the roux briefly to remove raw-flour taste and build that velvety spoon-coat.
- Chicken or vegetable broth – low sodium gives seasoning control; whisk in slowly to avoid lumps and lift fond. A smooth base now means a silky finish later, even with cheese.
- Whole milk (or half-and-half) – richness without overwhelming; add on low heat near the end to prevent curdling. Higher fat helps resist seizing, but keep below a simmer anyway for best texture.
- Heavy cream (optional) – the ultra-lux touch; more fat, more protection from curdling under low, gentle heat. Add late, and never let it boil to keep things satin-smooth.
- Sharp cheddar cheese – freshly shredded melts cleaner than pre-shredded; fold it in off heat to avoid grainy soup. Tempered cheese plus low temp equals glossy, seamless body.
- Fresh parsley, chives, and thyme – bright herbs that cut through richness; stir in at the end for fresh aroma. Late addition keeps flavors lively rather than stewed.
- Salt, black pepper, optional cayenne or smoked paprika – season gradually since cheese brings salt; a hint of heat adds cozy depth. Taste after cheese to avoid oversalting.
- Optional garnishes – bacon for crunch and savor, sour cream for tang, extra cheddar and croutons for texture. Add at the table so everyone can dial their bowl to their mood.
Ingredient substitutions that actually work
Vegetarian? Use vegetable broth and skip bacon; richness still lands with dairy and cheddar, especially when melted off-heat to stay smooth. Vegan? Use olive oil, plant-based milk, and vegan cheddar; add it late and off heat for the best glide.
No Yukon Golds around? Use Russets with care – reduce cook time and blend less to avoid a gluey texture from extra starch; keep the blender gentle. A mix of cheddar with a bit of smoked gouda adds dimension, but melt it off heat to prevent splitting.
Best time to serve this dish
Cold nights, game days, and easy weeknights – this soup slots right in, hearty but not fussy, and friendly to big batches. Serve when conversation lingers; the pot holds beautifully on low as long as it never boils after dairy goes in.
Planning ahead for guests? Make it a few hours early, hold below a simmer, then add cheese right before serving for the silkiest finish. The room goes quiet after the first spoonful, then someone says – more, please.
Pairing ideas that complement (and don’t compete)
Think crunch and contrast: crusty bread or garlicky breadsticks for dunking, and a crisp green salad to lift the richness. A bright vinaigrette cuts through creaminess while the soup brings the warm, cozy bass notes.
Want extras on the side? Try roasted vegetables or simple grilled chicken – clean flavors that play nice. Keep beverages low-intervention: sparkling water with lemon, or a light beer if it’s that kind of night.
How to make Hearty Cheddar Garlic Herb Potato Soup Recipe?

Step 1: Prep the potatoes like a pro
Peel and cube Yukon Golds into neat ½‑inch pieces for even cooking; rinse under cold water to remove excess starch. This reduces gumminess later and keeps the soup silky once dairy goes in.
Set them aside while building the base – organization here makes the later steps flow. Clean prep reduces overcooking and gives consistent texture after blending.
Step 2: Sauté onions and garlic until perfect
Melt butter (or butter plus olive oil) in a heavy pot over medium; cook onions 5–7 minutes until soft and translucent, not browned. Then add garlic and stir 1–2 minutes – fragrant but never burnt, to avoid bitterness.
Easy does it with heat; gentle sweat develops sweetness without sharp edges. This foundation supports the cheese and herbs later, so keep it calm.
Step 3: Create the roux for a creamy base
Sprinkle in flour and stir constantly for 1–2 minutes to cook off raw taste; this roux thickens and stabilizes dairy. Roux plus potato starch equals a velvety, steady soup that resists splitting.
Look for a glossy paste that loosens at the edges; that’s your green light. Keep stirring so nothing catches on the bottom.
Step 4: Add broth slowly and bring to simmer
Whisk broth in gradually, scraping up fond and smoothing any lumps; bring to a gentle simmer. A smooth base now means clean, creamy texture later when the dairy arrives.
Keep the simmer mild – bubbling hard can rough up textures before the potatoes even start. Patience pays off big here.
Step 5: Cook the potatoes until tender
Add rinsed potatoes, return to a gentle simmer, then cover and cook 15–20 minutes until fork-tender. Stir occasionally to prevent sticking, which can scorch and add bitterness.
Tender, not falling apart, is the sweet spot; you’ll blend some later for body while keeping chunks for heartiness. That contrast is the charm.
Step 6: Blend half the soup for creaminess
Use an immersion blender to pulse until about half to two-thirds is creamy, leaving visible potato pieces; blend carefully to avoid overworking starch. If using a countertop blender, work in small batches, vent the lid, and never overfill.
Partial blending gives body without turning gummy, and it preserves rustic texture; stop as soon as it looks velvety with tender bits. Overblending risks gluey soup, so go light-handed.
Step 7: Add dairy and herbs gently
Lower heat to minimum; stir in whole milk or half‑and‑half, plus cream if using, and keep below a simmer to prevent curdling. Higher-fat dairy is more stable, but low-and-slow is still the rule.
Stir in parsley, chives, and thyme; let the soup warm through for about 5 minutes so the herbs bloom. Last-minute herbs keep flavors fresh and green.
Step 8: Melt in the cheese off-heat
Remove from heat; add freshly shredded sharp cheddar by the handful, stirring until each addition melts smoothly. Off-heat melting avoids seized, grainy cheese and preserves that glossy finish.
If needed, stir in a pinch of starch before cheese to help it bind to the liquid for extra creaminess. Shredding cheese fresh also improves melt quality significantly.
Step 9: Season and serve with favorite toppings
Taste, then finish with salt, black pepper, and a pinch of cayenne or smoked paprika for gentle warmth. Season after cheese so salt stays balanced, not pushy.
Ladle into bowls and top with bacon, sour cream, chives, extra cheddar, or croutons for texture and pop. Let everyone build their own bowl – fun, fast, and very tasty.
Tips
- Keep dairy happy: add milk and cream late, on low heat, and never boil; curdling happens fast above about 180°F. Temper if needed by whisking in a little hot soup before adding to the pot.
- Melt cheese like a pro: turn the heat off, add in small handfuls, and stir until smooth before adding more. This simple timing trick protects texture every time.
- Blend with care: stop when the soup turns velvety yet still dotted with potato – overblending can make it gluey. Immersion blenders give precise control, just pulse and move around the pot.
- Rinse potatoes: washing off surface starch reduces gumminess later and helps the soup stay silky. It’s a tiny step with big texture returns.
How to store and reheat without losing the magic
Cool, then refrigerate in airtight containers up to 3–5 days; flavors deepen and meld by day two. Reheat gently on the stove over low to medium heat, stirring often, adding a splash of milk or broth if thick.
Freezing? Best to freeze before adding dairy and cheese; stir those in fresh when reheating for the creamiest result. If freezing with dairy anyway, reheat low-and-slow and stir well to re-emulsify.
FAQ
Can this soup be made vegan?
Yes – use olive oil, vegetable broth, and unsweetened plant milks like oat or cashew; finish with a good-melting vegan cheddar off-heat. Keep temperatures low to protect the emulsion, just like dairy versions.
How can the soup be thickened if it’s too thin?
Simmer uncovered to reduce, or whisk in a slurry of flour or cornstarch and water, cooking briefly until glossy. Begin with small amounts to keep it spoonable and creamy, not stodgy.
Why is partial blending important?
It gives the soup body and creaminess while keeping satisfying chunks, avoiding the baby-food trap. Blend in pulses and stop as soon as it looks velvety with bits still intact.
Can different potatoes be used?
Russets can work, but they’re starchier – reduce cooking time and blend less to avoid gumminess. Yukon Golds are naturally creamy and hold shape, which is why they’re favored for soups like this.
How to Serve Hearty Cheddar Garlic Herb Potato Soup Recipe
Garnish boldly: bacon for crunch, sour cream for cool tang, chives for a fresh snap, croutons for bite, extra cheddar for joy. Layer textures on top of that silky base and it becomes a showstopper in seconds.
Go big with bread bowls, or keep it clean in white bowls with a tumble of herbs; either way, it looks as good as it tastes. Presentation can be playful, but keep the soup warm – not boiling – till the moment it’s served.
Cheddar Garlic Herb Potato Soup Recipe
Description
This Death by Chocolate Cheesecake is an indulgent, decadent dessert that's pure bliss for chocolate lovers. Featuring a rich chocolate Oreo crust, an ultra-creamy chocolate cheesecake filling, and a thick, fudgy chocolate ganache topping, it's a show-stopping dessert perfect for special occasions. Made without a water bath and baked to a slightly wobbly center, it's surprisingly simple to make and always earns rave reviews.
Ingredients
For the Crust
For the Filling
For the Ganache
Instructions
Make the Crust
-
Preheat oven to 325°F (165°C). Grease the sides of a 9-inch springform pan and wrap the bottom and sides tightly with aluminum foil to prevent leaks.
-
Place the chocolate Oreo cookies in a food processor and pulse until finely ground into crumbs. Add the melted butter and pulse until the mixture resembles wet sand.
-
Press the crumb mixture firmly and evenly into the bottom of the prepared springform pan.
-
Bake the crust for 10 minutes. Remove from the oven and place on a wire rack to cool completely while you make the filling.
Make the Filling
-
Reduce the oven temperature to 325°F if it was different. In the bowl of a stand mixer fitted with the paddle attachment, beat the softened cream cheese on medium speed until smooth and completely free of lumps, about 2 minutes.Scrape down the sides of the bowl as needed.
-
Add the granulated sugar and beat on low speed until combined, then increase to medium and beat for 1 minute.
-
Add the sour cream and vanilla extract. Beat on low speed until just combined.
-
Add the eggs, one at a time, beating on low speed just until each egg is incorporated. Do not overmix.Overmixing incorporates too much air and can cause cracks.
-
With the mixer on low, slowly pour in the melted and slightly cooled chocolate. Beat until just combined and the batter is smooth.
-
Pour the chocolate cheesecake batter over the cooled crust and smooth the top with a spatula.
Bake the Cheesecake
-
Place the springform pan on a rimmed baking sheet. Bake for about 50 minutes, or until the top looks slightly dry and the center is still slightly wobbly when gently shaken. An instant-read thermometer inserted into the center should read 150°F.Err on the side of under-baking to prevent cracks.
-
Turn off the oven and crack the oven door open about 1-2 inches. Let the cheesecake cool in the oven for 10 minutes. This gradual cooling helps prevent cracking.
-
Remove the cheesecake from the oven and place it on a wire rack to cool to room temperature.
Make the Ganache & Finish
-
Once the cheesecake is at room temperature, refrigerate it until completely chilled and set, at least 4 hours or preferably overnight.
-
To make the ganache, place the chopped chocolate in a heatproof bowl. Heat the heavy cream in a small saucepan over medium heat until it just begins to simmer. Pour the hot cream over the chocolate and let it sit for 2-3 minutes. Gently whisk until smooth and glossy.
-
Let the ganache cool slightly for 5-10 minutes (it should still be pourable but not hot). Stir in the 1/2 cup of chopped Snickers bars.
-
Pour the ganache over the chilled cheesecake, using a spatula to spread it evenly to the edges.
-
Garnish with additional chopped Snickers bars on top if desired.
-
Refrigerate for at least 30 minutes to set the ganache before slicing and serving.
-
To serve, run a thin knife under hot water and wipe it dry before slicing for clean cuts. Release the springform pan sides and transfer the cheesecake to a serving plate.
Nutrition Facts
Servings 12
Serving Size 1 slice
- Amount Per Serving
- Calories 620kcal
- % Daily Value *
- Total Fat 38g59%
- Saturated Fat 20g100%
- Trans Fat 1.0g
- Cholesterol 135mg45%
- Sodium 480mg20%
- Potassium 320mg10%
- Total Carbohydrate 62g21%
- Dietary Fiber 2g8%
- Sugars 48g
- Protein 9g18%
- Calcium 80 mg
- Iron 6 mg
* Percent Daily Values are based on a 2,000 calorie diet. Your daily value may be higher or lower depending on your calorie needs.
Note
- Room Temperature Ingredients: Ensure cream cheese and eggs are at room temperature for a smooth, lump-free batter.
- No Water Bath: This recipe is designed to be baked without a water bath, making it simpler and less prone to leaks.
- Don't Overbake: The center should still be slightly wobbly when you remove it from the oven. It will set as it cools.
- Prevent Cracking: Cooling the cheesecake gradually in the turned-off oven with the door cracked is crucial for preventing surface cracks.
- Ganache Consistency: Let the ganache cool slightly before pouring to ensure it sets properly but is still pourable.
- Chill Time: For the cleanest slices and best texture, chill the cheesecake overnight.
- Serving: Use a hot knife for perfect slices. Serve with whipped cream or fresh berries if desired.
Frequently Asked Questions
Can I use a different crust?
Yes! A standard Oreo crust or a graham cracker crust would work well. For a non-chocolate option, use graham crackers.
Why did my cheesecake crack?
Cracks are often caused by overmixing, baking too long, or cooling too quickly. Make sure to mix on low after adding eggs, don't overbake, and cool gradually in the oven.
Can I make this ahead of time?
Absolutely! This cheesecake tastes even better after 1-2 days in the fridge as the flavors meld. Make it up to 3 days in advance.
Can I freeze Death by Chocolate Cheesecake?
Yes, it freezes very well. Wrap the chilled, ganache-topped cheesecake tightly in plastic wrap and then foil. Freeze for up to 2 months. Thaw overnight in the refrigerator before serving.